
Appearance
Meteor.js 3 + Solid
在本教程中,我们将使用 Solid 和 Meteor 3.0 创建一个简单的 To-Do 应用。Meteor 可以很好地与其他框架配合使用,例如 React、Vue 3、Svelte 和 Blaze。
¥In this tutorial, we will create a simple To-Do app using Solid and Meteor 3.0. Meteor works well with other frameworks like React, Vue 3, Svelte, and Blaze.
Solid 是一个现代 UI 框架,它会将你的响应式代码编译为在运行时高效的 DOM 更新,从而在不使用虚拟 DOM 的情况下生成更小的包并实现卓越的性能。它于 2020 年发布,因其细粒度的响应式、简洁性和轻量级特性而广受欢迎。与旧方法相比,Solid 通过使用编译器在需要的地方精确优化更新,消除了 React 等框架中常见的大量样板代码和运行时开销。它采用声明式 JSX 语法,内置信号等基本元素用于状态管理,以及效果和资源,可以与 Meteor 的响应式数据源(如 跟踪器 和 Minimongo)无缝集成。这意味着你的 UI 会随着数据的变化自动更新,无需手动操作 DOM。
¥Solid is a modern UI framework that compiles your reactive code to highly efficient DOM updates at runtime, resulting in smaller bundles and exceptional performance without a virtual DOM. Launched in 2020, it has gained popularity for its fine-grained reactivity, simplicity, and lightweight nature. Compared to older approaches, Solid eliminates much of the boilerplate and runtime overhead found in frameworks like React by using a compiler that optimizes updates precisely where needed. It employs a declarative JSX syntax with built-in primitives like signals for state management, effects, and resources that can be seamlessly integrated with Meteor's reactive data sources likeTracker and Minimongo. This means your UI updates automatically as data changes, without manual DOM manipulation.
如果你是新手,不确定该使用哪个 UI 框架,Solid 是一个不错的选择 - 它易于学习(尤其如果你熟悉类似 React 的 JSX),性能卓越,响应式细粒度控制出色,并且拥有不断壮大的社区。即使在 Solid 应用中,你仍然可以利用为其他框架设计的 Meteor 包,例如 accounts-ui。
¥If you're new and not sure what UI framework to use, Solid is a great place to start—it's easy to learn (especially if you're familiar with React-like JSX), highly performant with fine-grained reactivity, and has a growing community. You can still leverage Meteor packages designed for other frameworks, like accounts-ui, even in a Solid app.
要开始构建 Solid 应用,你需要一个代码编辑器。如果你不确定选择哪一个,Visual Studio 代码 是一个不错的选择。
¥To start building your Solid app, you'll need a code editor. If you're unsure which one to choose, Visual Studio Code is a good option.
让我们开始构建你的应用!
¥Let’s begin building your app!
目录
¥Table of Contents
1:创建应用
¥1: Creating the app
1.1:安装 Meteor
¥1.1: Install Meteor
首先,我们需要按照 安装指南 的步骤安装 Meteor。
¥First, we need to install Meteor by following this installation guide.
1.2:创建 Meteor 项目
¥1.2: Create Meteor Project
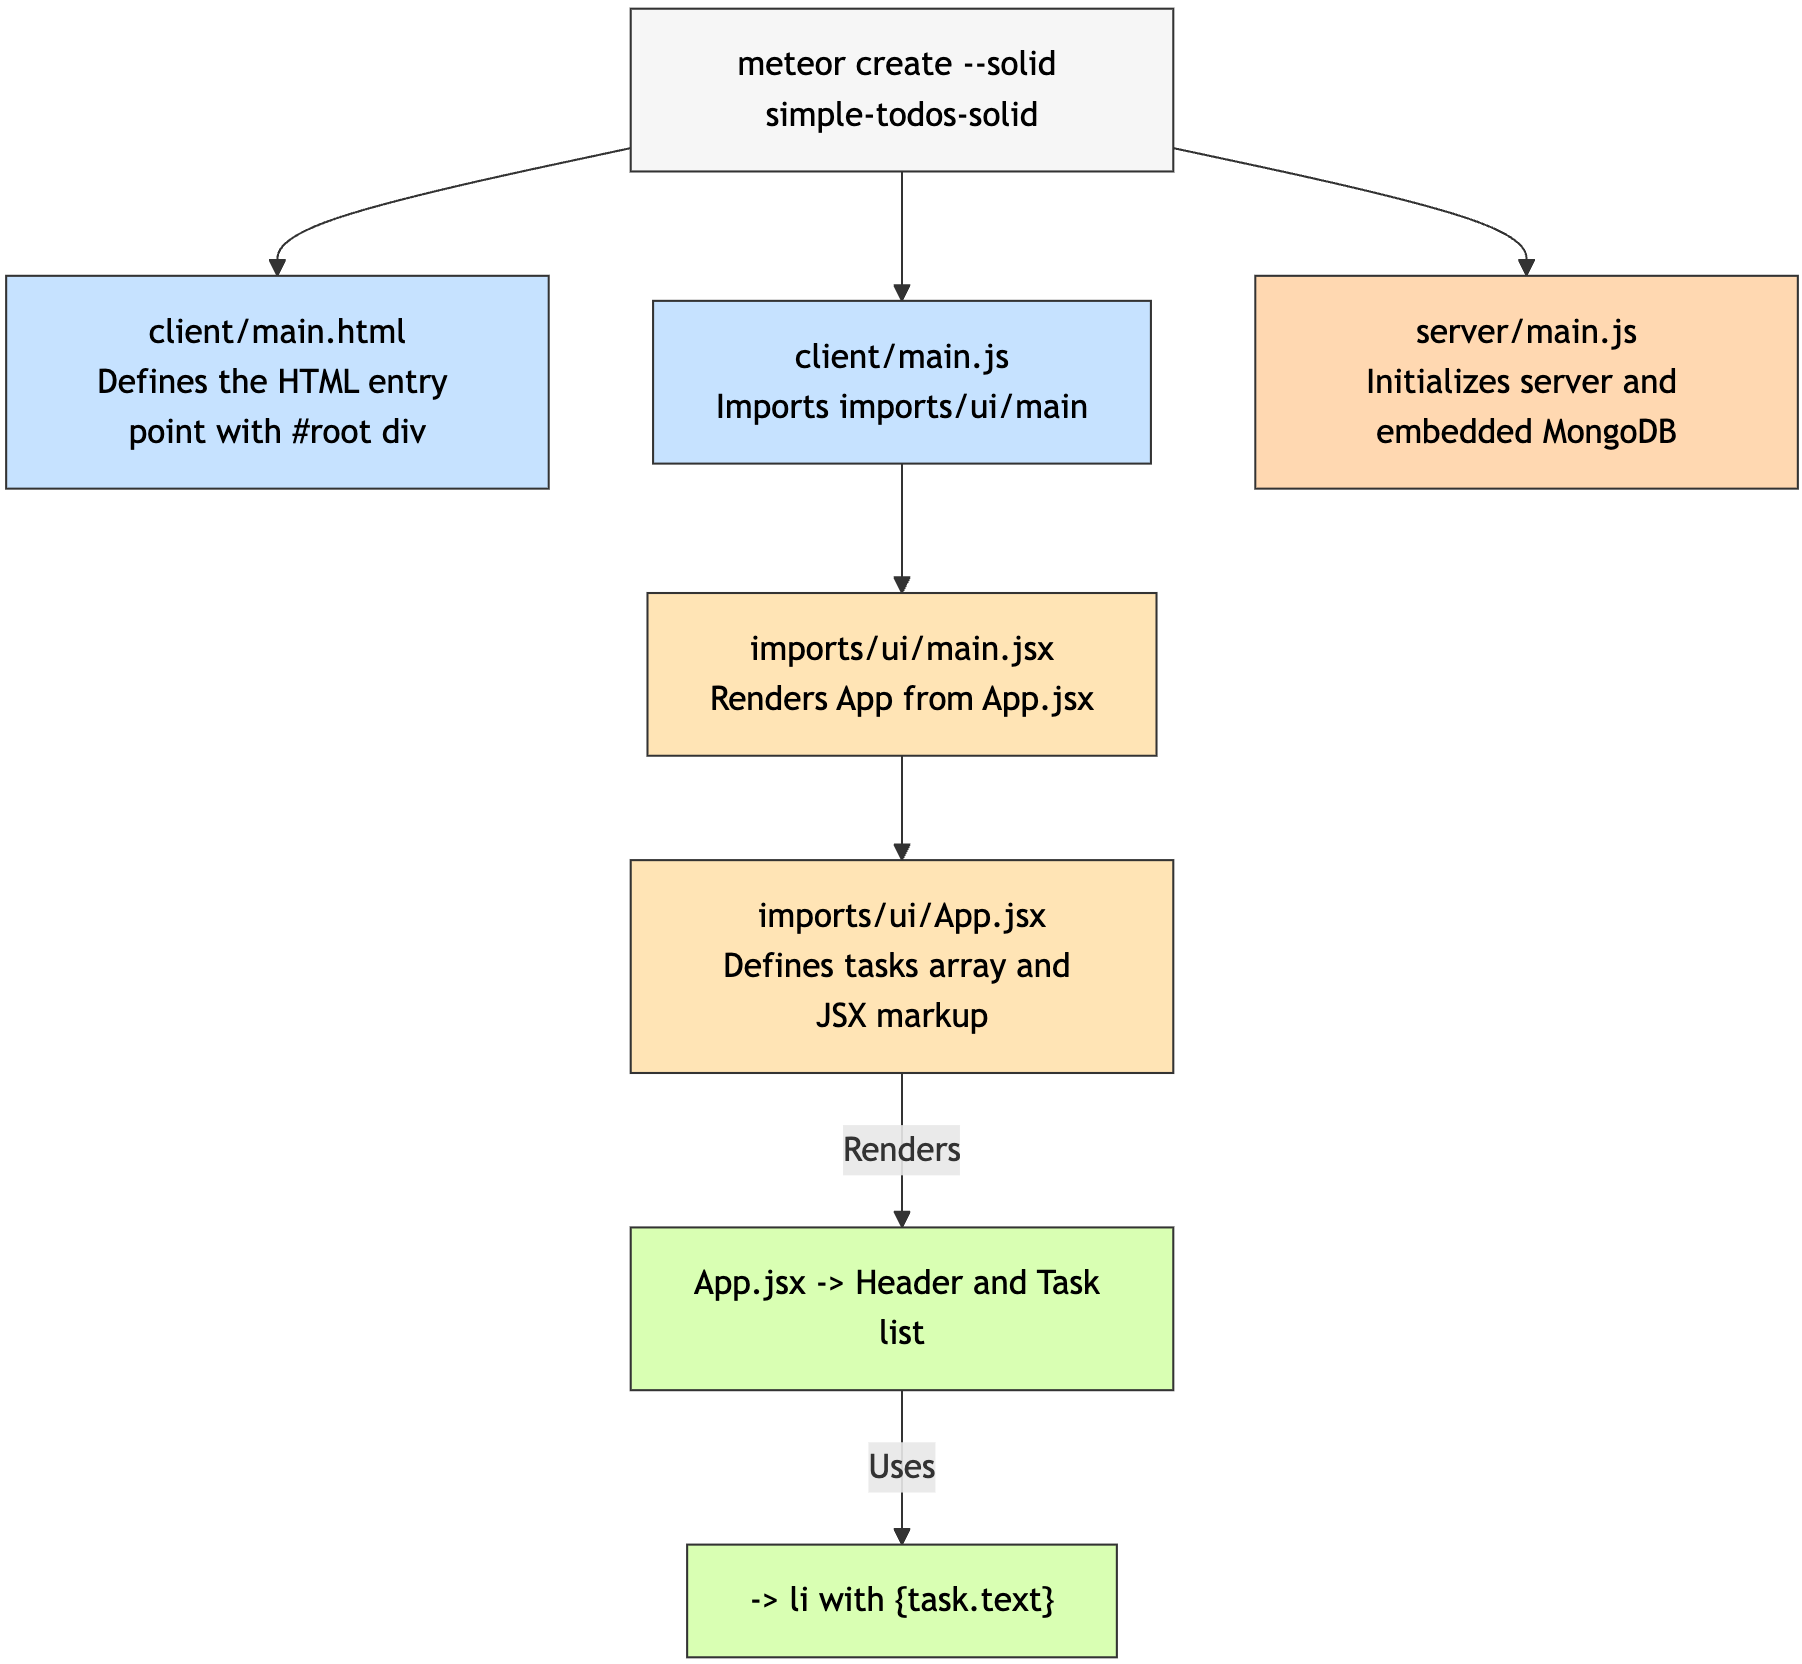
使用 Solid 配置 Meteor 的最简单方法是使用命令 meteor create,并加上选项 --solid 和你的项目名称:
¥The easiest way to setup Meteor with Solid is by using the command meteor create with the option --solid and your project name:
shell
meteor create --solid simple-todos-solidMeteor 将为你创建所有必要的文件。
¥Meteor will create all the necessary files for you.
位于 client 目录中的文件正在设置你的客户端(Web),例如,你可以看到 client/main.html,其中 Meteor 正在将你的 App 主要组件渲染到 HTML 中。
¥The files located in the client directory are setting up your client side (web), you can see for example client/main.html where Meteor is rendering your App main component into the HTML.
此外,请检查 Meteor 设置服务器端(Node.js)的 server 目录,你可以看到 server/main.js,这里非常适合初始化 MongoDB 数据库并添加一些数据。你不需要安装 MongoDB,因为 Meteor 提供了一个可供你使用的嵌入式版本。
¥Also, check the server directory where Meteor is setting up the server side (Node.js), you can see the server/main.js which would be a good place to initialize your MongoDB database with some data. You don't need to install MongoDB as Meteor provides an embedded version of it ready for you to use.
你现在可以使用以下命令运行 Meteor 应用:
¥You can now run your Meteor app using:
shell
meteor不用担心,从现在开始,Meteor 将使你的应用与所有更改保持同步。
¥Don't worry, Meteor will keep your app in sync with all your changes from now on.
快速浏览 Meteor 创建的所有文件,你现在不需要了解它们,但知道它们在哪里会很好。
¥Take a quick look at all the files created by Meteor, you don't need to understand them now but it's good to know where they are.
你的 Solid 代码将位于 imports/ui 目录中,App.jsx 文件将作为 Solid 待办事项应用的根组件。
¥Your Solid code will be located inside the imports/ui directory, and the App.jsx file will be the root component of your Solid To-do app.
1.3:创建任务
¥1.3: Create Tasks
要开始开发我们的待办事项应用,请将默认启动应用的代码替换为以下代码。接下来,我们将讨论它的作用。
¥To start working on our todo list app, let’s replace the code of the default starter app with the code below. From there, we’ll talk about what it does.
首先,让我们简化 HTML 入口点,如下所示:
¥First, let’s simplify our HTML entry point like so:
html
<head>
  <title>Simple todo</title>
  <meta name="viewport" content="width=device-width, initial-scale=1.0">
</head>

<body>
  <noscript>You need to enable JavaScript to run this app.</noscript>
  <div id="root"></div>
</body>
imports/ui/main.jsx 文件应该导入并渲染主 Solid 组件(注意:这是通过 client/main.js 引用的,client/main.js 导入了它):
¥The imports/ui/main.jsx file should import and render the main Solid component (note: this is referenced via client/main.js which imports it):
jsx
/* @refresh reload */
import { render } from 'solid-js/web';
import { App } from './App';
import { Meteor } from "meteor/meteor";
import './main.css';

Meteor.startup(() => {
  render(() => <App/>, document.getElementById('root'));
});js
import '../imports/ui/main';在 imports/ui 文件夹中,我们修改 App.jsx 以显示标题和任务列表:
¥Inside the imports/ui folder let us modify App.jsx to display a header and a list of tasks:
jsx
import { For } from "solid-js";

export const App = () => {
  const tasks = [
    { text: 'This is task 1' },
    { text: 'This is task 2' },
    { text: 'This is task 3' },
  ];

  return (
    <div class="container">
      <header>
        <h1>Todo List</h1>
      </header>

      <ul>
        <For each={tasks}>
          {(task) => (
            <li>{task.text}</li>
          )}
        </For>
      </ul>
    </div>
  );
};
我们刚刚修改了主 Solid 组件 App.jsx,它将渲染到 body 中的 #root div 中。它会显示一个标题和一个任务列表。目前,我们使用静态示例数据来展示任务。
¥We just modified our main Solid component App.jsx, which will be rendered into the #root div in the body. It shows a header and a list of tasks. For now, we're using static sample data to display the tasks.
现在你可以从项目中删除这些初始文件,因为我们不再需要它们:Info.jsx, Hello.jsx
¥You can now delete these starter files from your project as we don't need them: Info.jsx, Hello.jsx
1.4:查看示例任务
¥1.4: View Sample Tasks
由于你尚未连接到服务器和数据库,我们直接在 App.jsx 中定义了一些示例数据来渲染任务列表。
¥As you are not connecting to your server and database yet, we’ve defined some sample data directly in App.jsx to render a list of tasks.
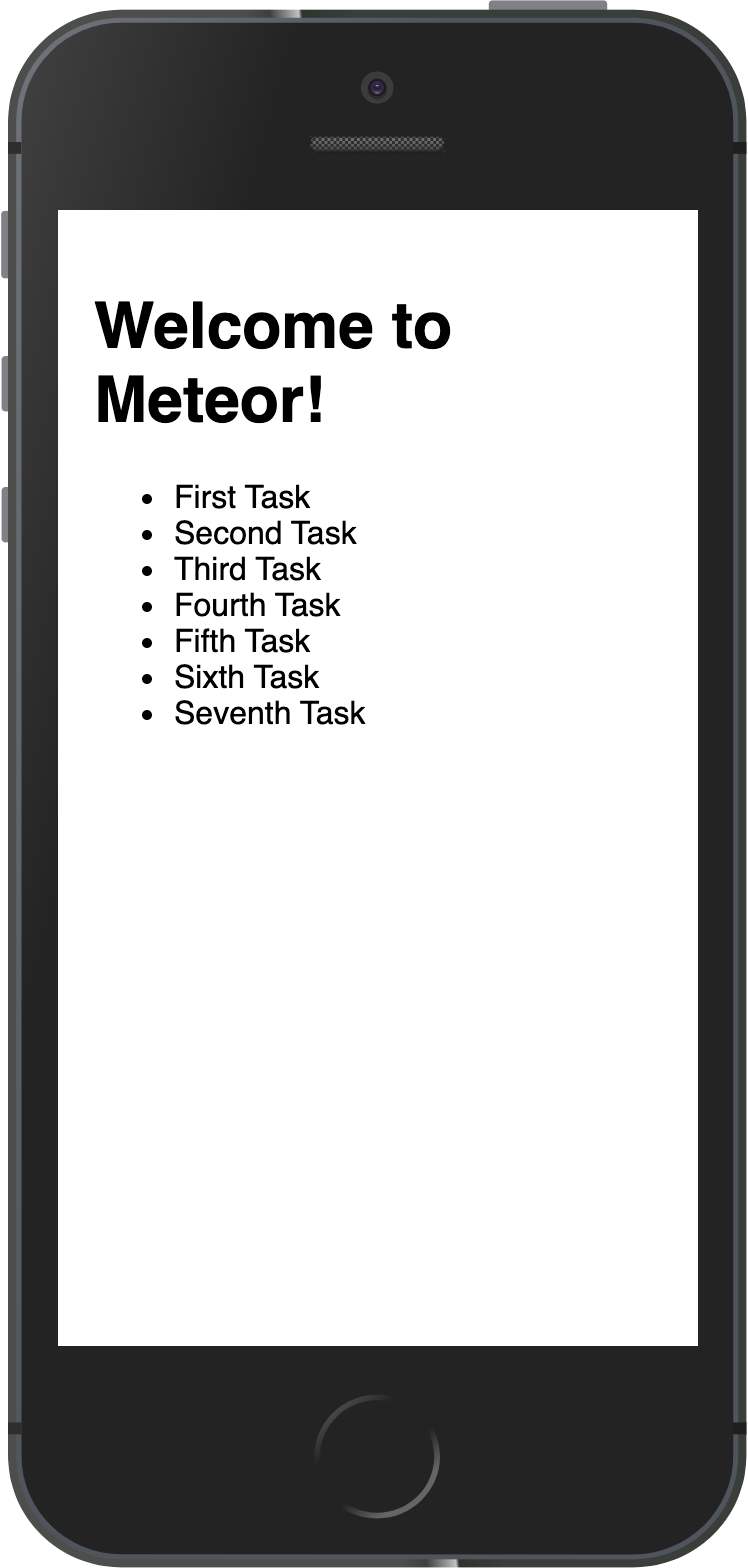
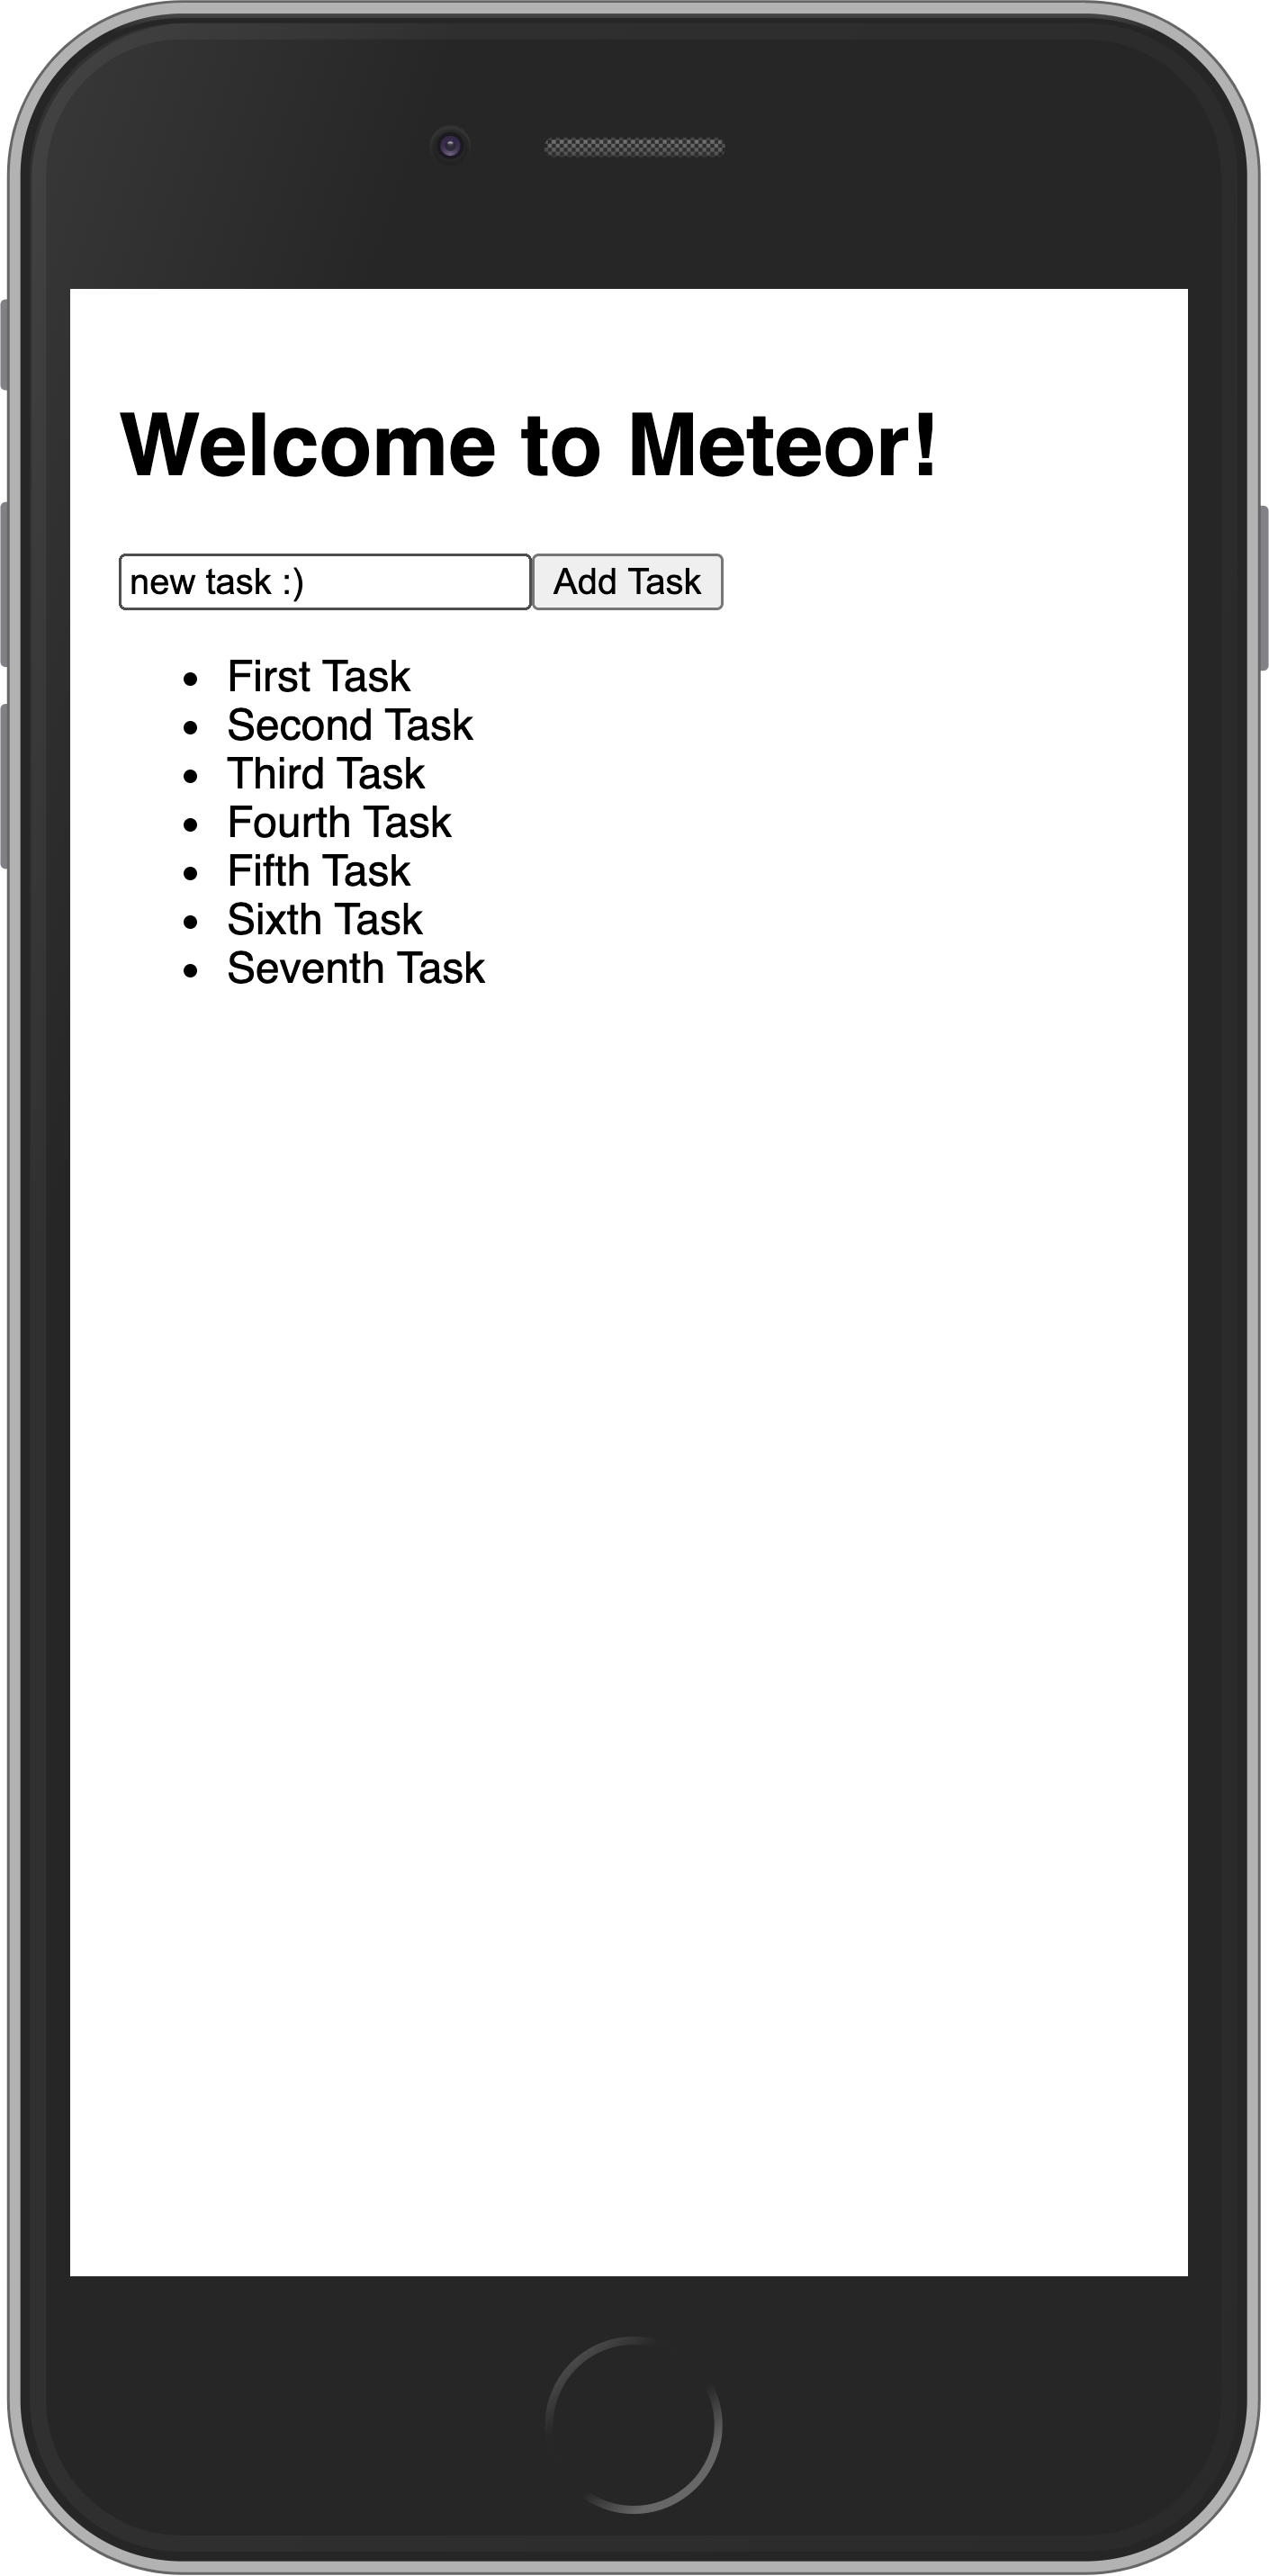
此时,Meteor 应该正在 3000 端口上运行,你可以访问正在运行的应用,并在 http://localhost:3000/ 中看到包含三个任务的列表。 - 但是,如果 Meteor 没有运行,请转到终端并切换到项目的根目录,然后输入 meteor 并按回车键启动应用。
¥At this point meteor should be running on port 3000 so you can visit the running app and see your list with three tasks displayed at http://localhost:3000/ - but if meteor is not running, go to your terminal and move to the top directory of your project and type meteor then press return to launch the app.
完成!让我们来看看这些代码片段的作用!
¥All right! Let’s find out what all these bits of code are doing!
1.5:渲染数据
¥1.5: Rendering Data
在 Solid 与 Meteor 的结合使用中,主要入口点是 client/main.js,它导入 imports/ui/main.jsx,并使用 Solid 的 render 函数将根 Solid 组件 App.jsx 渲染到 HTML 中的目标元素(例如 <div id="root"></div>)。
¥In Solid with Meteor, your main entry point is client/main.js, which imports imports/ui/main.jsx to render your root Solid component App.jsx to a target element in the HTML like <div id="root"></div> using Solid's render function.
Solid 组件使用 JSX 语法在 .jsx 文件中定义,其中可以包含 JavaScript 逻辑、导入和响应式原语。JSX 标记可以使用 Solid 的控制流组件,例如使用 <For> 进行循环,使用 {expression} 进行数据插值。
¥Solid components are defined in .jsx files using JSX syntax, which can include JavaScript logic, imports, and reactive primitives. The JSX markup can use Solid's control flow components, such as <For> for looping and {expression} for interpolating data.
你可以直接在组件函数中定义数据和逻辑。在上面的代码中,我们直接在组件中定义了一个 tasks 数组。在标记中,我们使用 <For each={tasks}> 遍历数组,并使用 {task.text} 显示每个任务的 text 属性。
¥You can define data and logic directly in the component function. In the code above, we defined a tasks array directly in the component. Inside the markup, we use <For each={tasks}> to iterate over the array and display each task's text property using {task.text}.
对于 Meteor 特有的响应式功能(例如订阅和集合),Meteor 中的 Solid 使用类似 effects 或自定义跟踪器的钩子与 Meteor 的 Tracker 集成。我们将在后续步骤中介绍这一点。
¥For Meteor-specific reactivity (like subscriptions and collections), Solid in Meteor integrates with Meteor's Tracker using hooks like effects or custom trackers. We'll cover that in later steps.
1.6:移动端外观
¥1.6: Mobile Look
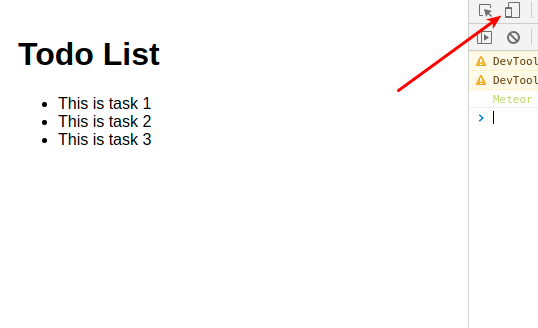
让我们看看你的应用在移动设备上的显示效果。你可以通过在浏览器中使用 right clicking 启动你的应用(我们假设你使用的是 Google Chrome,因为它是最流行的浏览器)来模拟移动环境,然后再使用 inspect,这将在浏览器中打开一个名为 Dev Tools 的新窗口。在 Dev Tools 中,你会看到一个显示移动设备和平板电脑的小图标:
¥Let’s see how your app is looking on mobile. You can simulate a mobile environment by right clicking your app in the browser (we are assuming you are using Google Chrome, as it is the most popular browser) and then inspect, this will open a new window inside your browser called Dev Tools. In the Dev Tools you have a small icon showing a Mobile device and a Tablet:
点击它,然后在顶部导航栏中选择你要模拟的手机。
¥Click on it and then select the phone that you want to simulate and in the top nav bar.
你还可以在个人手机上测试你的应用。为此,请在移动浏览器的导航栏中使用本地 IP 地址连接到你的应用。
¥You can also check your app in your personal cellphone. To do so, connect to your App using your local IP in the navigation browser of your mobile browser.
此命令应在 Unix 系统
ifconfig | grep "inet " | grep -Fv 127.0.0.1 | awk '{print $2}'上打印你的本地 IP 地址。¥This command should print your local IP for you on Unix systems
ifconfig | grep "inet " | grep -Fv 127.0.0.1 | awk '{print $2}'在 Microsoft Windows 系统中,请在命令提示符中尝试以下命令:
ipconfig | findstr "IPv4 Address"¥On Microsoft Windows try this in a command prompt
ipconfig | findstr "IPv4 Address"
你应该看到以下内容:
¥You should see the following:
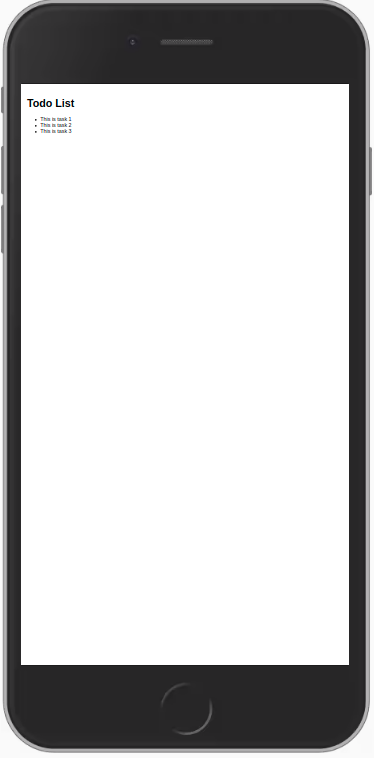
如你所见,所有内容都很小,因为我们没有针对移动设备调整视口。你可以通过在 client/main.html 文件中,在 head 标签内、title 之后添加以下代码行来修复此问题和其他类似问题。
¥As you can see, everything is small, as we are not adjusting the view port for mobile devices. You can fix this and other similar issues by adding these lines to your client/main.html file, inside the head tag, after the title.
html
<head>
<title>Simple todo</title>
<meta charset="utf-8"/>
<meta http-equiv="x-ua-compatible" content="ie=edge"/>
<meta
name="viewport"
content="width=device-width, height=device-height, viewport-fit=cover, initial-scale=1, maximum-scale=1, minimum-scale=1, user-scalable=no"
/>
<meta name="mobile-web-app-capable" content="yes"/>
<meta name="apple-mobile-web-app-capable" content="yes"/>
</head>
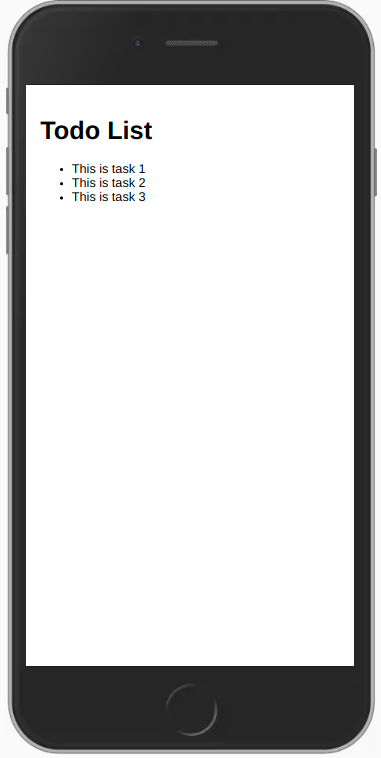
...现在,你的应用应该能够在移动设备上正确缩放,并如下所示:
¥Now your app should scale properly on mobile devices and look like this:
1.7:热模块替换
¥1.7: Hot Module Replacement
Meteor 使用名为 hot-module-replacement 的包,该包已为你添加。此软件包更新正在运行的应用中在重建期间修改的 javascript 模块。缩短开发过程中的反馈周期,让你可以更快地查看和测试更改(甚至在构建完成之前更新应用)。你也不会丢失状态,你的应用代码将会更新,并且你的状态将保持不变。
¥Meteor uses a package called hot-module-replacement which is already added for you. This package updates the javascript modules in a running app that were modified during a rebuild. Reduces the feedback cycle while developing, so you can view and test changes quicker (it even updates the app before the build has finished). You are also not going to lose the state, your app code will be updated, and your state will be the same.
默认情况下,当 Meteor 与 Solid 结合使用时,响应式开发是通过将 Solid 的细粒度信号和效果与 Meteor 的 Tracker 系统集成来实现的。这使得当数据库中的数据发生变化时,用户的屏幕能够实时更新,而无需用户手动刷新。你可以使用 Tracker.autorun 结合 Solid 的 createEffect 或信号来实现无缝响应式。
¥By default, when using Solid with Meteor, reactivity is handled by integrating Solid's fine-grained signals and effects with Meteor's Tracker system. This allows real-time updates of the user's screen as data changes in the database without them having to manually refresh. You can achieve this using Tracker.autorun combined with Solid's createEffect or signals for seamless reactivity.
你可以在 此处 中了解更多有关包的信息。
¥You can read more about packages here.
此时你还应该添加 dev-error-overlay 包,以便在 Web 浏览器中查看错误。
¥You should also add the package dev-error-overlay at this point, so you can see the errors in your web browser.
shell
meteor add dev-error-overlay你可以尝试犯一些错误,这样你不仅会在控制台中看到错误信息,还会在浏览器中看到错误信息。
¥You can try to make some mistakes and then you are going to see the errors in the browser and not only in the console.
下一步,我们将使用 MongoDB 数据库来存储任务。
¥In the next step we are going to work with our MongoDB database to be able to store our tasks.
2:集合
¥2: Collections
Meteor 已经为你设置了 MongoDB。为了使用我们的数据库,我们需要创建一个集合,我们将在其中存储我们的文档,在我们的例子中是 tasks。
¥Meteor already sets up MongoDB for you. In order to use our database, we need to create a collection, which is where we will store our documents, in our case our tasks.
你可以阅读有关集合 此处 的更多信息。
¥You can read more about collections here.
在此步骤中,我们将实现所有必要的代码,以便为我们的任务建立一个基本集合并运行。
¥In this step we will implement all the necessary code to have a basic collection for our tasks up and running.
2.1:创建任务集合
¥2.1: Create Tasks Collection
我们可以通过在 imports/api/TasksCollection.js 处创建一个新文件来创建一个新集合来存储我们的任务,该文件实例化一个新的 Mongo 集合并将其导出。
¥We can create a new collection to store our tasks by creating a new file at imports/api/TasksCollection.js which instantiates a new Mongo collection and exports it.
js
import { Mongo } from "meteor/mongo";

export const TasksCollection = new Mongo.Collection("tasks");
请注意,我们将文件存储在 imports/api 目录中,该目录是存储 API 相关代码(如发布物和方法)的地方。你可以根据需要命名此文件夹,这只是一个选择。
¥Notice that we stored the file in the imports/api directory, which is a place to store API-related code, like publications and methods. You can name this folder as you want, this is just a choice.
如果初始项目中存在 imports/api/links.js 文件,你可以将其删除,因为我们不再需要它。
¥If there is a imports/api/links.js file from the starter project, you can delete that now as we don't need it.
你可以阅读有关应用结构和导入/导出 此处 的更多信息。
¥You can read more about app structure and imports/exports here.
2.2:初始化任务集合
¥2.2: Initialize Tasks Collection
为了使我们的集合正常工作,你需要将其导入服务器,以便设置一些管道。
¥For our collection to work, you need to import it in the server so it sets some plumbing up.
如果你要在同一个文件上使用,你可以使用 import "/imports/api/TasksCollection" 或 import { TasksCollection } from "/imports/api/TasksCollection",但请确保它已导入。
¥You can either use import "/imports/api/TasksCollection" or import { TasksCollection } from "/imports/api/TasksCollection" if you are going to use on the same file, but make sure it is imported.
现在很容易检查我们的集合中是否有数据,否则,我们也可以轻松插入一些示例数据。
¥Now it is easy to check if there is data or not in our collection, otherwise, we can insert some sample data easily as well.
你不需要保留 server/main.js 的旧内容。
¥You don't need to keep the old content of server/main.js.
js
import { Meteor } from "meteor/meteor";
import { TasksCollection } from "/imports/api/TasksCollection";
const insertTask = async (taskText) =>
await TasksCollection.insertAsync({ text: taskText });
Meteor.startup(async () => {
if (await TasksCollection.find().countAsync() === 0) {
[
"First Task",
"Second Task",
"Third Task",
"Fourth Task",
"Fifth Task",
"Sixth Task",
"Seventh Task",
].forEach(insertTask);
}
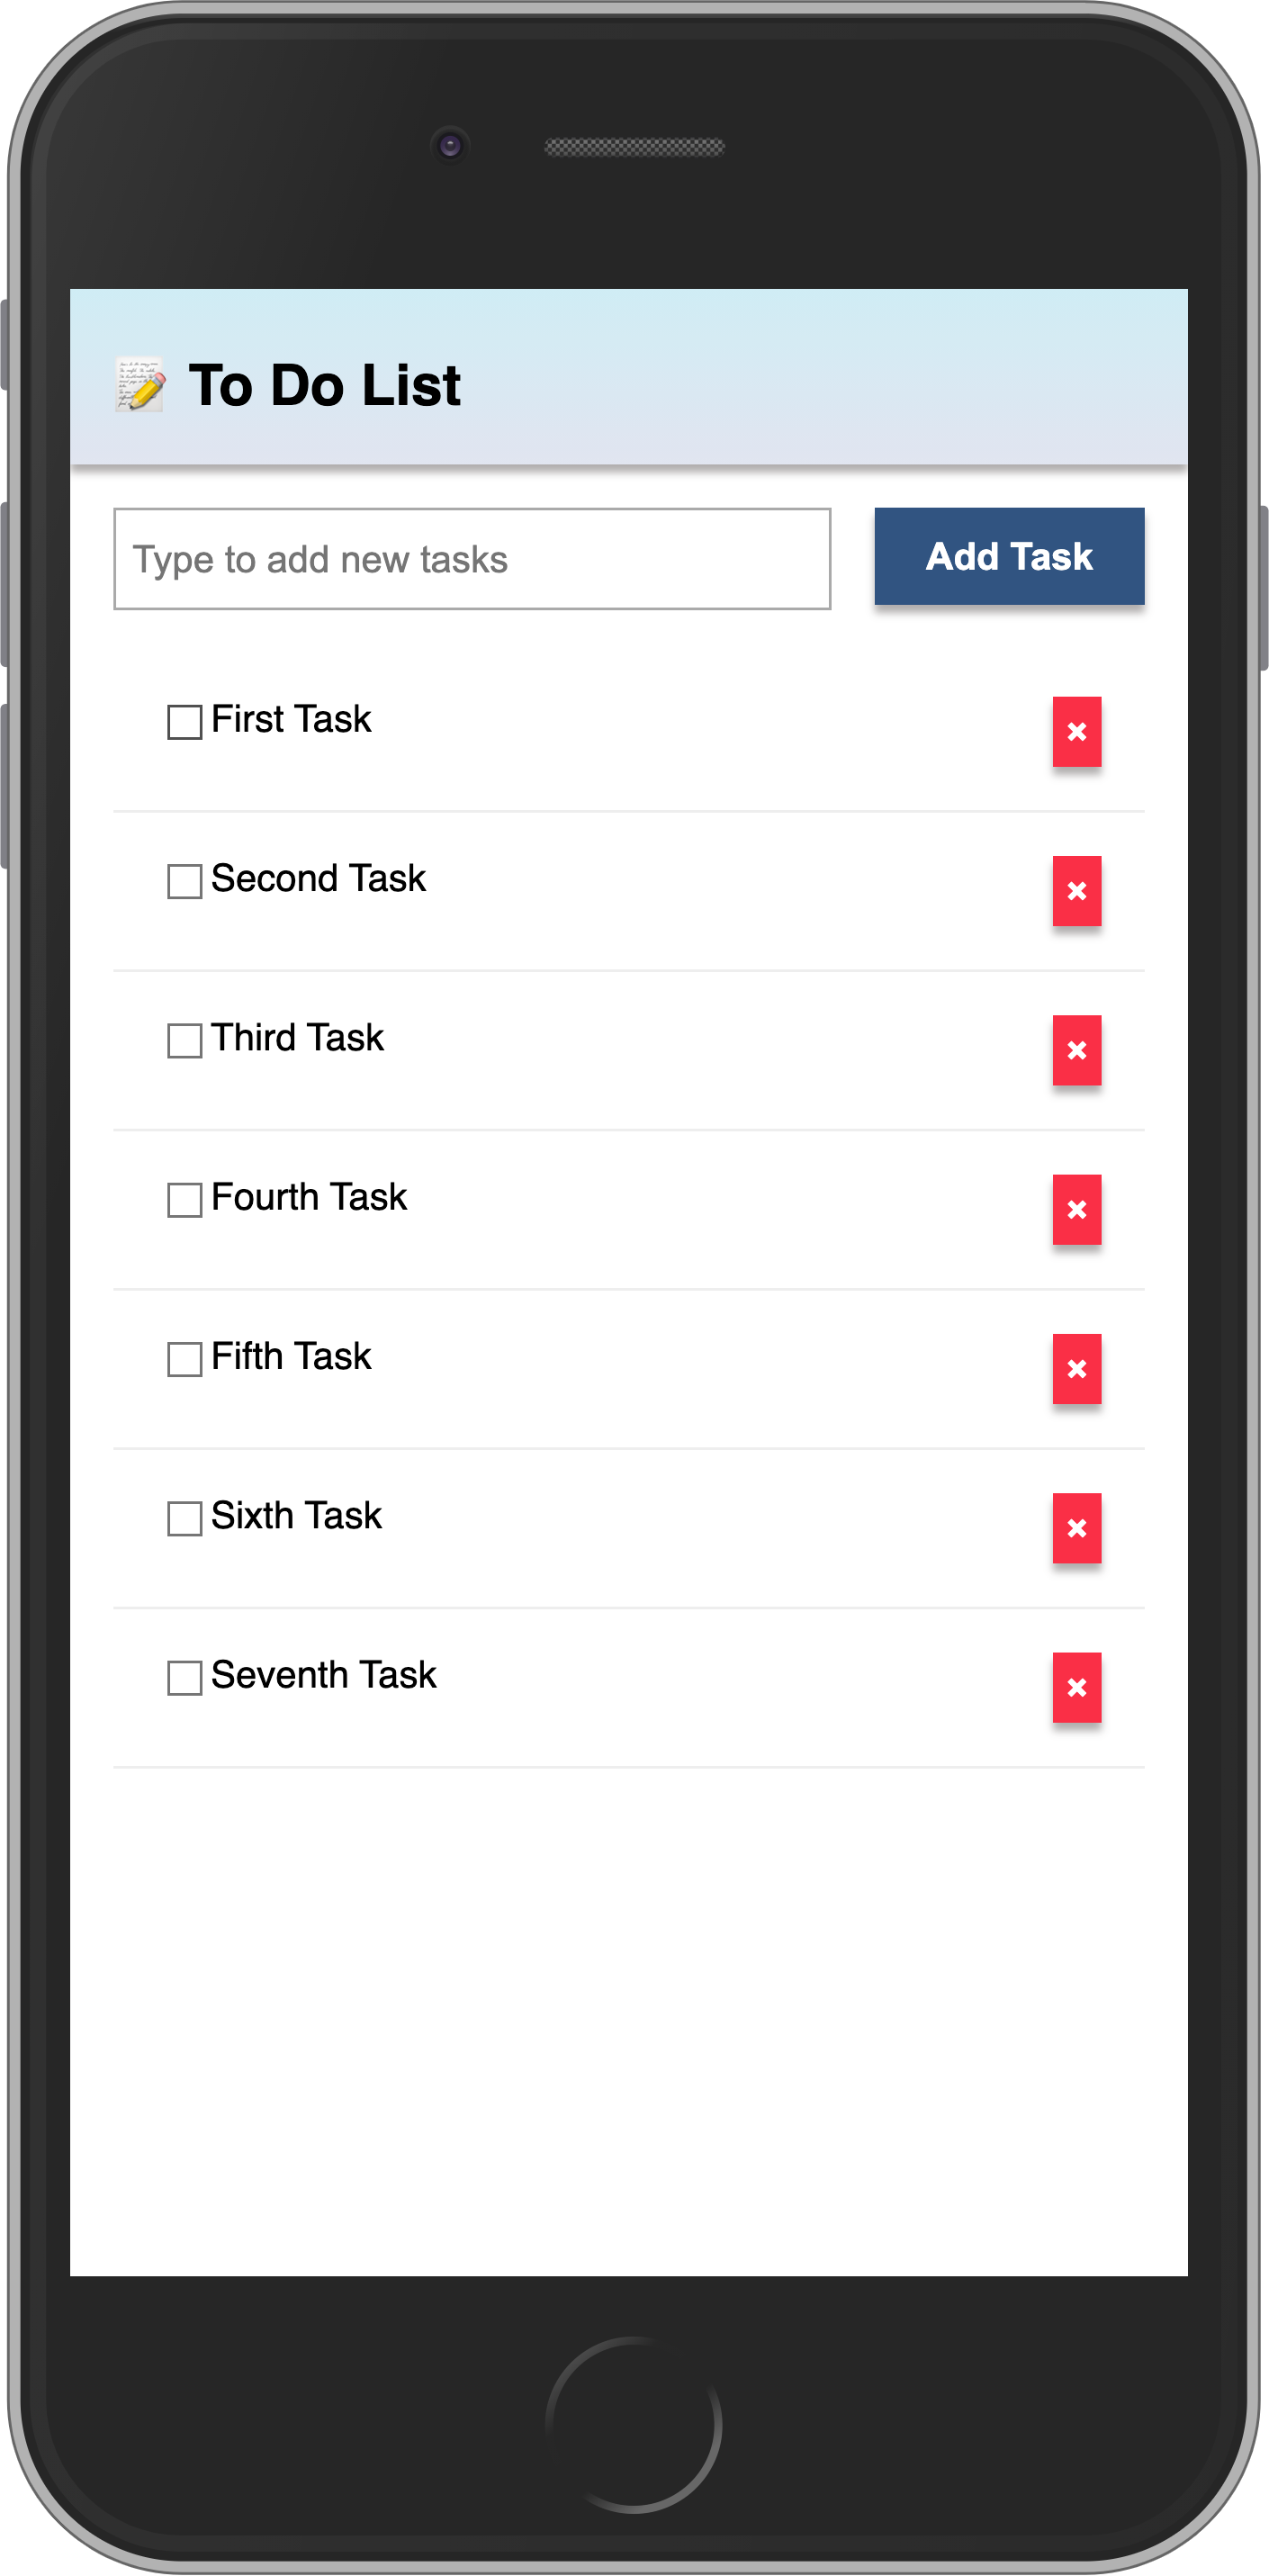
});因此,你正在导入 TasksCollection 并向其添加一些任务,遍历字符串数组,并为每个字符串调用一个函数将此字符串作为我们的 text 字段插入到我们的 task 文档中。
¥So you are importing the TasksCollection and adding a few tasks to it iterating over an array of strings and for each string calling a function to insert this string as our text field in our task document.
2.3:渲染任务集合
¥2.3: Render Tasks Collection
接下来是有趣的部分,你将使用 Solid 渲染任务。这很简单。
¥Now comes the fun part, you will render the tasks with Solid. That will be pretty simple.
在你的 App.jsx 文件中,导入 TasksCollection 并使用 Tracker 来订阅并响应式地获取任务:
¥In your App.jsx file, import the TasksCollection and use Tracker to subscribe and fetch the tasks reactively:
jsx
import { createSignal, For, Show } from "solid-js";
import { Meteor } from "meteor/meteor";
import { Tracker } from "meteor/tracker";
import { TasksCollection } from "../api/TasksCollection";

export const App = () => {
  const subscription = Meteor.subscribe("tasks");
  const [isReady, setIsReady] = createSignal(subscription.ready());
  const [tasks, setTasks] = createSignal([]);

  Tracker.autorun(async () => {
    setIsReady(subscription.ready());
    setTasks(await TasksCollection.find().fetchAsync());
  });

  return (
    <div class="container">
      <header>
        <h1>Todo List</h1>
      </header>

      <Show
        when={isReady()}
        fallback={<div>Loading ...</div>}
      >
        <ul>
          <For each={tasks()}>
            {(task) => (
              <li>{task.text}</li>
            )}
          </For>
        </ul>
      </Show>
    </div>
  );
};
但请稍等!缺少某些内容。如果你现在运行你的应用,你将看到你没有渲染任何任务。
¥But wait! Something is missing. If you run your app now, you'll see that you don't render any tasks.
这是因为我们需要将数据发布到客户端。
¥That's because we need to publish our data to the client.
有关发布物/订阅的更多信息,请查看我们的 docs。
¥For more information on Publications/Subscriptions, please check our docs.
Meteor 不需要 REST 调用。它依赖于服务器端的 MongoDB 与客户端的 MiniMongoDB 进行同步。它通过先在服务器端发布集合,然后在客户端订阅这些集合来实现这一点。
¥Meteor doesn't need REST calls. It instead relies on synchronizing the MongoDB on the server with a MiniMongoDB on the client. It does this by first publishing collections on the server and then subscribing to them on the client.
首先,为我们的任务创建一个发布:
¥First, create a publication for our tasks:
javascript
import { Meteor } from "meteor/meteor";
import { TasksCollection } from "./TasksCollection";

Meteor.publish("tasks", function () {
  return TasksCollection.find();
});
现在,我们需要将此文件导入我们的服务器:
¥Now, we need to import this file in our server:
js
...
import { TasksCollection } from '/imports/api/TasksCollection';

import "../imports/api/TasksPublications";

const insertTask = taskText => TasksCollection.insertAsync({ text: taskText });
...
剩下的就是订阅此发布物,我们已经在 App.jsx 中添加了它,方法如下:
¥The only thing left is subscribe to this publication, which we've already added in App.jsx using:
jsx
...
const subscription = Meteor.subscribe("tasks");
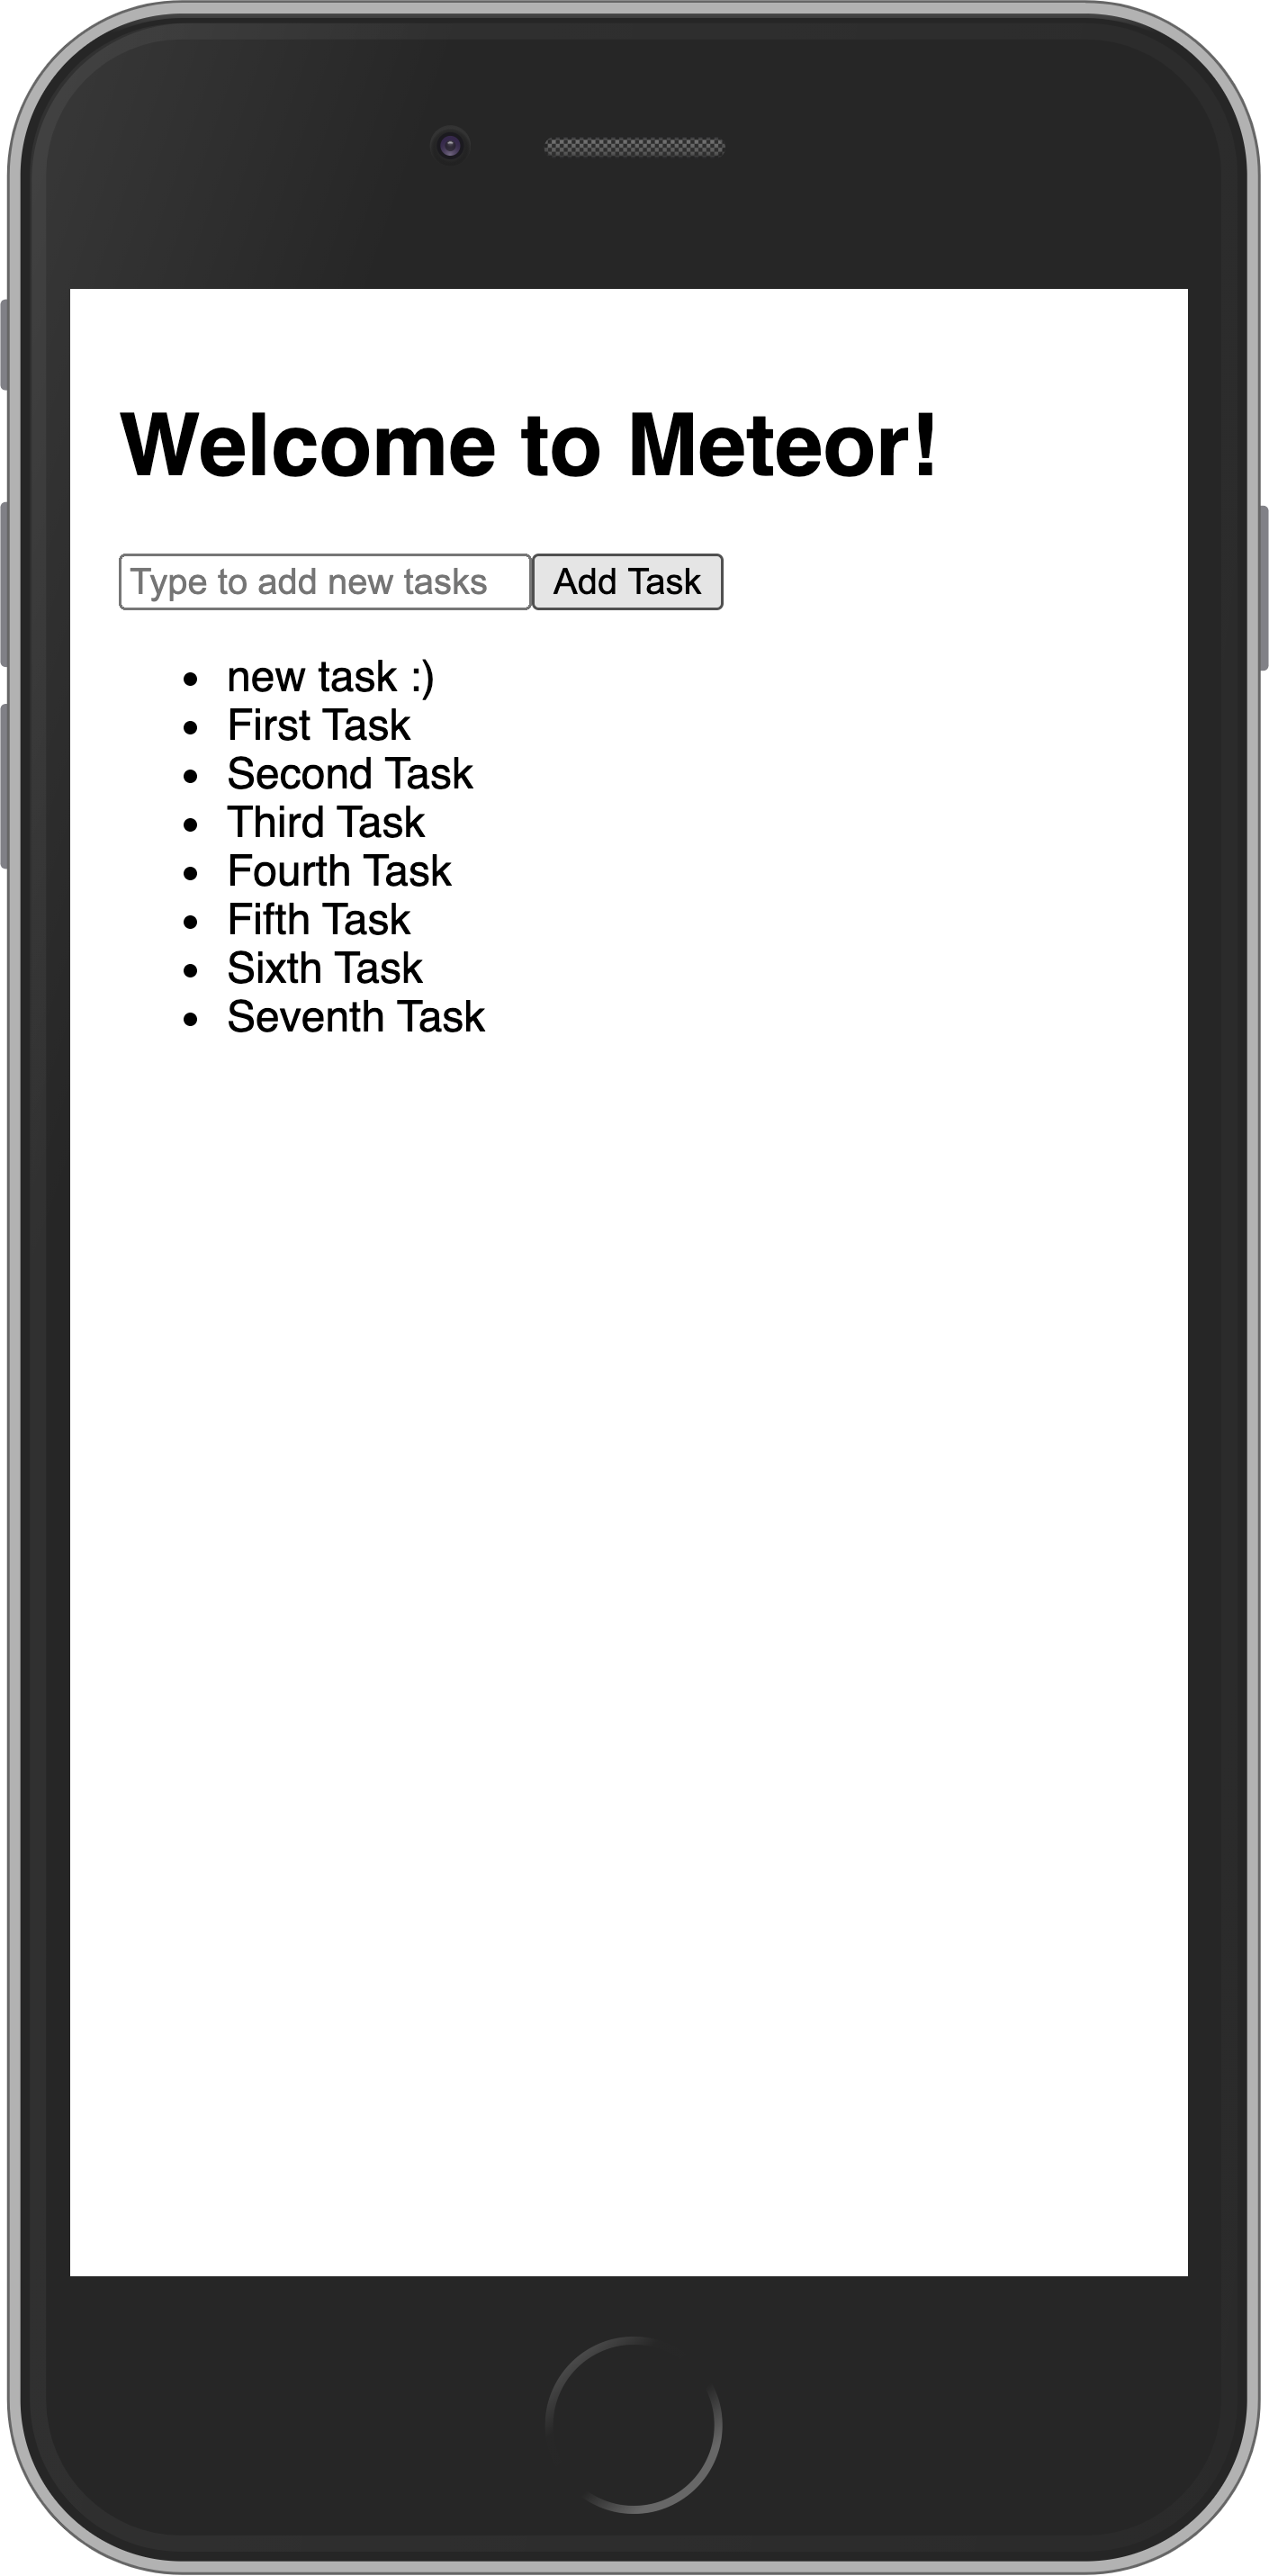
...查看你的应用现在应该是什么样子:
¥See how your app should look like now:
你可以在服务器上更改 MongoDB 上的数据,你的应用将做出反应并为你重新渲染。
¥You can change your data on MongoDB in the server and your app will react and re-render for you.
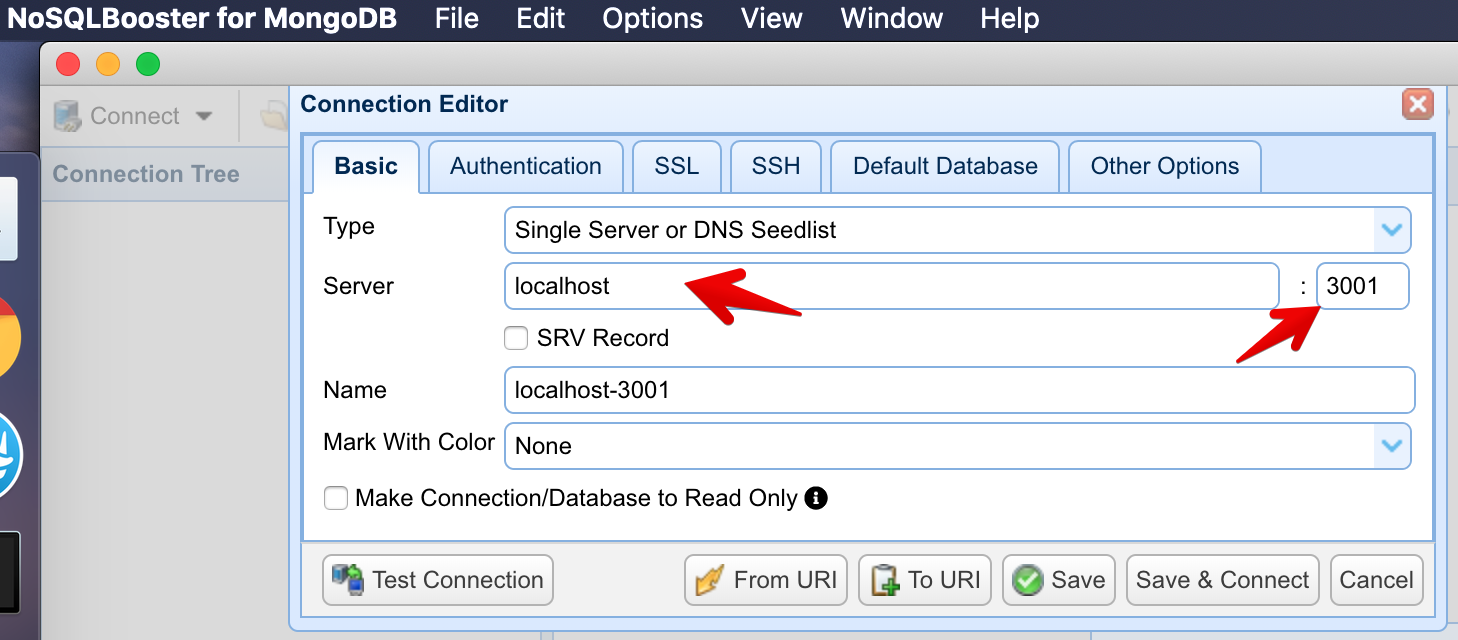
你可以从应用文件夹或使用 Mongo UI 客户端(如 NoSQLBooster)连接到在终端中运行 meteor mongo 的 MongoDB。你的嵌入式 MongoDB 正在端口 3001 中运行。
¥You can connect to your MongoDB running meteor mongo in the terminal from your app folder or using a Mongo UI client, like NoSQLBooster. Your embedded MongoDB is running in port 3001.
查看如何连接:
¥See how to connect:
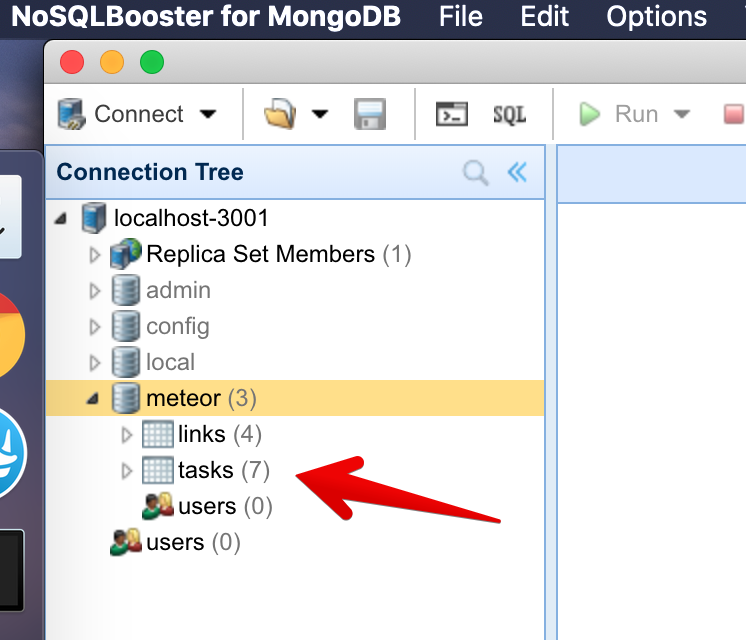
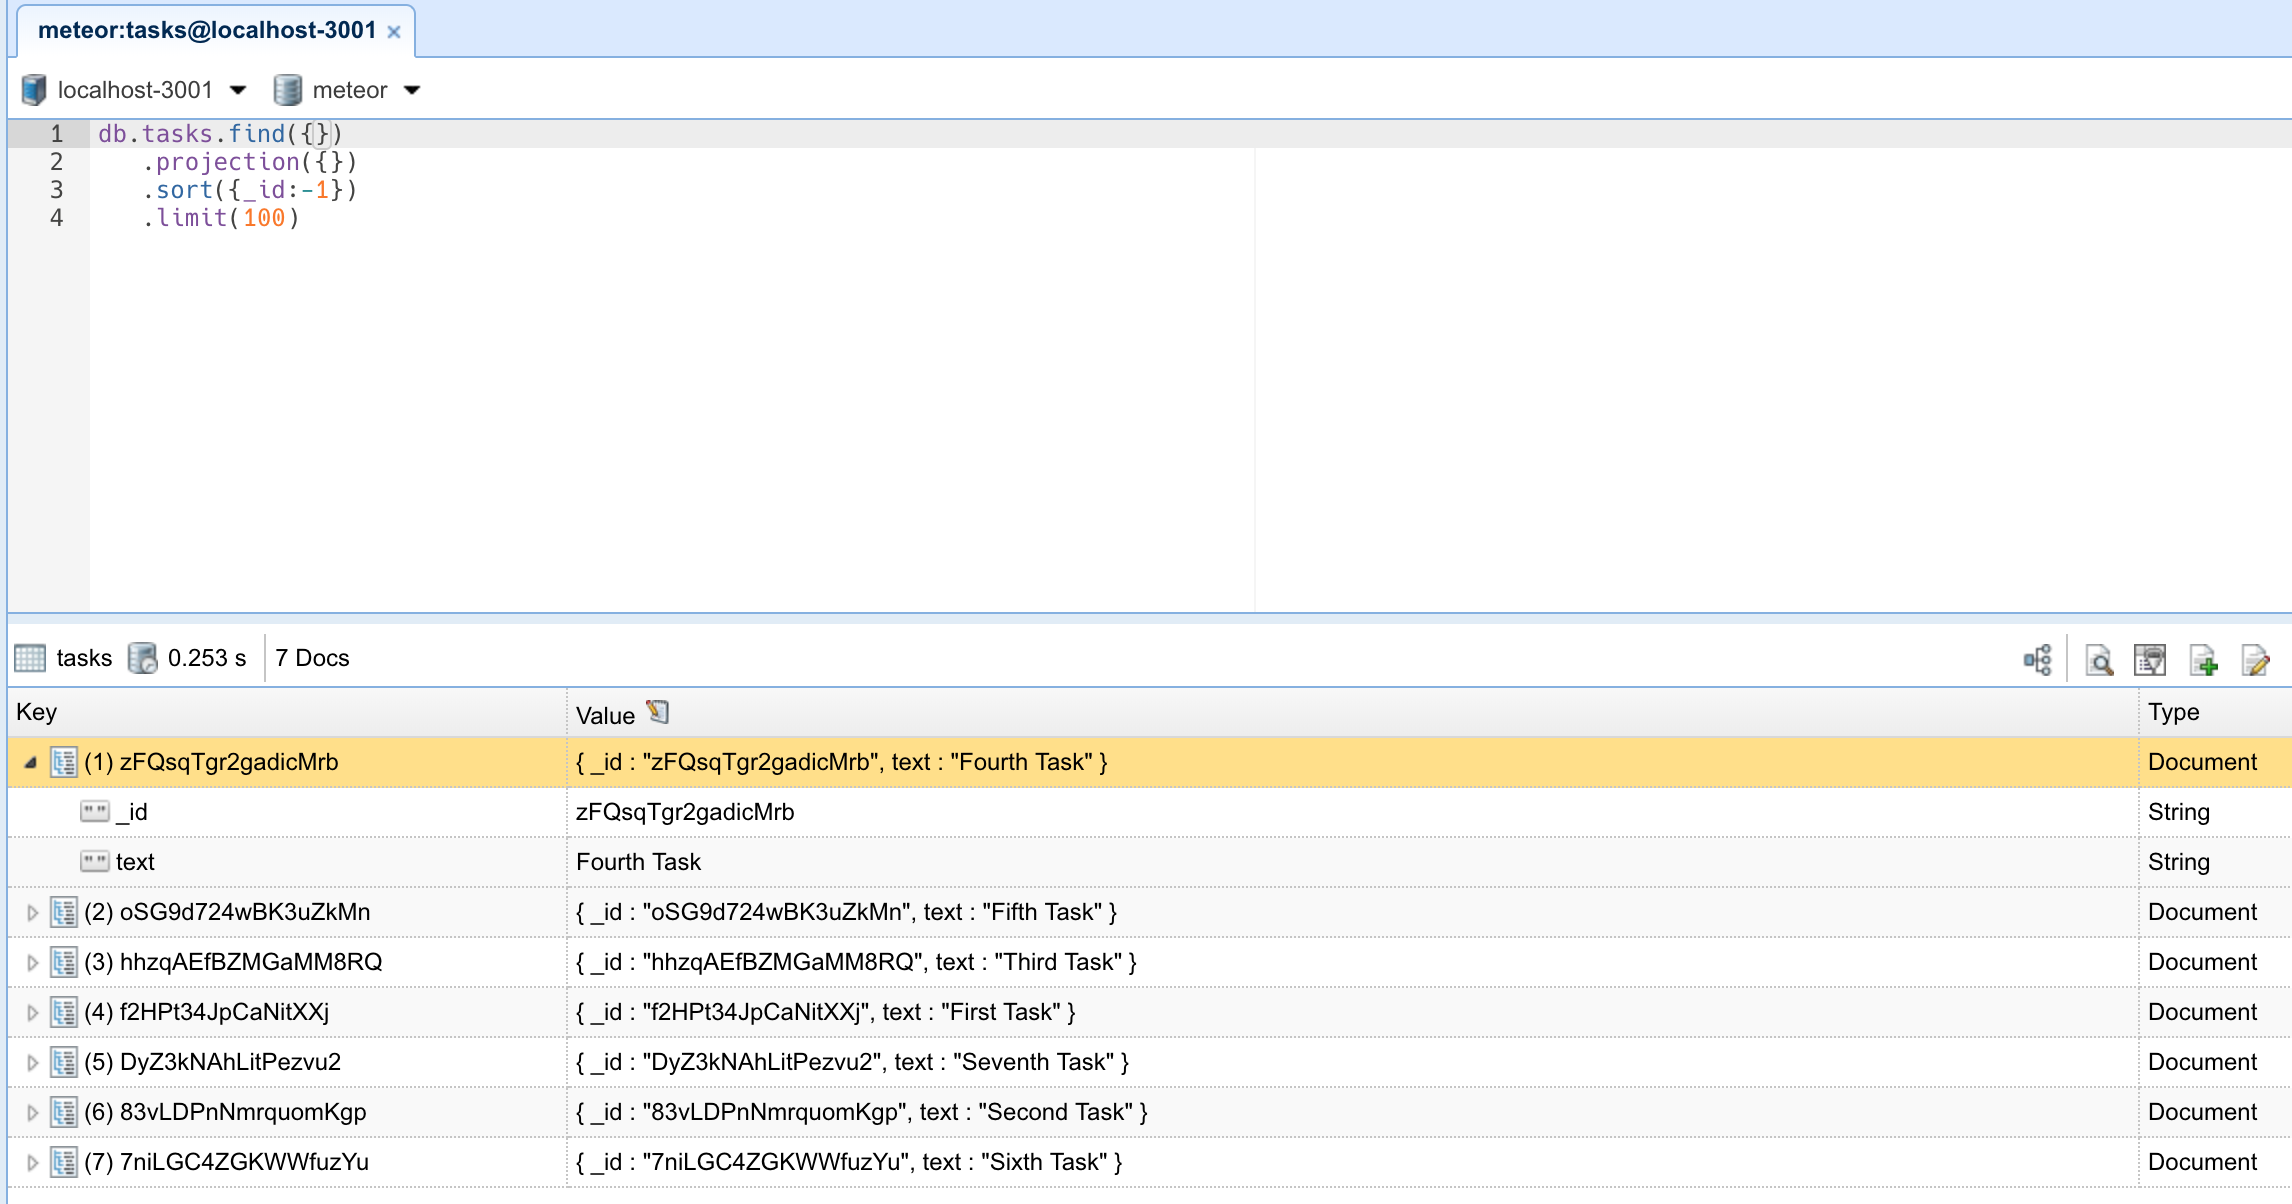
查看你的数据库:
¥See your database:
你可以双击你的集合以查看存储在其中的文档:
¥You can double-click your collection to see the documents stored on it:
在下一步中,我们将使用表单创建任务。
¥In the next step, we are going to create tasks using a form.
3:表单和事件
¥3: Forms and Events
所有应用都需要允许用户与存储的数据进行某种交互。在我们的例子中,第一种交互类型是插入新任务。没有它,我们的 To-Do 应用就不会很有用。
¥All apps need to allow the user to perform some sort of interaction with the data that is stored. In our case, the first type of interaction is to insert new tasks. Without it, our To-Do app wouldn't be very helpful.
用户在网站上插入或编辑数据的主要方式之一是通过表单。在大多数情况下,使用 <form> 标签是个好主意,因为它赋予其中的元素语义。
¥One of the main ways in which a user can insert or edit data on a website is through forms. In most cases, it is a good idea to use the <form> tag since it gives semantic meaning to the elements inside it.
3.1:创建任务表单
¥3.1: Create Task Form
在 App.jsx 文件中创建一个新的 form,并在其中添加一个输入字段和一个按钮。请将其放置在 header 和 Show 元素之间:
¥Create a new form inside the App.jsx file, and inside we’ll add an input field and a button. Place it between the header and the Show elements:
jsx
...
     </header>

      <form class="task-form" onSubmit={addTask}>
        <input
          type="text"
          placeholder="Type to add new tasks"
          value={newTask()}
          onInput={(e) => setNewTask(e.currentTarget.value)}
        />
        <button type="submit">Add Task</button>
      </form>

      <Show
...
在上面的代码中,我们将表单直接集成到了 App.jsx 组件中,并将其放置在任务列表上方。我们使用 Solid 的信号来实现输入的双向绑定(通过 value 和 onInput),并使用 onSubmit 处理程序来处理表单提交。
¥In the code above, we've integrated the form directly into the App.jsx component, positioning it above the task list. We're using Solid's signals for two-way binding on the input (via value and onInput) and an onSubmit handler for form submission.
现在,在 App 函数定义的顶部添加信号和 addTask() 函数处理程序。它会调用一个尚未创建但很快就会创建的 Meteor 方法 tasks.insert:
¥Let's now add our signals and addTask() function handler inside the top of the App function definition. It will call a Meteor method tasks.insert that isn't yet created but we'll soon make:
jsx
...

export const App = () => {
  const [newTask, setNewTask] = createSignal('');

  const addTask = async (event) => {
    event.preventDefault();
    if (newTask().trim()) {
      await Meteor.callAsync("tasks.insert", {
        text: newTask(),
        createdAt: new Date(),
      });
      setNewTask('');
    }
  };

  const subscription = Meteor.subscribe("tasks");

...
总而言之,我们的文件应该如下所示:
¥Altogether, our file should look like:
jsx
import { createSignal, For, Show } from "solid-js";
import { Meteor } from "meteor/meteor";
import { Tracker } from "meteor/tracker";
import { TasksCollection } from "../api/TasksCollection";

export const App = () => {
  const [newTask, setNewTask] = createSignal('');

  const addTask = async (event) => {
    event.preventDefault();
    if (newTask().trim()) {
      await Meteor.callAsync("tasks.insert", {
        text: newTask(),
        createdAt: new Date(),
      });
      setNewTask('');
    }
  };

  const subscription = Meteor.subscribe("tasks");
  const [isReady, setIsReady] = createSignal(subscription.ready());
  const [tasks, setTasks] = createSignal([]);

  Tracker.autorun(async () => {
    setIsReady(subscription.ready());
    setTasks(await TasksCollection.find().fetchAsync());
  });

  return (
    <div class="container">
      <header>
        <h1>Todo List</h1>
      </header>

      <form class="task-form" onSubmit={addTask}>
        <input
          type="text"
          placeholder="Type to add new tasks"
          value={newTask()}
          onInput={(e) => setNewTask(e.currentTarget.value)}
        />
        <button type="submit">Add Task</button>
      </form>

      <Show
        when={isReady()}
        fallback={<div>Loading ...</div>}
      >
        <ul>
          <For each={tasks()}>
            {(task) => (
              <li>{task.text}</li>
            )}
          </For>
        </ul>
      </Show>
    </div>
  );
};
3.2:更新样式表
¥3.2: Update the Stylesheet
你还可以根据需要设置其样式。目前,我们只需要顶部的一些边距,这样表单就不会显得偏离目标。添加 CSS 类 .task-form,该类名必须与表单元素中 class 属性的名称相同。请注意,在 Solid 中,你不会像在 React 中那样使用 className。
¥You also can style it as you wish. For now, we only need some margin at the top so the form doesn't seem off the mark. Add the CSS class .task-form, this needs to be the same name in your class attribute in the form element. Notice how in Solid you don't use className like you would in React.
css
...

.task-form {
  margin-top: 1rem;
}

...
3.3:添加提交处理程序
¥3.3: Add Submit Handler
现在让我们创建一个函数来处理表单提交并将新任务插入数据库。为此,我们需要实现一个 Meteor 方法。
¥Now let's create a function to handle the form submit and insert a new task into the database. To do it, we will need to implement a Meteor Method.
方法本质上是对服务器的 RPC 调用,可让你安全地在服务器端执行操作。你可以阅读有关 Meteor 方法 此处 的更多信息。
¥Methods are essentially RPC calls to the server that let you perform operations on the server side securely. You can read more about Meteor Methods here.
要创建方法,你可以创建一个名为 TasksMethods.js 的文件。
¥To create your methods, you can create a file called TasksMethods.js.
javascript
import { Meteor } from "meteor/meteor";
import { TasksCollection } from "./TasksCollection";

Meteor.methods({
  "tasks.insert"(doc) {
    return TasksCollection.insertAsync(doc);
  },
});
请记住在 main.js 服务器文件中导入你的方法,删除 insertTask 函数,并在 forEach 代码块中调用新的 Meteor 方法。
¥Remember to import your method on the main.js server file, delete the insertTask function, and invoke the new meteor method inside the forEach block.
javascript
import { Meteor } from "meteor/meteor";
import { TasksCollection } from "/imports/api/TasksCollection";
import "../imports/api/TasksPublications";
import "../imports/api/TasksMethods";

Meteor.startup(async () => {
  if ((await TasksCollection.find().countAsync()) === 0) {
    [
      "First Task",
      "Second Task",
      "Third Task",
      "Fourth Task",
      "Fifth Task",
      "Sixth Task",
      "Seventh Task",
    ].forEach((taskName) => {
      Meteor.callAsync("tasks.insert", {
        text: taskName,
        createdAt: new Date(),
      });
    });
  }
});
在 forEach 函数中,我们通过调用 Meteor.callAsync() 将任务添加到 tasks 集合中。第一个参数是我们要调用的方法的名称,第二个参数是任务的文本。
¥Inside the forEach function, we are adding a task to the tasks collection by calling Meteor.callAsync(). The first argument is the name of the method we want to call, and the second argument is the text of the task.
另外,在你的 task 文档中插入一个日期 createdAt,这样你就知道每个任务的创建时间。
¥Also, insert a date createdAt in your task document so you know when each task was created.
现在,我们需要在客户端文件中导入 TasksMethods.js 以启用乐观 UI(例如,在 imports/ui/main.jsx 中):
¥Now we need to import TasksMethods.js in a client-side file to enable optimistic UI (e.g., in imports/ui/main.jsx):
jsx
/* @refresh reload */
import { render } from 'solid-js/web';
import { App } from './App';
import { Meteor } from "meteor/meteor";
import './main.css';
import "/imports/api/TasksMethods"; // // this import allows for optimistic execution

Meteor.startup(() => {
  render(() => <App/>, document.getElementById('root'));
});
在 addTask 函数(如 3.1 所示)中,我们阻止了默认表单提交,获取了输入值,调用 Meteor 方法以乐观方式插入任务,并清空了输入。
¥In the addTask function (shown in 3.1), we prevent the default form submission, get the input value, call the Meteor method to insert the task optimistically, and clear the input.
Meteor 方法在客户端使用 MiniMongo 进行乐观执行,同时调用服务器。如果服务器调用失败,MiniMongo 会回滚更改,从而提供流畅的用户体验。这有点像格斗游戏中的 回滚网络代码。
¥Meteor methods execute optimistically on the client using MiniMongo while simultaneously calling the server. If the server call fails, MiniMongo rolls back the change, providing a speedy user experience. It's a bit like rollback netcode in fighting video games.
3.4:首先显示最新任务
¥3.4: Show Newest Tasks First
现在,你只需要进行一些让用户满意的更改:我们需要先显示最新任务。我们可以通过对 Mongo 查询进行排序来快速完成此操作。
¥Now you just need to make a change that will make users happy: we need to show the newest tasks first. We can accomplish this quite quickly by sorting our Mongo query.
jsx
...

Tracker.autorun(async () => {
  setIsReady(subscription.ready());
  setTasks(await TasksCollection.find({}, { sort: { createdAt: -1 } }).fetchAsync());
});

...
你的应用应如下所示:
¥Your app should look like this:
在下一步中,我们将更新你的任务状态并为用户提供一种删除任务的方法。
¥In the next step, we are going to update your tasks state and provide a way for users to remove tasks.
4:更新和删除
¥4: Update and Remove
到目前为止,你只将文档插入到我们的集合中。让我们看看如何通过与用户界面交互来更新和删除它们。
¥Up until now, you have only inserted documents into our collection. Let's take a look at how you can update and remove them by interacting with the user interface.
4.1:添加复选框
¥4.1: Add Checkbox
首先,你需要向你的 Task 组件添加一个 checkbox 元素。
¥First, you need to add a checkbox element to your Task component.
接下来,让我们在 imports/ui/Task.jsx 中为 task 创建一个新文件,以便开始分离应用中的逻辑。
¥Next, let’s create a new file for our task in imports/ui/Task.jsx, so we can start to separate the logic in our app.
jsx
import { Meteor } from "meteor/meteor";

export const Task = (props) => {
  const { task } = props;

  const toggleChecked = async () => {
    await Meteor.callAsync("tasks.toggleChecked", { _id: task._id, isChecked: task.isChecked });
  };

  return (
    <li>
      <label>
        <input type="checkbox" checked={task.isChecked} onChange={toggleChecked} />
        <span>{task.text}</span>
      </label>
    </li>
  );
};
现在,更新 App.jsx,使其在 <For> 循环中导入并使用 Task 组件。移除旧的 <li> 标记。
¥Now, update App.jsx to import and use the Task component in the <For> loop. Remove the old <li> markup.
jsx
import { createSignal, For, Show } from "solid-js";
import { Meteor } from "meteor/meteor";
import { Tracker } from "meteor/tracker";
import { TasksCollection } from "../api/TasksCollection";
import { Task } from "./Task.jsx";

export const App = () => {
  const [newTask, setNewTask] = createSignal('');

  const addTask = async (event) => {
    event.preventDefault();
    if (newTask().trim()) {
      await Meteor.callAsync("tasks.insert", {
        text: newTask(),
        createdAt: new Date(),
      });
      setNewTask('');
    }
  };

  const subscription = Meteor.subscribe("tasks");
  const [isReady, setIsReady] = createSignal(subscription.ready());
  const [tasks, setTasks] = createSignal([]);

  Tracker.autorun(async () => {
    setIsReady(subscription.ready());
    setTasks(await TasksCollection.find({}, { sort: { createdAt: -1 } }).fetchAsync());
  });

  return (
    <div class="container">
      <header>
        <h1>Todo List</h1>
      </header>

      <form class="task-form" onSubmit={addTask}>
        <input
          type="text"
          placeholder="Type to add new tasks"
          value={newTask()}
          onInput={(e) => setNewTask(e.currentTarget.value)}
        />
        <button type="submit">Add Task</button>
      </form>

      <Show
        when={isReady()}
        fallback={<div>Loading ...</div>}
      >
        <ul>
          <For each={tasks()}>
            {(task) => (
              <Task task={task} />
            )}
          </For>
        </ul>
      </Show>
    </div>
  );
};
4.2:切换复选框
¥4.2: Toggle Checkbox
现在,你可以通过切换其 isChecked 字段来更新你的任务文档。
¥Now you can update your task document by toggling its isChecked field.
首先,创建一个名为 tasks.toggleChecked 的新方法来更新 isChecked 属性。
¥First, create a new method called tasks.toggleChecked to update the isChecked property.
js
import { Meteor } from "meteor/meteor";
import { TasksCollection } from "./TasksCollection";

Meteor.methods({
  ...
  "tasks.toggleChecked"({ _id, isChecked }) {
    return TasksCollection.updateAsync(_id, {
      $set: { isChecked: !isChecked },
    });
  },
});
在 Task.jsx 中(如上所示),我们添加了一个 onChange 处理程序,该处理程序调用方法来切换选中状态。
¥In Task.jsx (as shown above), we've added an onChange handler that calls the method to toggle the checked state.
即使刷新 Web 浏览器,复选框的切换状态现在也应该会保留在数据库中。
¥Toggling checkboxes should now persist in the DB even if you refresh the web browser.
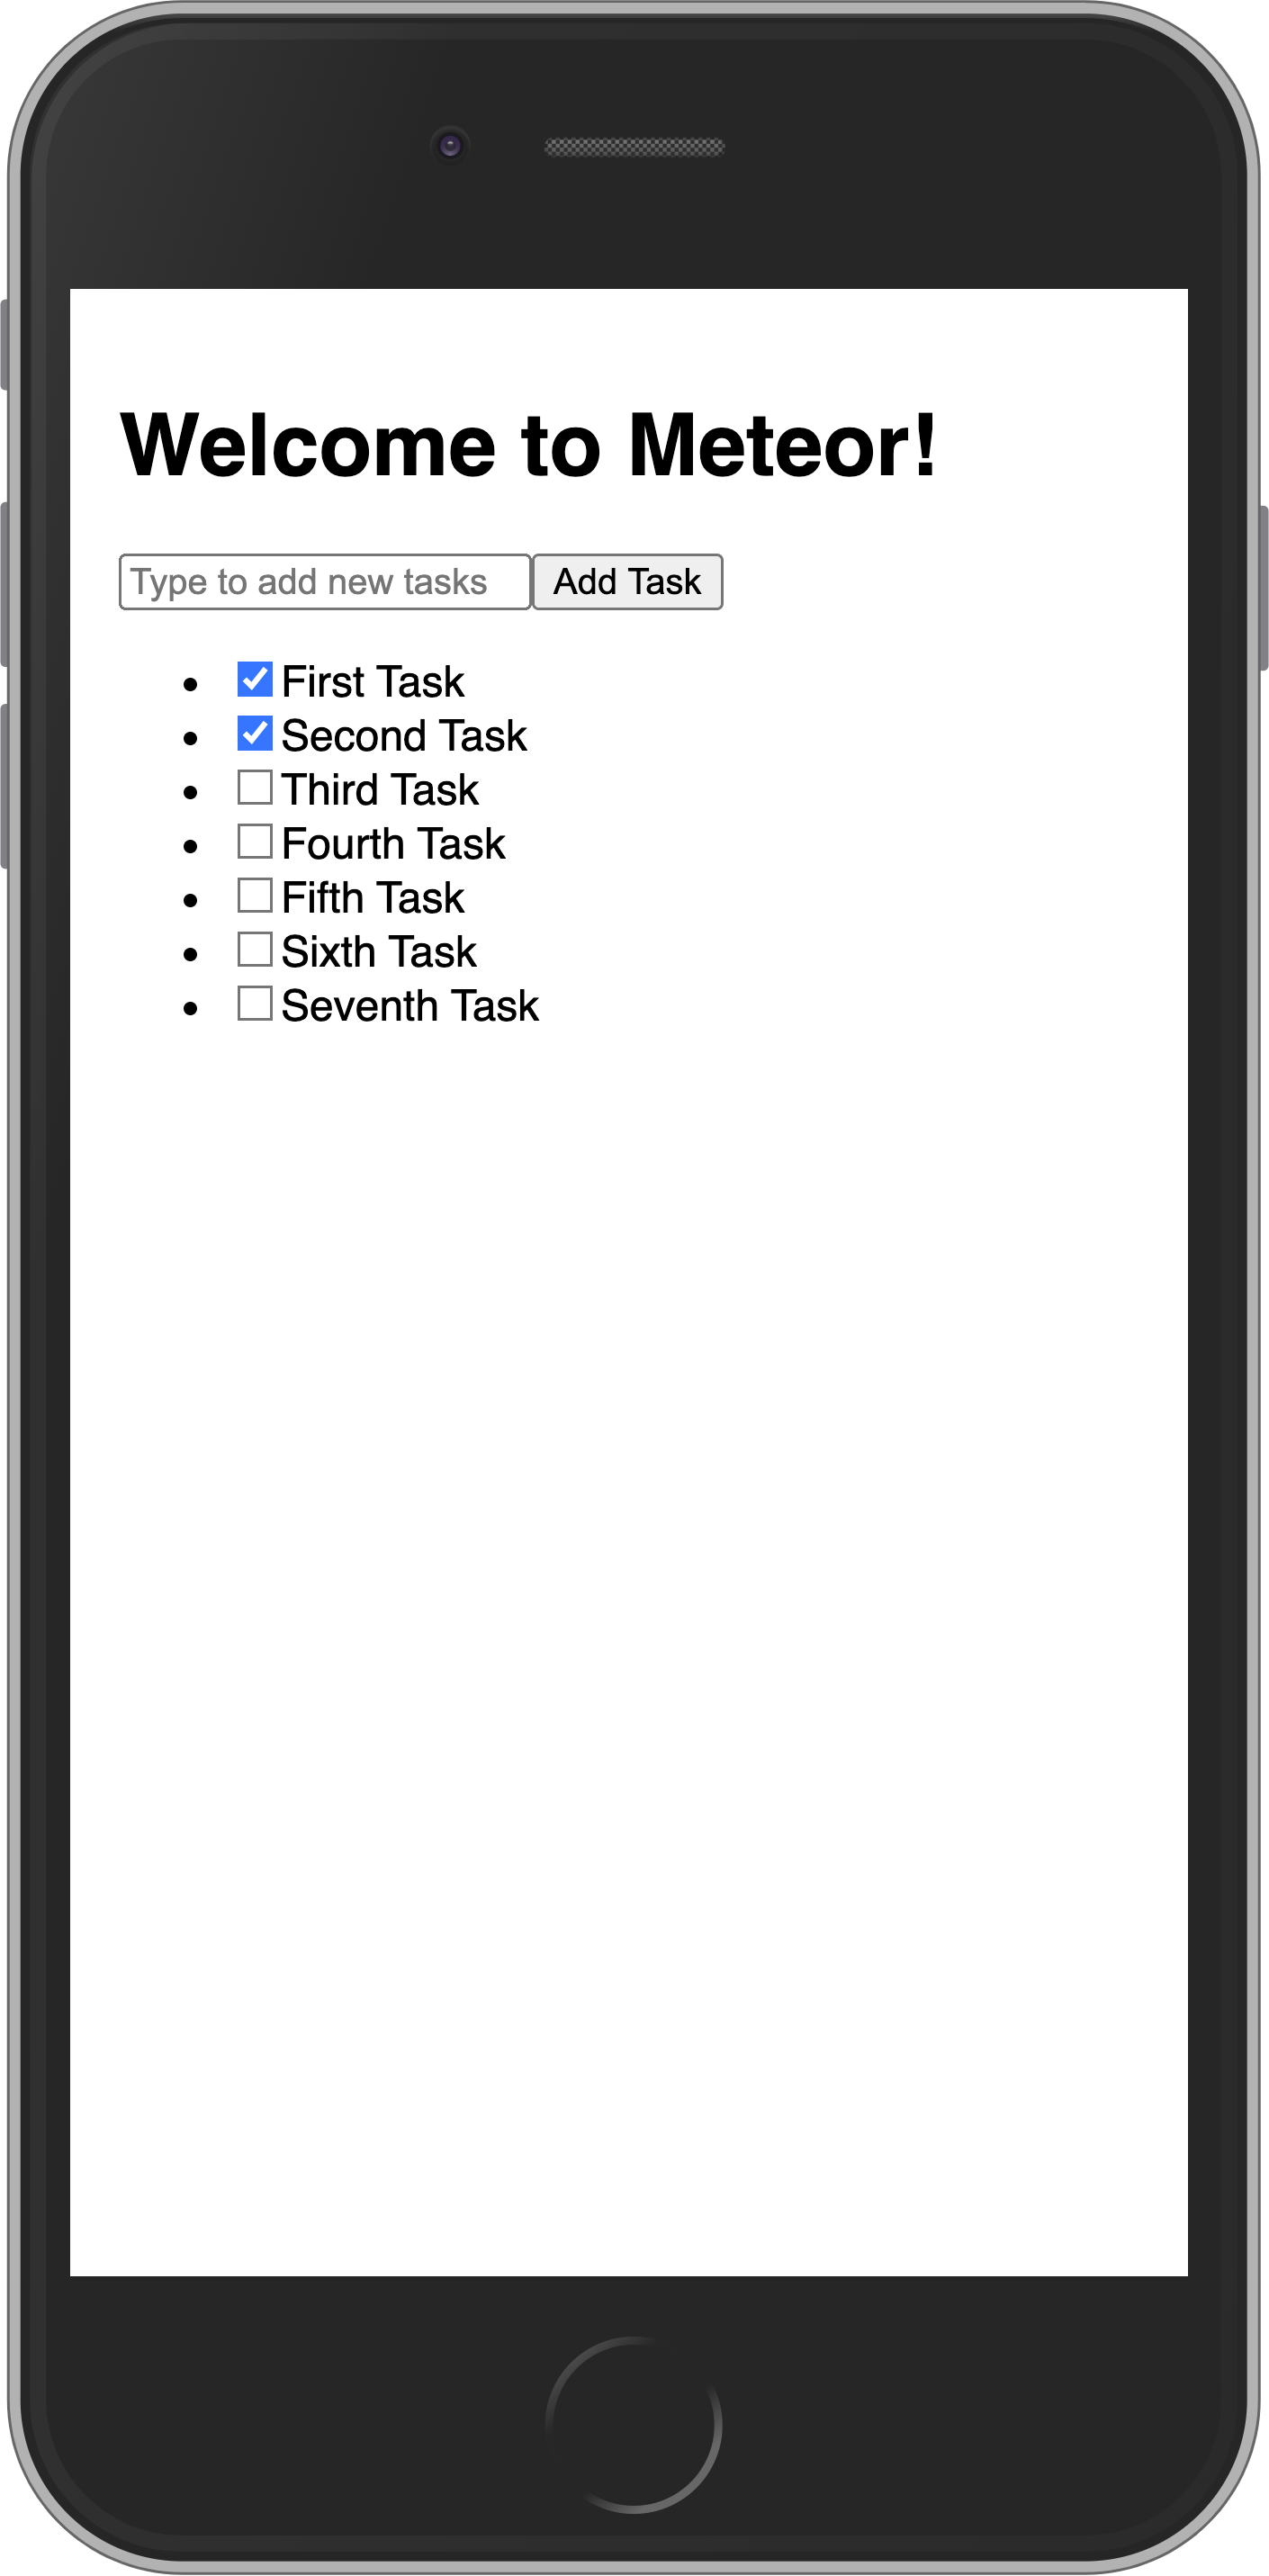
你的应用应如下所示:
¥Your app should look like this:
如果你的计算机速度足够快,在设置默认任务时,可能会出现部分任务日期相同的情况。当你切换复选框时,UI 会响应式更新,导致它们在 UI 中以不确定的方式显示为 "跳转"。为了使其稳定,你可以为任务的 _id 添加二级排序:
¥If your computer is fast enough, it's possible that when it sets up the default tasks a few will have the same date. That will cause them to non-deterministically "jump around" in the UI as you toggle checkboxes and the UI reactively updates. To make it stable, you can add a secondary sort on the _id of the task:
jsx
...

Tracker.autorun(async () => {
  setIsReady(subscription.ready());
  setTasks(await TasksCollection.find({}, { sort: { createdAt: -1, _id: -1 } }).fetchAsync());
});

...
4.3:删除任务
¥4.3: Remove tasks
你只需几行代码即可删除任务。
¥You can remove tasks with just a few lines of code.
首先,在 Task 组件的 label 后添加一个按钮,并在 deleteTask 函数之间添加一个 deleteTask 函数。
¥First, add a button after the label in your Task component and a deleteTask function.
jsx
import { Meteor } from "meteor/meteor";
export const Task = (props) => {
const { task } = props;
const toggleChecked = async () => {
await Meteor.callAsync("tasks.toggleChecked", { _id: task._id, isChecked: task.isChecked });
};
const deleteTask = async () => {
await Meteor.callAsync("tasks.delete", { _id: task._id });
};
return (
<li>
<label>
<input type="checkbox" checked={task.isChecked} onChange={toggleChecked} />
<span>{task.text}</span>
</label>
<button class="delete" onClick={deleteTask}>×</button> // [!code highlight]
</li>
);
};接下来,你需要一个用于删除任务的函数。为此,让我们创建一个名为 tasks.delete 的新方法:
¥Next you need to have a function to delete the task. For that, let's create a new method called tasks.delete:
js
import { Meteor } from "meteor/meteor";
import { TasksCollection } from "./TasksCollection";

Meteor.methods({
  ...
  "tasks.delete"({ _id }) {
    return TasksCollection.removeAsync(_id);
  },
});
现在,删除逻辑在 Task.jsx 中通过删除按钮上的 onClick 事件来处理,该事件会调用 Meteor 方法。
¥Now the removal logic is handled in Task.jsx via the onClick event on the delete button, which calls the Meteor method.
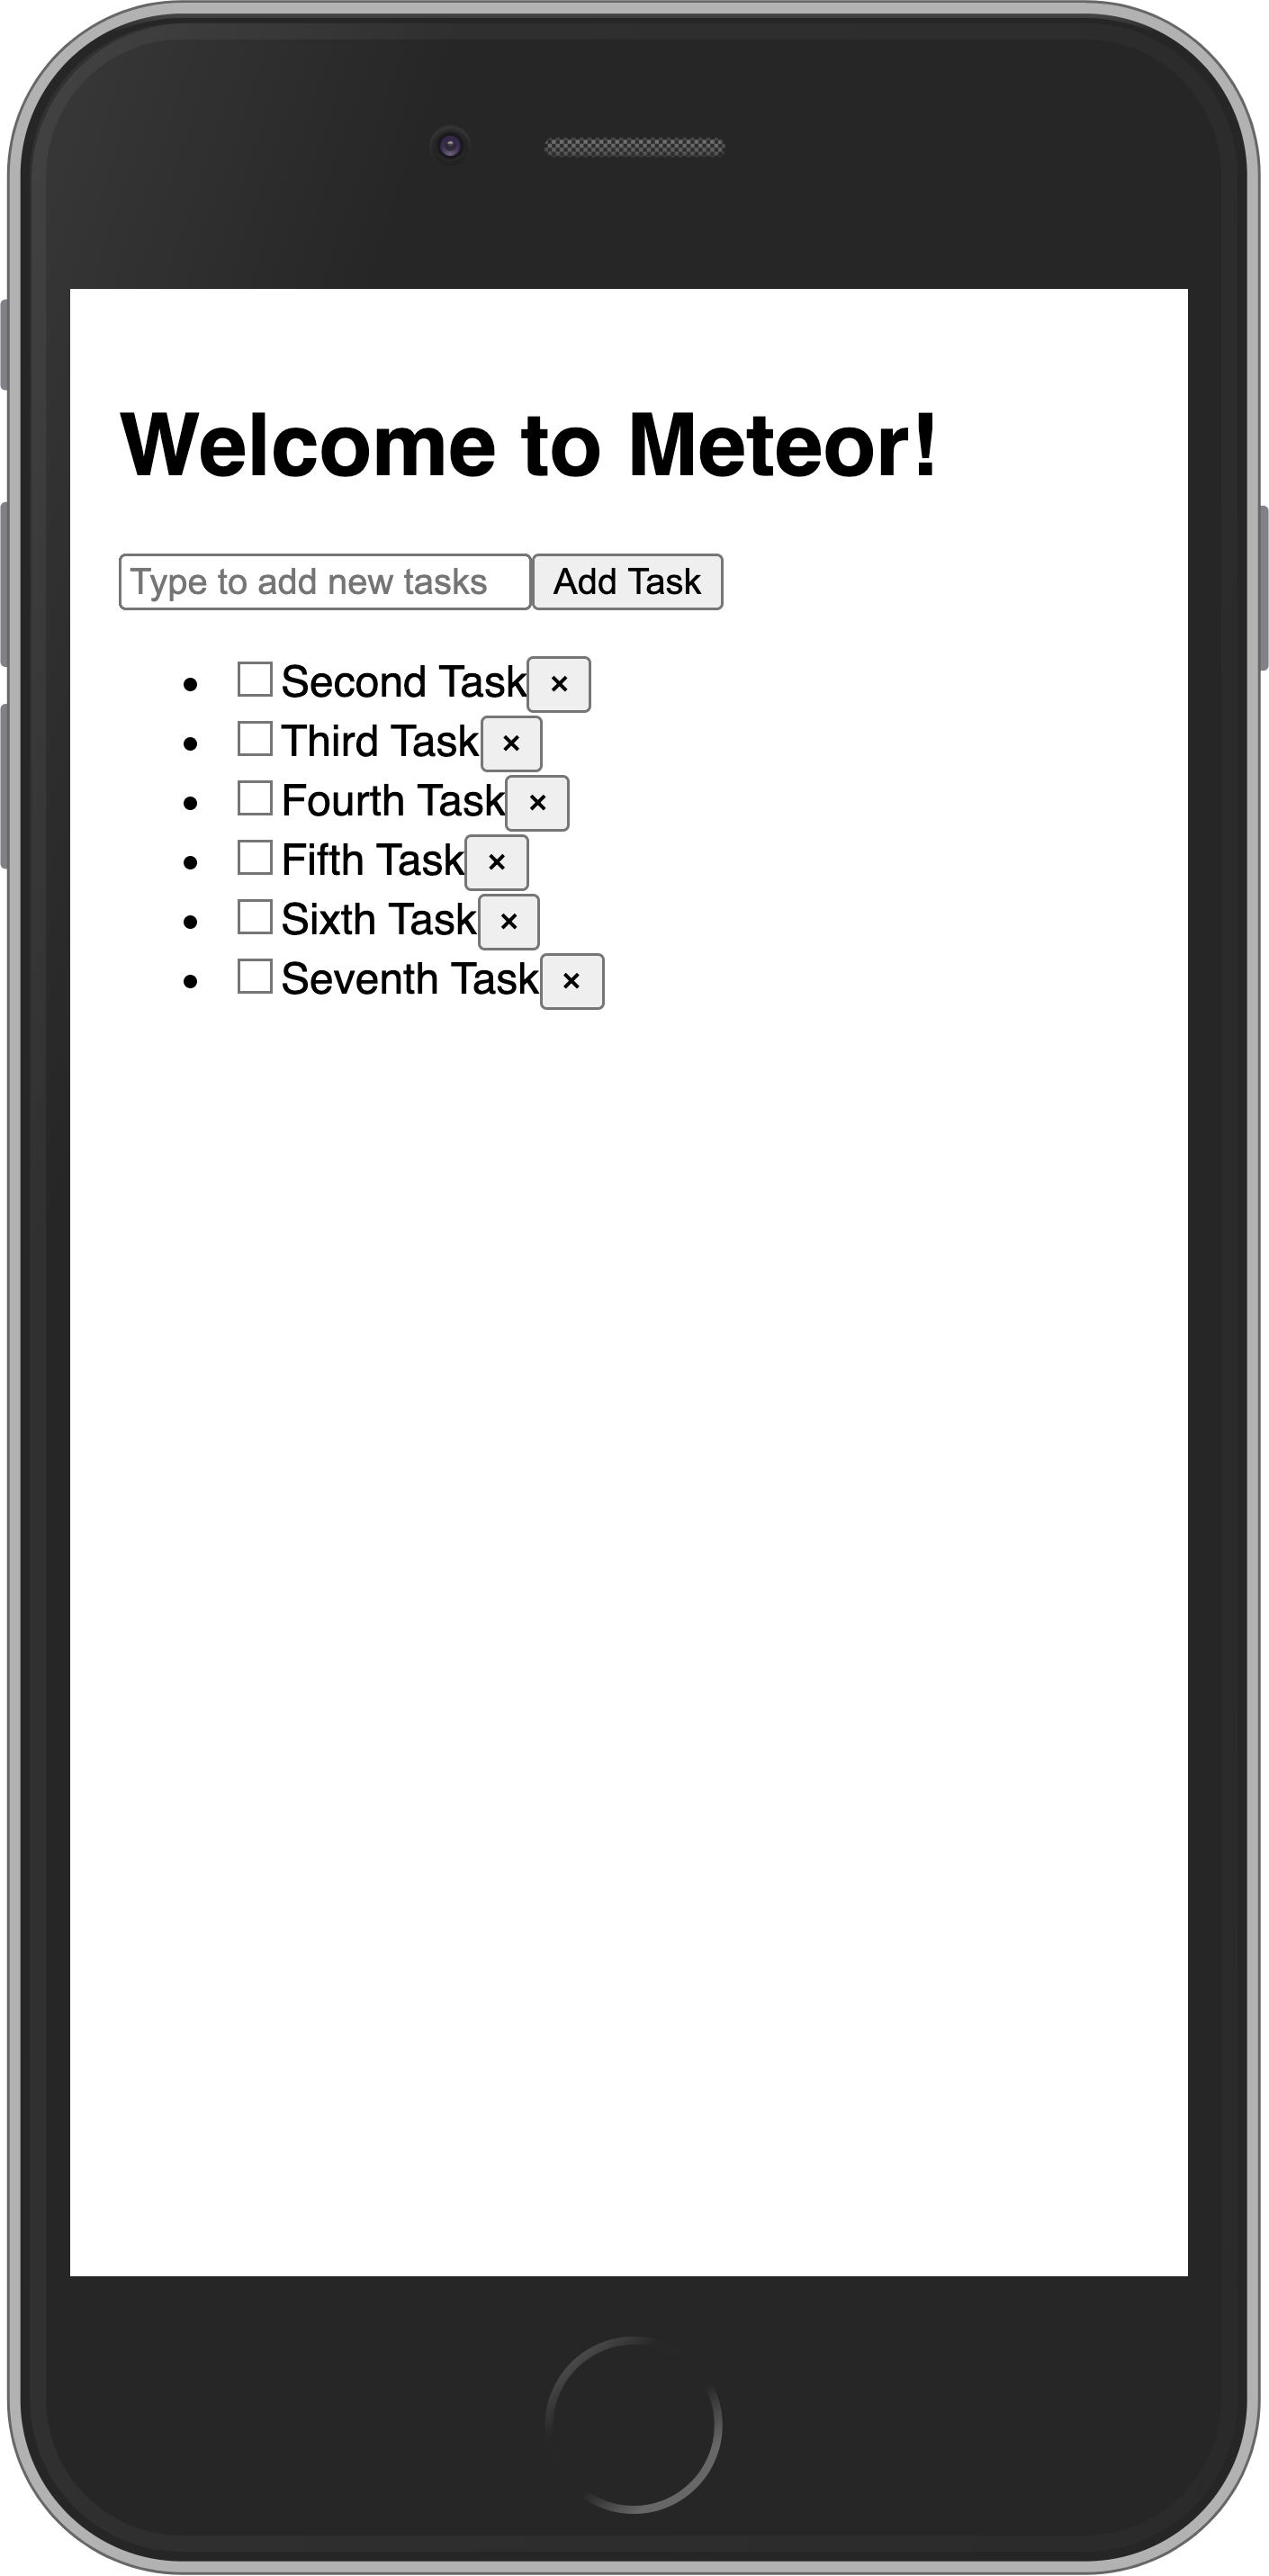
你的应用应如下所示:
¥Your app should look like this:
4.4:在事件处理程序中获取数据
¥4.4: Getting data in event handlers
在集合中,每个插入的文档都有一个唯一的 _id 字段,该字段可以引用该特定文档。在组件内部,task 属性提供了对任务对象的访问,包括其 _id 和其他字段,例如 isChecked 和 text。我们使用这些文件来调用 Meteor 方法来更新或删除特定任务。
¥In a collection, every inserted document has a unique _id field that can refer to that specific document. Inside the component, the task prop provides access to the task object, including its _id and other fields like isChecked and text. We use these to call Meteor methods for updating or removing the specific task.
在下一步中,我们将使用带有 Flexbox 的 CSS 改善应用的外观。
¥In the next step, we are going to improve the look of your app using CSS with Flexbox.
5:样式
¥5: Styles
5.1:CSS
到目前为止,我们的用户界面看起来相当丑陋。让我们添加一些基本样式,作为更专业的应用的基础。
¥Our user interface up until this point has looked quite ugly. Let's add some basic styling which will serve as the foundation for a more professional looking app.
用下面的内容替换我们的 imports/ui/main.css 文件的内容,想法是在顶部有一个应用栏,以及一个可滚动的内容,包括:
¥Replace the content of our imports/ui/main.css file with the one below, the idea is to have an app bar at the top, and a scrollable content including:
添加新任务的表单;
¥form to add new tasks;
任务列表。
¥list of tasks.
css
body {
  font-family: sans-serif;
  background-color: #315481;
  background-image: linear-gradient(to bottom, #315481, #918e82 100%);
  background-attachment: fixed;

  position: absolute;
  top: 0;
  bottom: 0;
  left: 0;
  right: 0;

  padding: 0;
  margin: 0;

  font-size: 14px;
}

button {
  font-weight: bold;
  font-size: 1em;
  border: none;
  color: white;
  box-shadow: 0 3px 3px rgba(34, 25, 25, 0.4);
  padding: 5px;
  cursor: pointer;
}

button:focus {
  outline: 0;
}

.app {
  display: flex;
  flex-direction: column;
  height: 100vh;
}

.app-header {
  flex-grow: 1;
  white-space: nowrap;
  overflow: hidden;
  text-overflow: ellipsis;
}

.main {
  display: flex;
  flex-direction: column;
  flex-grow: 1;
  overflow: auto;
  background: white;
}

.main::-webkit-scrollbar {
  width: 0;
  height: 0;
  background: inherit;
}

header {
  background: #d2edf4;
  background-image: linear-gradient(to bottom, #d0edf5, #e1e5f0 100%);
  padding: 20px 15px 15px 15px;
  position: relative;
  box-shadow: 0 3px 3px rgba(34, 25, 25, 0.4);
}

.app-bar {
  display: flex;
  justify-content: space-between;
}

.app-bar h1 {
  font-size: 1.5em;
  margin: 0;
  display: inline-block;
  margin-right: 1em;
}

.task-form {
  display: flex;
  margin: 16px;
}

.task-form > input {
  flex-grow: 1;
  box-sizing: border-box;
  padding: 10px 6px;
  background: transparent;
  border: 1px solid #aaa;
  width: 100%;
  font-size: 1em;
  margin-right: 16px;
}

.task-form > input:focus {
  outline: 0;
}

.task-form > button {
  min-width: 100px;
  height: 95%;
  background-color: #315481;
}

.tasks {
  list-style-type: none;
  padding-inline-start: 0;
  padding-left: 16px;
  padding-right: 16px;
  margin-block-start: 0;
  margin-block-end: 0;
}

.tasks > li {
  display: flex;
  padding: 16px;
  border-bottom: #eee solid 1px;
  align-items: center;
}

.tasks > li > label {
  flex-grow: 1;
}

.tasks > li > button {
  justify-self: flex-end;
  background-color: #ff3046;
}
如果你想了解有关此样式表的更多信息,请查看有关 Flexbox 的这篇文章,以及来自 Wes Bos 的关于它的免费 视频教程。
¥If you want to learn more about this stylesheet check this article about Flexbox, and also this free video tutorial about it from Wes Bos.
Flexbox 是分发和对齐 UI 中元素的绝佳工具。
¥Flexbox is an excellent tool to distribute and align elements in your UI.
5.2:应用样式
¥5.2: Applying styles
现在,你需要在组件周围添加一些元素。你将在 App.jsx 的主 div 中添加一个 class,在 h1 周围添加一个 header 元素和几个 div 元素,并在表单和列表周围添加一个主 div。请查看下面的示例;请注意类名,它们必须与 CSS 文件中的名称相同:
¥Now you need to add some elements around your components. You are going to add a class to your main div in the App.jsx, also a header element with a few div elements around your h1, and a main div around your form and list. Check below how it should be; pay attention to the name of the classes, they need to be the same as in the CSS file:
jsx
import { createSignal, For, Show } from "solid-js";
import { Meteor } from "meteor/meteor";
import { Tracker } from "meteor/tracker";
import { TasksCollection } from "../api/TasksCollection";
import { Task } from "./Task.jsx";

export const App = () => {
  const [newTask, setNewTask] = createSignal('');

  const addTask = async (event) => {
    event.preventDefault();
    if (newTask().trim()) {
      await Meteor.callAsync("tasks.insert", {
        text: newTask(),
        createdAt: new Date(),
      });
      setNewTask('');
    }
  };

  const subscription = Meteor.subscribe("tasks");
  const [isReady, setIsReady] = createSignal(subscription.ready());
  const [tasks, setTasks] = createSignal([]);

  Tracker.autorun(async () => {
    setIsReady(subscription.ready());
    setTasks(await TasksCollection.find({}, { sort: { createdAt: -1, _id: -1 } }).fetchAsync());
  });

  return (
    <div class="app">
      <header>
        <div class="app-bar">
          <div class="app-header">
            <h1>📝️ Todo List</h1>
          </div>
        </div>
      </header>

      <div class="main">
        <form class="task-form" onSubmit={addTask}>
          <input
            type="text"
            placeholder="Type to add new tasks"
            value={newTask()}
            onInput={(e) => setNewTask(e.currentTarget.value)}
          />
          <button type="submit">Add Task</button>
        </form>

        <Show
          when={isReady()}
          fallback={<div>Loading ...</div>}
        >
          <ul class="tasks">
            <For each={tasks()}>
              {(task) => (
                <Task task={task} />
              )}
            </For>
          </ul>
        </Show>
      </div>
    </div>
  );
};
你的应用应如下所示:
¥Your app should look like this:
在下一步中,我们将使此任务列表更具交互性,例如,提供一种过滤任务的方法。
¥In the next step, we are going to make this task list more interactive, for example, providing a way to filter tasks.
6:过滤任务
¥6: Filter tasks
在此步骤中,你将按状态过滤任务并显示待处理任务的数量。
¥In this step, you will filter your tasks by status and show the number of pending tasks.
6.1:响应式状态
¥6.1: Reactive State
首先,你将添加一个按钮,用于显示或隐藏列表中已完成的任务。
¥First, you will add a button to show or hide the completed tasks from the list.
在 Solid 中,我们使用信号来管理组件状态以实现响应式。Solid 的细粒度响应式会在状态更改时自动更新 UI。
¥In Solid, we manage component state using signals for reactivity. Solid's fine-grained reactivity will automatically update the UI when the state changes.
我们将向 App.jsx 组件添加一个 hideCompleted 变量和一个用于切换该变量的函数。
¥We'll add a hideCompleted variable to the App.jsx component and a function to toggle it.
jsx
import { createSignal, For, Show } from "solid-js";
import { Meteor } from "meteor/meteor";
import { Tracker } from "meteor/tracker";
import { TasksCollection } from "../api/TasksCollection";
import { Task } from "./Task.jsx";

export const App = () => {
  const [newTask, setNewTask] = createSignal('');
  const [hideCompleted, setHideCompleted] = createSignal(false);

  const addTask = async (event) => {
    event.preventDefault();
    if (newTask().trim()) {
      await Meteor.callAsync("tasks.insert", {
        text: newTask(),
        createdAt: new Date(),
      });
      setNewTask('');
    }
  };

  const toggleHideCompleted = () => {
    setHideCompleted(!hideCompleted());
  };

  const subscription = Meteor.subscribe("tasks");
  const [isReady, setIsReady] = createSignal(subscription.ready());
  const [tasks, setTasks] = createSignal([]);

  Tracker.autorun(async () => {
    setIsReady(subscription.ready());
    setTasks(await TasksCollection.find({}, { sort: { createdAt: -1, _id: -1 } }).fetchAsync());
  });

  // markup will be updated in next steps
};
然后,在标记中添加按钮以切换状态:
¥Then, add the button in the markup to toggle the state:
jsx
// ... javascript above remains the same

return (
  <div class="app">
    <header>
      <div class="app-bar">
        <div class="app-header">
          <h1>📝️ Todo List</h1>
        </div>
      </div>
    </header>

    <div class="main">
      <form class="task-form" onSubmit={addTask}>
        <input
          type="text"
          placeholder="Type to add new tasks"
          value={newTask()}
          onInput={(e) => setNewTask(e.currentTarget.value)}
        />
        <button type="submit">Add Task</button>
      </form>

      <div class="filter"> // [!code highlight]
        <button onClick={toggleHideCompleted}> // [!code highlight]
          <Show
            when={hideCompleted()}
            fallback="Hide Completed"
          > // [!code highlight]
            Show All // [!code highlight]
          </Show> // [!code highlight]
        </button> // [!code highlight]
      </div> // [!code highlight]

      <Show
        when={isReady()}
        fallback={<div>Loading ...</div>}
      >
        <ul class="tasks">
          <For each={tasks()}>
            {(task) => (
              <Task task={task} />
            )}
          </For>
        </ul>
      </Show>
    </div>
  </div>
);
你可能注意到我们使用 <Show> 来设置按钮文本。你可以了解更多关于 Solid 的条件渲染 此处 的信息。
¥You may notice we’re using <Show> for the button text. You can learn more about Solid's conditional rendering here.
6.2:按钮样式
¥6.2: Button style
你应该为按钮添加一些样式,使其看起来不会是灰色的并且没有很好的对比度。你可以使用以下样式作为参考:
¥You should add some style to your button so it does not look gray and without a good contrast. You can use the styles below as a reference:
css
.filter {
  display: flex;
  justify-content: center;
}

.filter > button {
  background-color: #62807e;
}
6.3:过滤任务
¥6.3: Filter Tasks
现在,更新响应式任务获取,以便在 hideCompleted 为真时应用过滤器。我们还将使用另一个 Tracker.autorun 来添加一个用于统计未完成任务数量的响应式信号。
¥Now, update the reactive tasks fetch to apply the filter if hideCompleted is true. We'll also add a reactive signal for the incomplete count using another Tracker.autorun.
jsx
import { createSignal, For, Show } from "solid-js";
import { Meteor } from "meteor/meteor";
import { Tracker } from "meteor/tracker";
import { TasksCollection } from "../api/TasksCollection";
import { Task } from "./Task.jsx";

export const App = () => {
  const [newTask, setNewTask] = createSignal('');
  const [hideCompleted, setHideCompleted] = createSignal(false);

  const addTask = async (event) => {
    event.preventDefault();
    if (newTask().trim()) {
      await Meteor.callAsync("tasks.insert", {
        text: newTask(),
        createdAt: new Date(),
      });
      setNewTask('');
    }
  };

  const toggleHideCompleted = () => {
    setHideCompleted(!hideCompleted());
  };

  const subscription = Meteor.subscribe("tasks");
  const [isReady, setIsReady] = createSignal(subscription.ready());
  const [tasks, setTasks] = createSignal([]);

  Tracker.autorun(async () => {
    setIsReady(subscription.ready());
    const query = hideCompleted() ? { isChecked: { $ne: true } } : {};
    setTasks(await TasksCollection.find(query, { sort: { createdAt: -1, _id: -1 } }).fetchAsync());
  });

  // Reactive incomplete count //
  const [incompleteCount, setIncompleteCount] = createSignal(0);
  Tracker.autorun(async () => {
    setIncompleteCount(await TasksCollection.find({ isChecked: { $ne: true } }).countAsync());
  });

  // markup remains the same
};
6.4:Meteor Dev Tools 扩展
¥6.4: Meteor Dev Tools Extension
你可以安装扩展程序以可视化 Mini Mongo 中的数据。
¥You can install an extension to visualize the data in your Mini Mongo.
Meteor DevTools Evolved 将帮助你调试应用,因为你可以看到 Mini Mongo 上有什么数据。
¥Meteor DevTools Evolved will help you to debug your app as you can see what data is on Mini Mongo.

你还可以查看 Meteor 从服务器发送和接收的所有消息,这对你了解 Meteor 的工作原理很有用。
¥You can also see all the messages that Meteor is sending and receiving from the server, this is useful for you to learn more about how Meteor works.
使用此 link 将其安装在你的 Google Chrome 浏览器中。
¥Install it in your Google Chrome browser using this link.
6.5:待处理任务
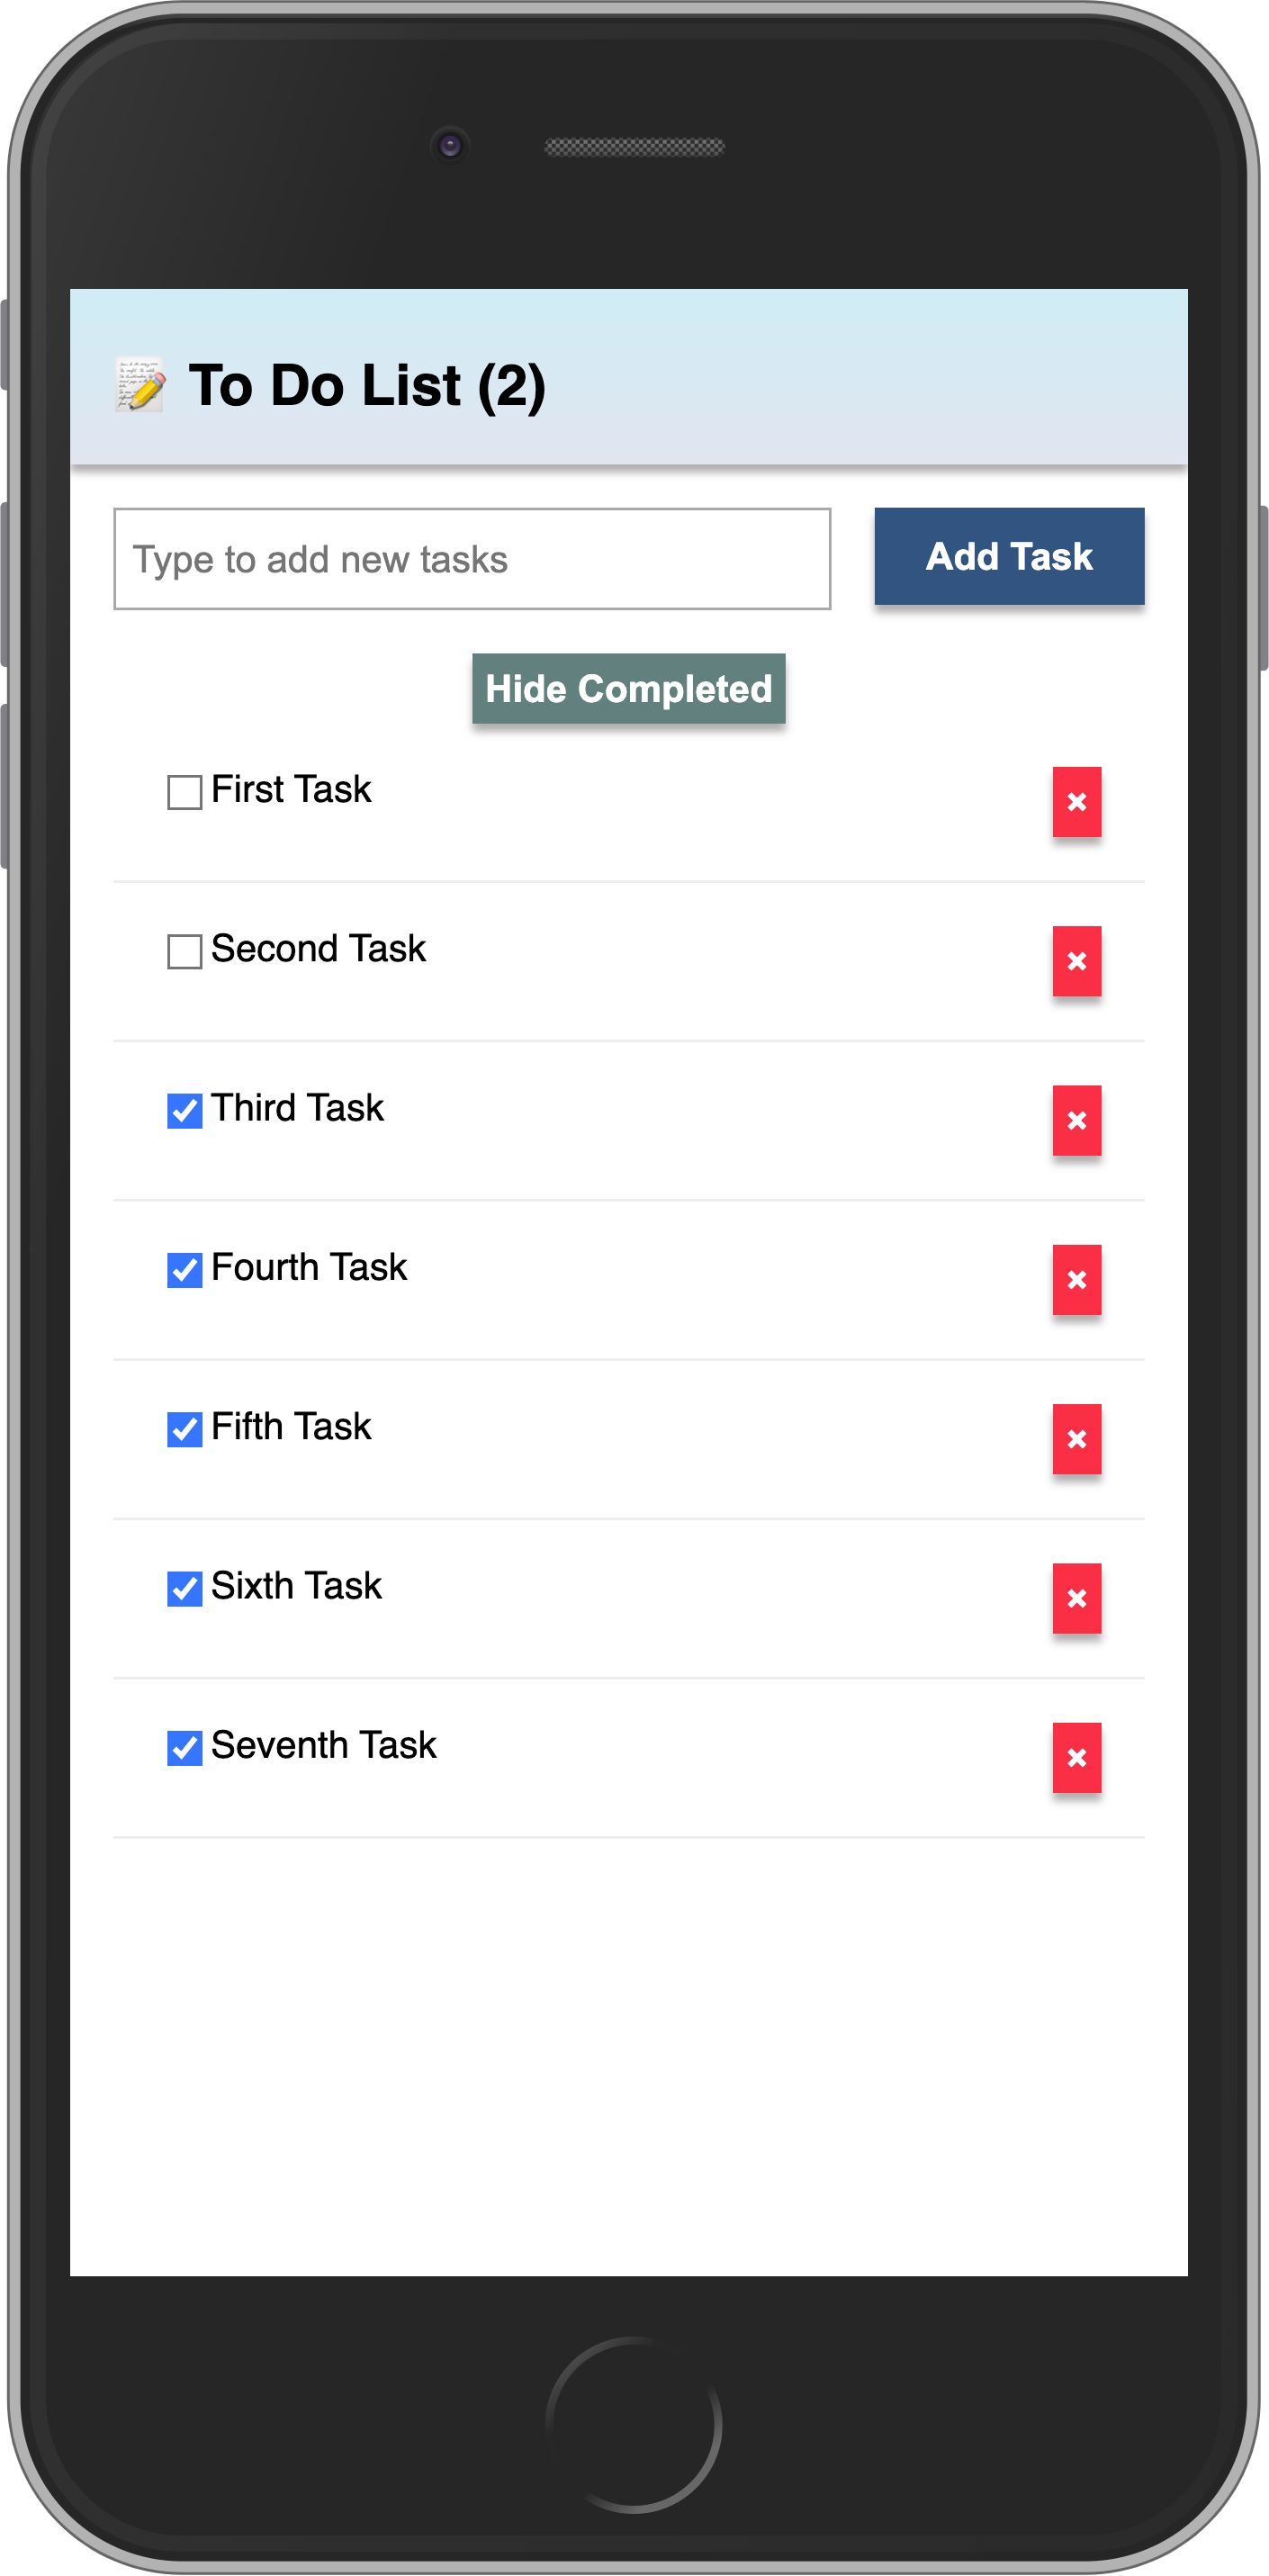
¥6.5: Pending tasks
更新 App 组件以显示应用栏中待处理任务的数量。
¥Update the App component in order to show the number of pending tasks in the app bar.
当没有待处理任务时,你应该避免在应用栏中添加零。在头部使用响应式 incompleteCount:
¥You should avoid adding zero to your app bar when there are no pending tasks. Use the reactive incompleteCount in the header:
jsx
// ... javascript with incompleteCount remains the same

return (
  <div class="app">
    <header>
      <div class="app-bar">
        <div class="app-header">
          <h1>📝️ To Do List {incompleteCount() > 0 ? `(${incompleteCount()})` : ''}</h1> // [!code highlight]
        </div>
      </div>
    </header>

    // rest of markup
  </div>
);
6.6:实现隐藏/显示切换功能
¥6.6: Make the Hide/Show toggle work
如果你尝试“隐藏/显示已完成”切换按钮,你会发现文本发生了变化,但实际上任务列表没有任何变化。切换按钮未触发预期的过滤,因为 hideCompleted 信号(来自 Solid)未与 Meteor 的 Tracker 响应系统集成。Tracker.autorun 仅在其内部依赖(例如订阅数据或 ReactiveVars)更改时才会重新运行,而不是在 Solid 信号更改时重新运行。所以,通过 setHideCompleted 更新 hideCompleted 会更改按钮文本(通过 Solid 的 <Show>),但它不会重新执行自动运行来更新查询并重新获取任务。
¥If you try the Hide/Show completed toggle button you'll see that the text changes but it doesn't actually do anything to the list of tasks. The toggle button isn't triggering the expected filtering because the hideCompleted signal (from Solid) isn't integrated with Meteor's Tracker reactivity system. Tracker.autorun only re-runs when its internal dependencies (like subscription data or ReactiveVars) change—not when Solid signals change. So, updating hideCompleted via setHideCompleted changes the button text (via Solid's <Show>), but it doesn't re-execute the autorun to update the query and re-fetch tasks.
这是将 Solid 的细粒度响应式与 Meteor 的 Tracker 连接起来时常见的挑战。我将在下面解释如何通过对代码的最小改动来修复此问题。
¥This is a common challenge when bridging Solid's fine-grained reactivity with Meteor's Tracker. I'll explain the fix below with minimal changes to your code.
为了让 Tracker 对 hideCompleted 中的更改做出反应,我们将使用 Meteor 的 ReactiveVar 来保存过滤器状态。这使得 Tracker 中的值具有响应性,因此当值更改时,自动运行会自动重新运行。我们将把它与你的 Solid 信号同步,用于 UI。
¥To make Tracker react to changes in hideCompleted, we'll use Meteor's ReactiveVar to hold the filter state. This makes the value reactive within Tracker, so the autorun re-runs automatically when it changes. We'll sync it with your Solid signal for the UI.
在 App.jsx 文件顶部添加此导入语句
¥Add this import at the top of App.jsx
jsx
import { ReactiveVar } from 'meteor/reactive-var';初始化一个 ReactiveVar 并使用 Solid createEffect 使其与你的 hideCompleted 信号保持同步。按如下方式更新你的 App 组件:
¥Initialize a ReactiveVar and use a Solid createEffect to keep it in sync with your hideCompleted signal. Update your App component like this:
在 App.jsx 文件顶部添加此导入语句
¥Add this import at the top of App.jsx
jsx
...
import { createSignal, For, Show, createEffect } from "solid-js"; // Updated import
...
export const App = () => {
const [newTask, setNewTask] = createSignal('');
const [hideCompleted, setHideCompleted] = createSignal(false);
// New: ReactiveVar for Tracker integration
const hideCompletedVar = new ReactiveVar(false);
// New: Sync Solid signal to ReactiveVar (triggers Tracker re-run) //
createEffect(() => {
hideCompletedVar.set(hideCompleted());
});
const addTask = async (event) => {
event.preventDefault();
if (newTask().trim()) {
await Meteor.callAsync("tasks.insert", {
text: newTask(),
createdAt: new Date(),
});
setNewTask('');
}
};
const toggleHideCompleted = () => {
setHideCompleted(!hideCompleted());
};
const subscription = Meteor.subscribe("tasks");
const [isReady, setIsReady] = createSignal(subscription.ready());
const [tasks, setTasks] = createSignal([]);
Tracker.autorun(async () => {
setIsReady(subscription.ready());
// Use ReactiveVar in the query for Tracker reactivity //
const query = hideCompletedVar.get() ? { isChecked: { $ne: true } } : {};
setTasks(await TasksCollection.find(query, { sort: { createdAt: -1, _id: -1 } }).fetchAsync());
});
// Reactive incomplete count (unchanged)
const [incompleteCount, setIncompleteCount] = createSignal(0);
Tracker.autorun(async () => {
setIncompleteCount(await TasksCollection.find({ isChecked: { $ne: true } }).countAsync());
});
// Return statement remains the same
return (
// ... your JSX here, unchanged
);
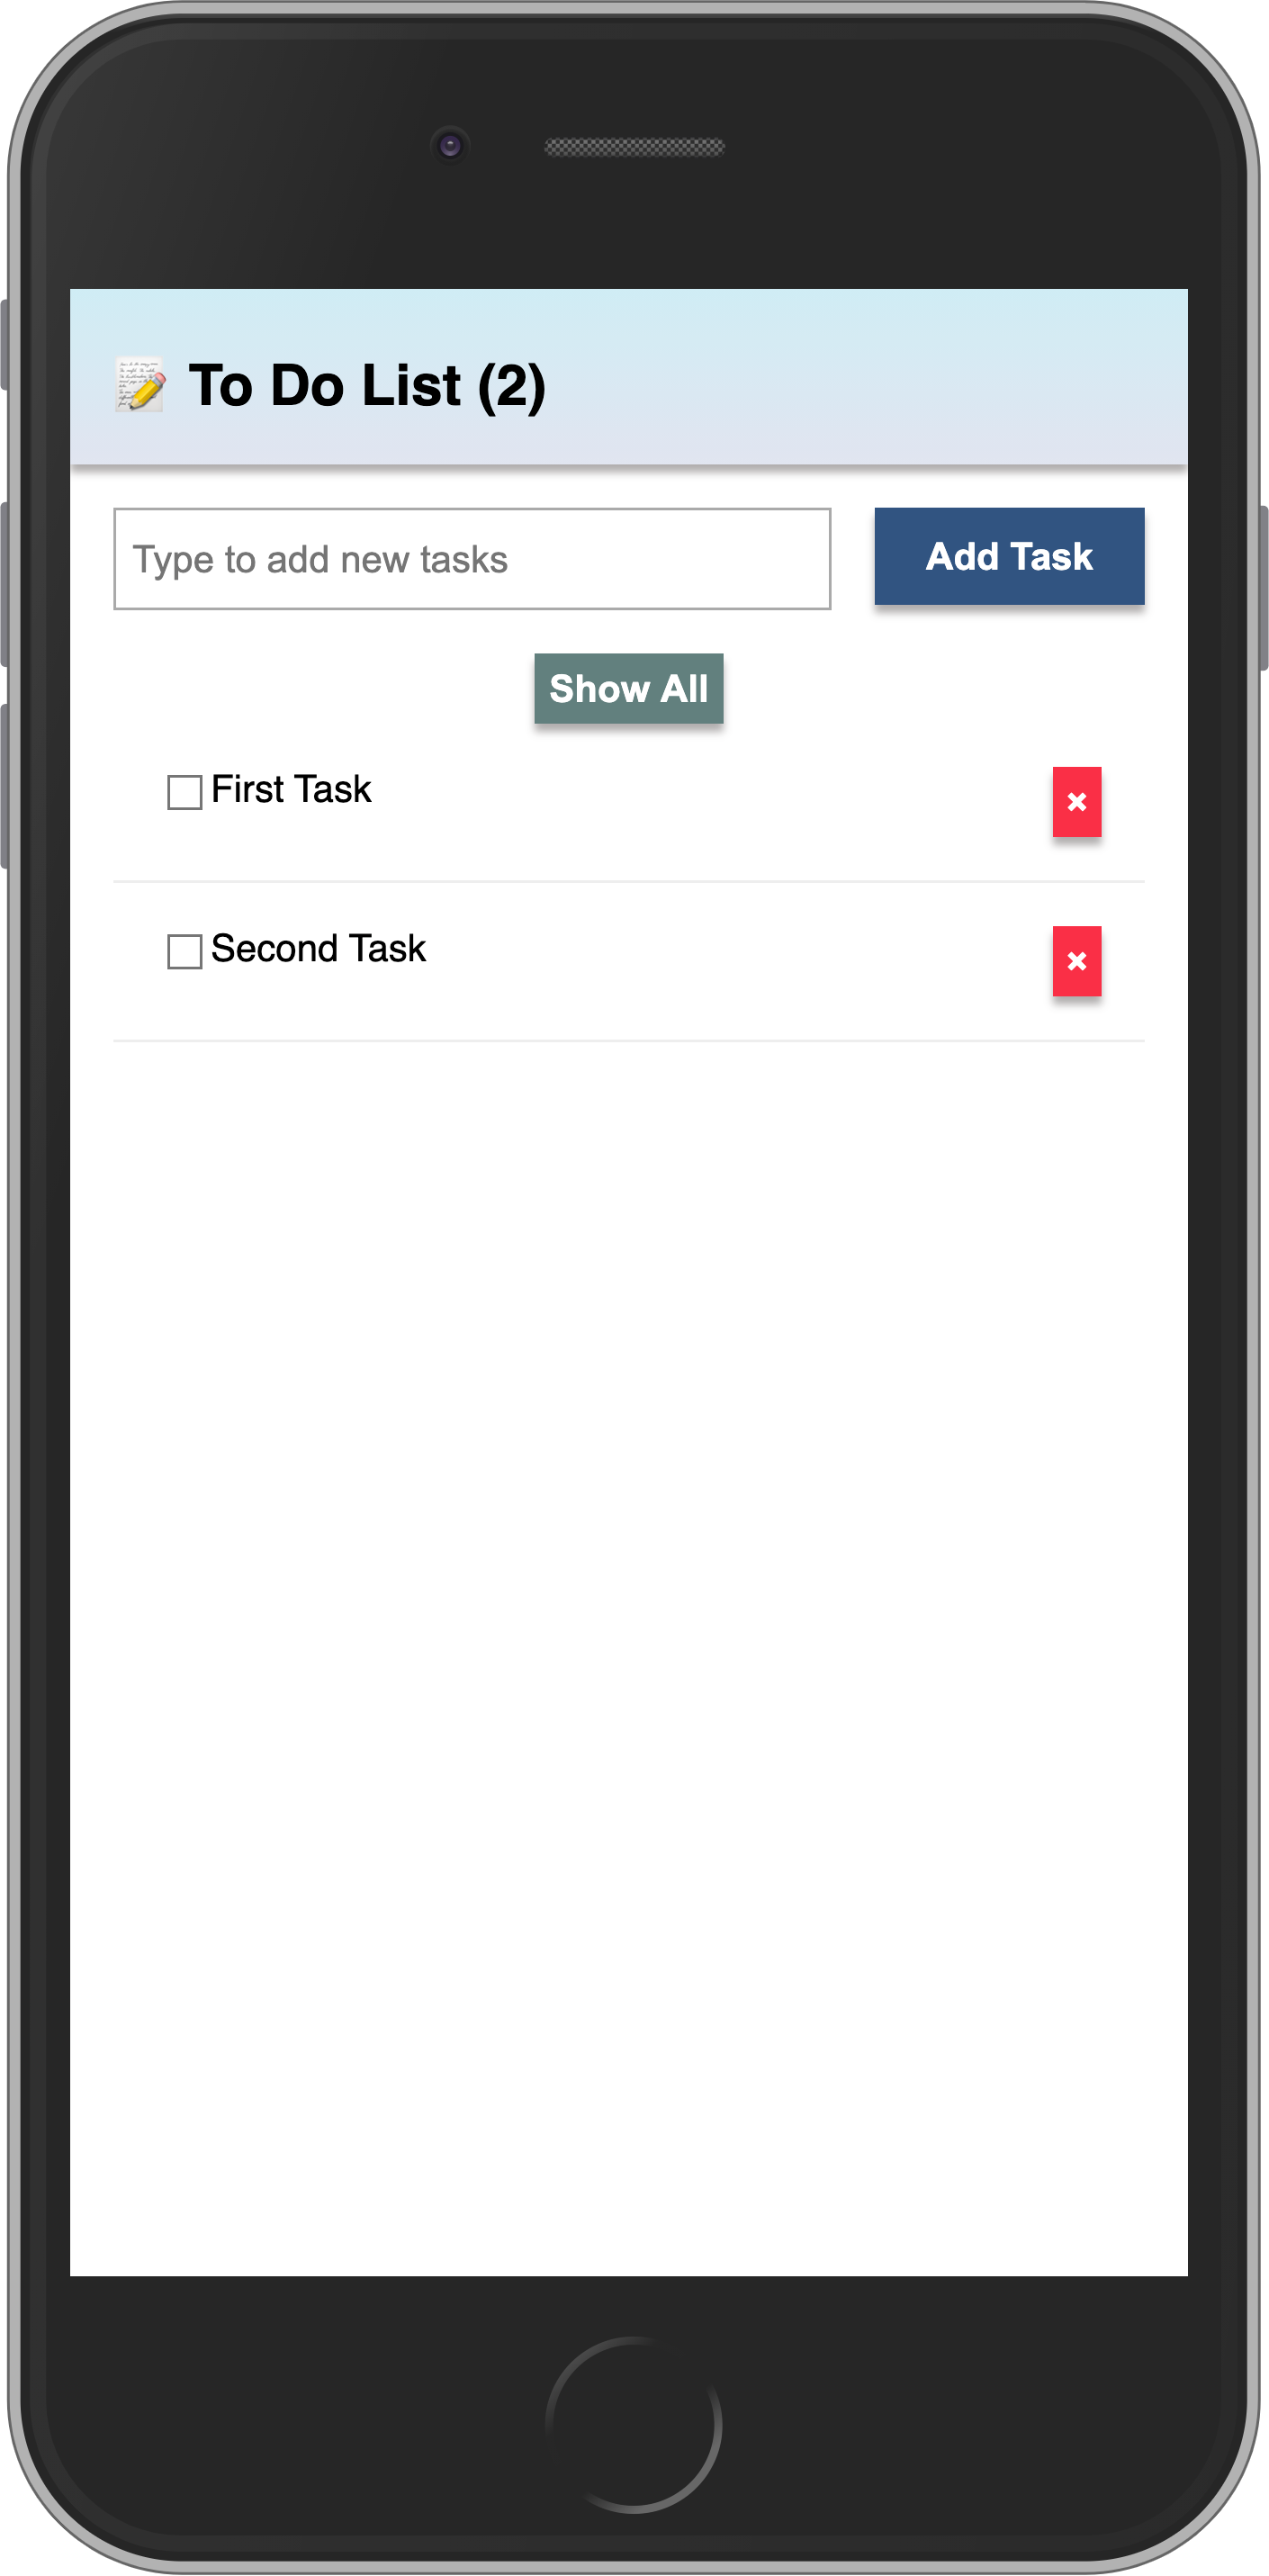
};工作原理:
¥Why this works:
ReactiveVar桥接了系统:当你切换hideCompleted(Solid 信号)时,createEffect会更新ReactiveVar。这将使 Tracker.autorun 失效并重新运行,从而使用更新后的查询重新获取任务。¥
ReactiveVarbridges the systems: When you togglehideCompleted(Solid signal), thecreateEffectupdates theReactiveVar. This invalidates and re-runs the Tracker.autorun, which re-fetches tasks with the updated query.无需重大重写:你现有的信号和 UI 逻辑将保持不变。
¥No major rewrites: Your existing signals and UI logic stay intact.
性能:Tracker 可以高效地处理重新获取数据,而 Solid 则通过
tasks信号更新 UI。¥Performance: Tracker handles the re-fetch efficiently, and Solid updates the UI via the
taskssignal.
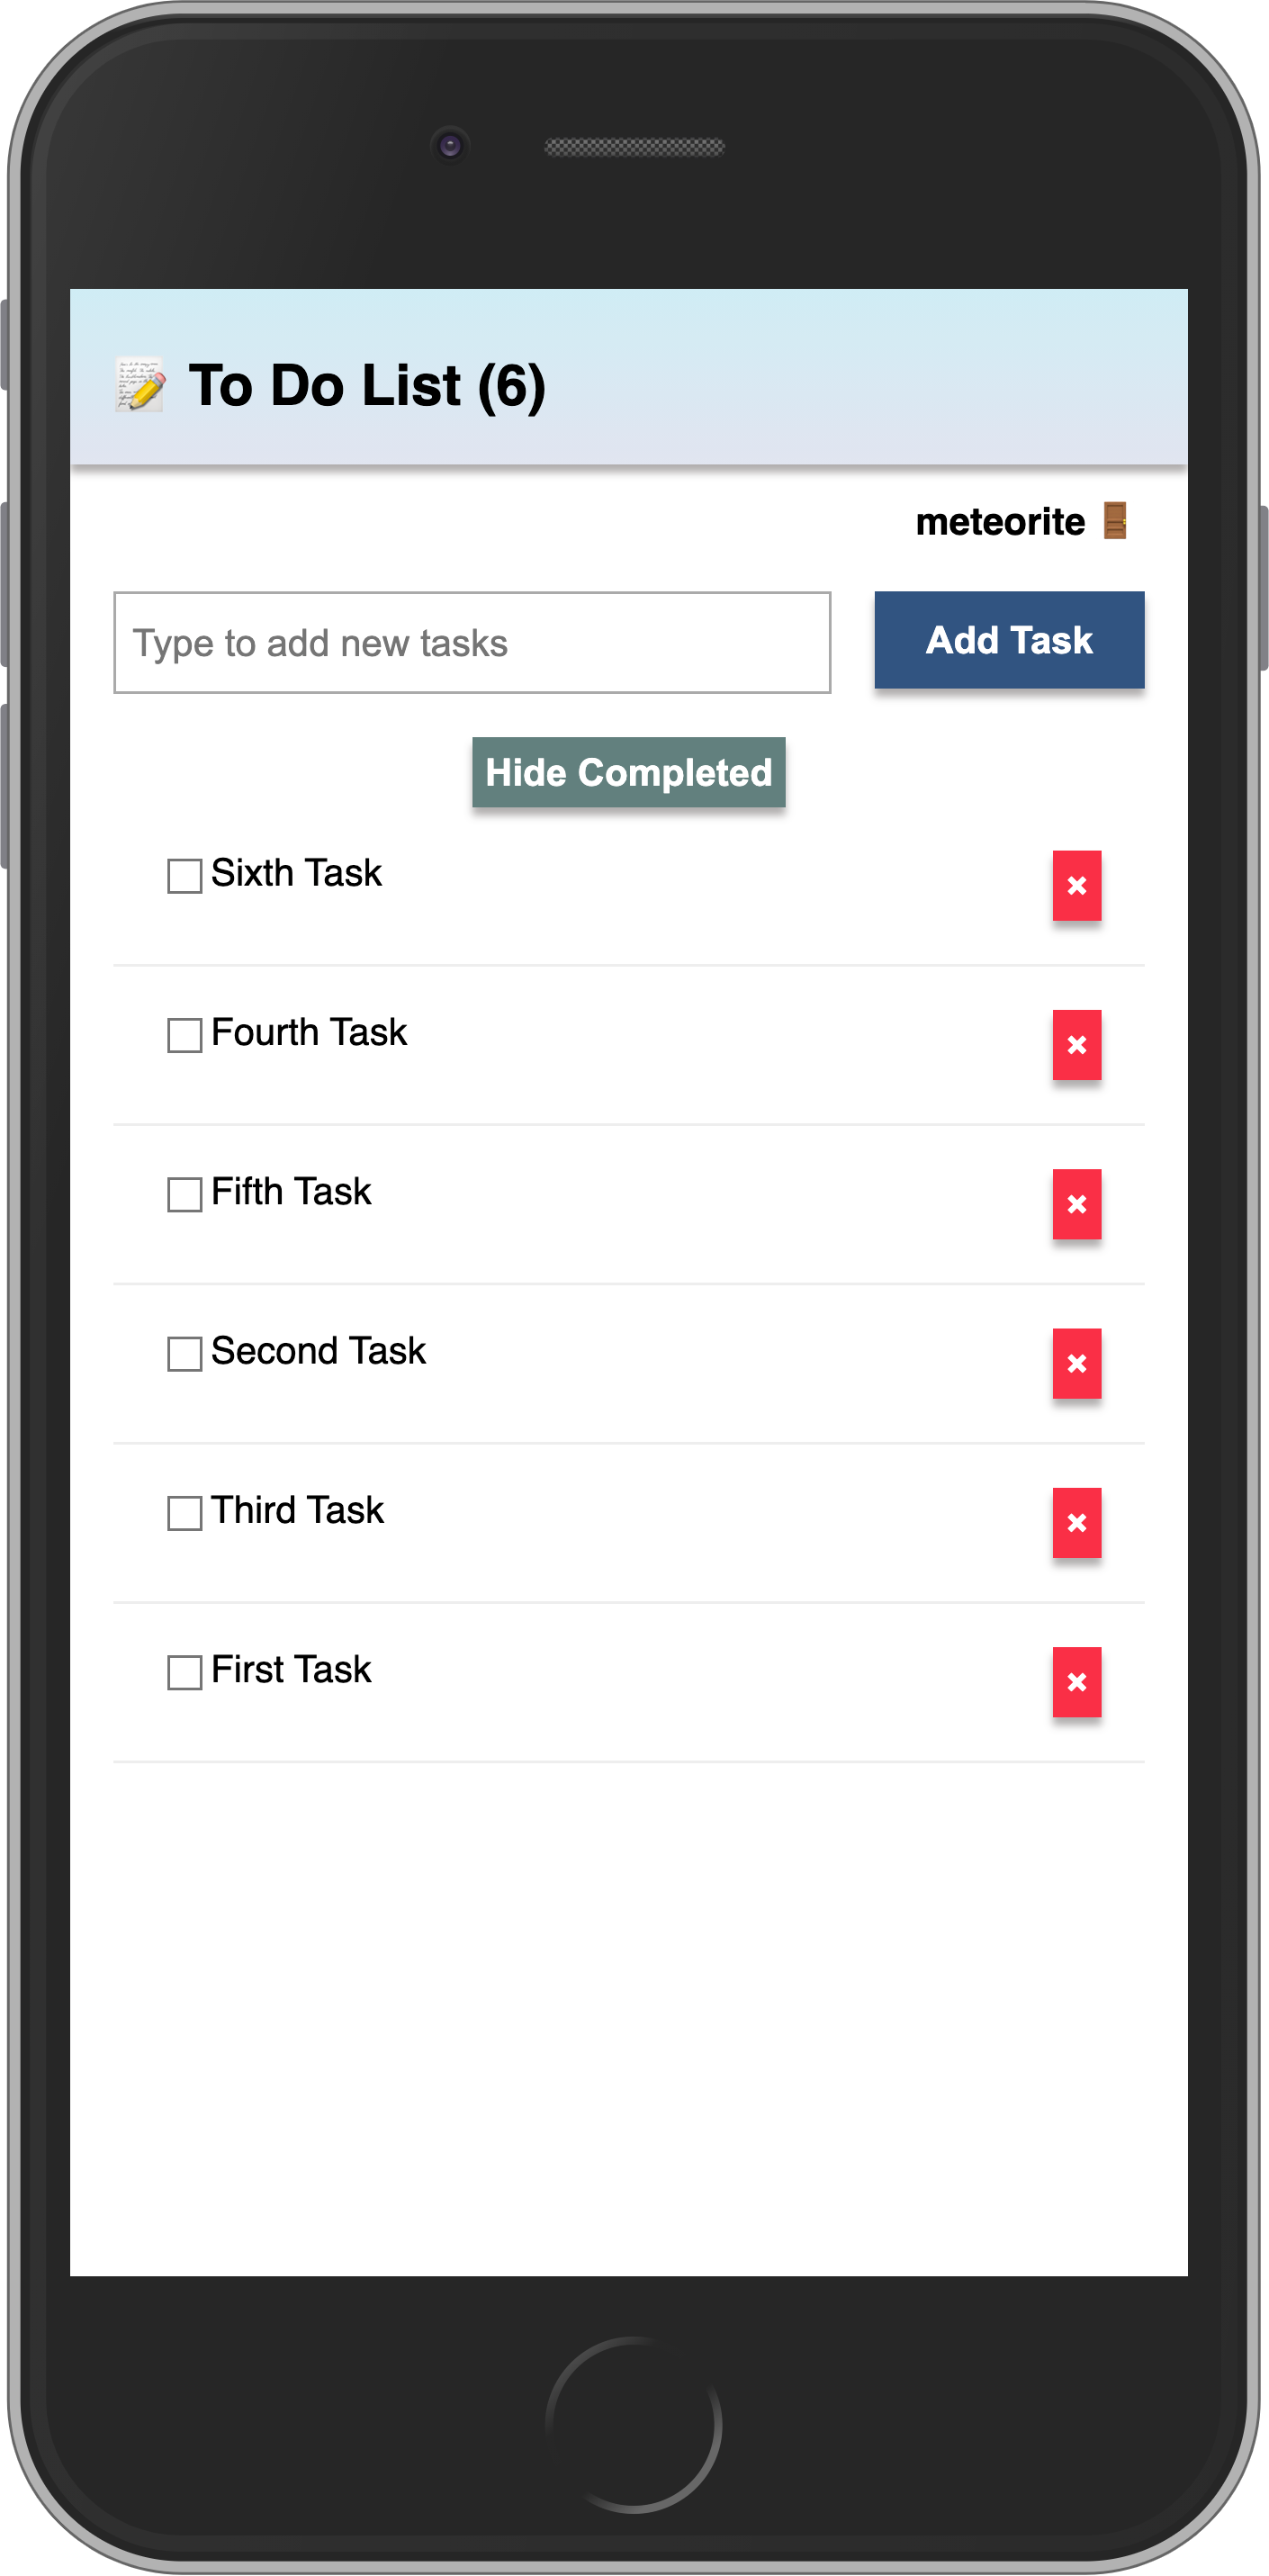
你的应用应如下所示:
¥Your app should look like this:
下一步,我们将在你的应用中包含用户访问权限。
¥In the next step we are going to include user access in your app.
7:添加用户账户
¥7: Adding User Accounts
7.1:密码身份验证
¥7.1: Password Authentication
Meteor 已经自带了一个基本的开箱即用的身份验证和账户管理系统,因此你只需添加 accounts-password 即可启用用户名和密码身份验证:
¥Meteor already comes with a basic authentication and account management system out of the box, so you only need to add the accounts-password to enable username and password authentication:
shell
meteor add accounts-password支持更多身份验证方法。你可以阅读有关账户系统 此处 的更多信息。
¥There are many more authentication methods supported. You can read more about the accounts system here.
我们还建议你安装 bcrypt Node 模块,否则你将看到一条警告,提示你正在使用它的纯 Javascript 实现。
¥We also recommend you to install bcrypt node module, otherwise, you are going to see a warning saying that you are using a pure-Javascript implementation of it.
shell
meteor npm install --save bcrypt你应该始终使用
meteor npm而不是仅使用npm,因此你始终使用 Meteor 固定的npm版本,这有助于你避免由于不同版本的 npm 安装不同的模块而导致的问题。¥You should always use
meteor npminstead of onlynpmso you always use thenpmversion pinned by Meteor, this helps you to avoid problems due to different versions of npm installing different modules.
7.2:创建用户账户
¥7.2: Create User Account
现在你可以为我们的应用创建一个默认用户,我们将使用 meteorite 作为用户名,如果我们在数据库中找不到它,我们只需在服务器启动时创建一个新用户。
¥Now you can create a default user for our app, we are going to use meteorite as username, we just create a new user on server startup if we didn't find it in the database.
js
import { Meteor } from 'meteor/meteor';
import { Accounts } from 'meteor/accounts-base';
import { TasksCollection } from '/imports/api/TasksCollection';
import "../imports/api/TasksPublications";
import "../imports/api/TasksMethods";

const SEED_USERNAME = 'meteorite';
const SEED_PASSWORD = 'password';

Meteor.startup(async () => {
  if (!(await Accounts.findUserByUsername(SEED_USERNAME))) {
    await Accounts.createUser({
      username: SEED_USERNAME,
      password: SEED_PASSWORD,
    });
  }

  ...
});
你目前不应该在应用 UI 中看到任何不同。
¥You should not see anything different in your app UI yet.
7.3:登录表单
¥7.3: Login Form
你需要为用户提供一种输入凭据和身份验证的方式,为此我们需要一个表单。
¥You need to provide a way for the users to input the credentials and authenticate, for that we need a form.
我们的登录表单将很简单,只有两个字段(用户名和密码)和一个按钮。你应该使用 Meteor.loginWithPassword(username, password);使用提供的输入对用户进行身份验证。
¥Our login form will be simple, with just two fields (username and password) and a button. You should use Meteor.loginWithPassword(username, password); to authenticate your user with the provided inputs.
在 imports/ui/ 中创建一个新的组件 Login.jsx:
¥Create a new component Login.jsx in imports/ui/:
jsx
import { createSignal } from "solid-js";
import { Meteor } from "meteor/meteor";

export const Login = () => {
  const [username, setUsername] = createSignal('');
  const [password, setPassword] = createSignal('');

  const login = async (event) => {
    event.preventDefault();
    await Meteor.loginWithPassword(username(), password());
  };

  return (
    <form class="login-form" onSubmit={login}>
      <div>
        <label for="username">Username</label>
        <input
          type="text"
          placeholder="Username"
          name="username"
          required
          value={username()}
          onInput={(e) => setUsername(e.currentTarget.value)}
        />
      </div>

      <div>
        <label for="password">Password</label>
        <input
          type="password"
          placeholder="Password"
          name="password"
          required
          value={password()}
          onInput={(e) => setPassword(e.currentTarget.value)}
        />
      </div>
      <div>
        <button type="submit">Log In</button>
      </div>
    </form>
  );
};
请务必在 App.jsx 中导入登录表单。
¥Be sure also to import the login form in App.jsx.
jsx
import { ReactiveVar } from 'meteor/reactive-var';
import { createSignal, For, Show, createEffect } from "solid-js";
import { Meteor } from "meteor/meteor";
import { Tracker } from "meteor/tracker";
import { TasksCollection } from "../api/TasksCollection";
import { Task } from "./Task.jsx";
import { Login } from "./Login.jsx";

// ... rest of the script
好的,现在你有了一个表单,让我们使用它。
¥Ok, now you have a form, let's use it.
7.4:需要身份验证
¥7.4: Require Authentication
我们的应用应该只允许经过身份验证的用户访问其任务管理功能。
¥Our app should only allow an authenticated user to access its task management features.
我们可以通过在未登录用户时渲染 Login 组件来实现这一点。否则,我们将渲染表单、筛选器和列表。
¥We can accomplish that by rendering the Login component when we don’t have an authenticated user. Otherwise, we render the form, filter, and list.
为了实现这一点,我们将在 App.jsx 中使用条件语句 <Show>:
¥To achieve this, we will use a conditional <Show> in App.jsx:
jsx
// ... other imports and code

const [currentUser, setCurrentUser] = createSignal(Meteor.user()); // Reactive current user //
Tracker.autorun(() => {
  setCurrentUser(Meteor.user());
});

// ... rest of script

return (
  <div class="app">
    <header>
      <div class="app-bar">
        <div class="app-header">
          <h1>📝️ To Do List {incompleteCount() > 0 ? `(${incompleteCount()})` : ''}</h1>
        </div>
      </div>
    </header>

    <div class="main">
      <Show
        when={currentUser()}
        fallback={<Login />}
      > // [!code highlight]
        <form class="task-form" onSubmit={addTask}>
          <input
            type="text"
            placeholder="Type to add new tasks"
            value={newTask()}
            onInput={(e) => setNewTask(e.currentTarget.value)}
          />
          <button type="submit">Add Task</button>
        </form>

        <div class="filter">
          <button onClick={toggleHideCompleted}>
            <Show
              when={hideCompleted()}
              fallback="Hide Completed"
            >
              Show All
            </Show>
          </button>
        </div>

        <Show
          when={isReady()}
          fallback={<div>Loading ...</div>}
        >
          <ul class="tasks">
            <For each={tasks()}>
              {(task) => (
                <Task task={task} />
              )}
            </For>
          </ul>
        </Show>
      </Show> // [!code highlight]
    </div>
  </div>
);如你所见,如果用户已登录,我们会渲染整个应用(currentUser 为真)。否则,我们将渲染登录组件。
¥As you can see, if the user is logged in, we render the whole app (currentUser is truthy). Otherwise, we render the Login component.
7.5:登录表单样式
¥7.5: Login Form style
好的,现在让我们设置登录表单的样式:
¥Ok, let's style the login form now:
css
.login-form {
  display: flex;
  flex-direction: column;
  height: 100%;

  justify-content: center;
  align-items: center;
}

.login-form > div {
  margin: 8px;
}

.login-form > div > label {
  font-weight: bold;
}

.login-form > div > input {
  flex-grow: 1;
  box-sizing: border-box;
  padding: 10px 6px;
  background: transparent;
  border: 1px solid #aaa;
  width: 100%;
  font-size: 1em;
  margin-right: 16px;
  margin-top: 4px;
}

.login-form > div > input:focus {
  outline: 0;
}

.login-form > div > button {
  background-color: #62807e;
}
现在,你的登录表单应该集中且美观。
¥Now your login form should be centralized and beautiful.
7.6:服务器启动
¥7.6: Server startup
从现在开始,每个任务都应该有一个所有者。所以,按照之前学习的方法,访问你的数据库,并从中删除所有任务:
¥Every task should have an owner from now on. So go to your database, as you learned before, and remove all the tasks from there:
db.tasks.remove({});
更改你的 server/main.js 以使用你的 meteorite 用户作为所有者添加种子任务。
¥Change your server/main.js to add the seed tasks using your meteorite user as owner.
确保在此更改后重新启动服务器,以便 Meteor.startup 块再次运行。无论如何,这可能都会自动发生,因为你将在服务器端代码中进行更改。
¥Make sure you restart the server after this change so Meteor.startup block will run again. This is probably going to happen automatically anyway as you are going to make changes in the server side code.
js
...

  const user = await Accounts.findUserByUsername(SEED_USERNAME);

  if ((await TasksCollection.find().countAsync()) === 0) {
    [
      "First Task",
      "Second Task",
      "Third Task",
      "Fourth Task",
      "Fifth Task",
      "Sixth Task",
      "Seventh Task",
    ].forEach((taskName) => {
      Meteor.callAsync("tasks.insert", {
        text: taskName,
        createdAt: new Date(),
        userId: user._id
      });
    });
  }

...
看到我们正在将一个名为 userId 的新字段与用户 _id 字段一起使用,我们还设置了 createdAt 字段。
¥See that we are using a new field called userId with our user _id field, we are also setting createdAt field.
7.7:任务所有者
¥7.7: Task owner
首先,让我们将发布更改为仅为当前登录的用户发布任务。这对于安全性很重要,因为你只发送属于该用户的数据。
¥First, let's change our publication to publish the tasks only for the currently logged user. This is important for security, as you send only data that belongs to that user.
js
import { Meteor } from "meteor/meteor";
import { TasksCollection } from "./TasksCollection";

Meteor.publish("tasks", function () {
  let result = this.ready();
  const userId = this.userId;
  if (userId) {
    result = TasksCollection.find({ userId });
  }

  return result;
});
现在,在尝试获取任何数据之前,让我们先检查是否存在 currentUser。更新响应式组件 tasks 和 incompleteCount,使其仅在登录后运行:
¥Now let's check if we have a currentUser before trying to fetch any data. Update the reactive tasks and incompleteCount to only run if logged in:
jsx
// ... other imports and code

  Tracker.autorun(async () => {
    setIsReady(subscription.ready());
    if (!Meteor.userId()) { // // Skip if not logged in
      setTasks([]);
      return;
    }
    // Use ReactiveVar in the query for Tracker reactivity
    const query = hideCompletedVar.get() ? { isChecked: { $ne: true } } : {};
    setTasks(await TasksCollection.find(query, { sort: { createdAt: -1, _id: -1 } }).fetchAsync());
  });

  // Reactive incomplete count
  const [incompleteCount, setIncompleteCount] = createSignal(0);
  Tracker.autorun(async () => {
    if (!Meteor.userId()) { // // Skip if not logged in
      setIncompleteCount(0);
      return;
    }
    setIncompleteCount(await TasksCollection.find({ isChecked: { $ne: true } }).countAsync());
  });

// ... rest of component
此外,更新 tasks.insert 方法以在创建新任务时包含字段 userId:
¥Also, update the tasks.insert method to include the field userId when creating a new task:
js
...
Meteor.methods({
  "tasks.insert"(doc) {
    const insertDoc = { ...doc };
    if (!('userId' in insertDoc)) {
      insertDoc.userId = this.userId;
    }
    return TasksCollection.insertAsync(insertDoc);
  },
...
7.8:注销
¥7.8: Log out
我们还可以通过在应用栏下方显示所有者的用户名来组织任务。我们添加一个新的 div,用户可以点击它来退出应用:
¥We can also organize our tasks by showing the owner’s username below our app bar. Let’s add a new div where the user can click and log out from the app:
jsx
...

      <div class="main">
        <Show
          when={currentUser()}
          fallback={<Login />}
        >
          <div class="user" onClick={() => Meteor.logout()}> // [!code highlight]
            {currentUser()?.username} 🚪 // [!code highlight]
          </div> // [!code highlight]

      ...
请记住也要为你的用户名设置样式。
¥Remember to style your username as well.
css
.user {
  display: flex;

  align-self: flex-end;

  margin: 8px 16px 0;
  font-weight: bold;
  cursor: pointer;
}
呼!你在此步骤中做了很多工作。对用户进行身份验证,在任务中设置用户,并为用户提供注销方式。
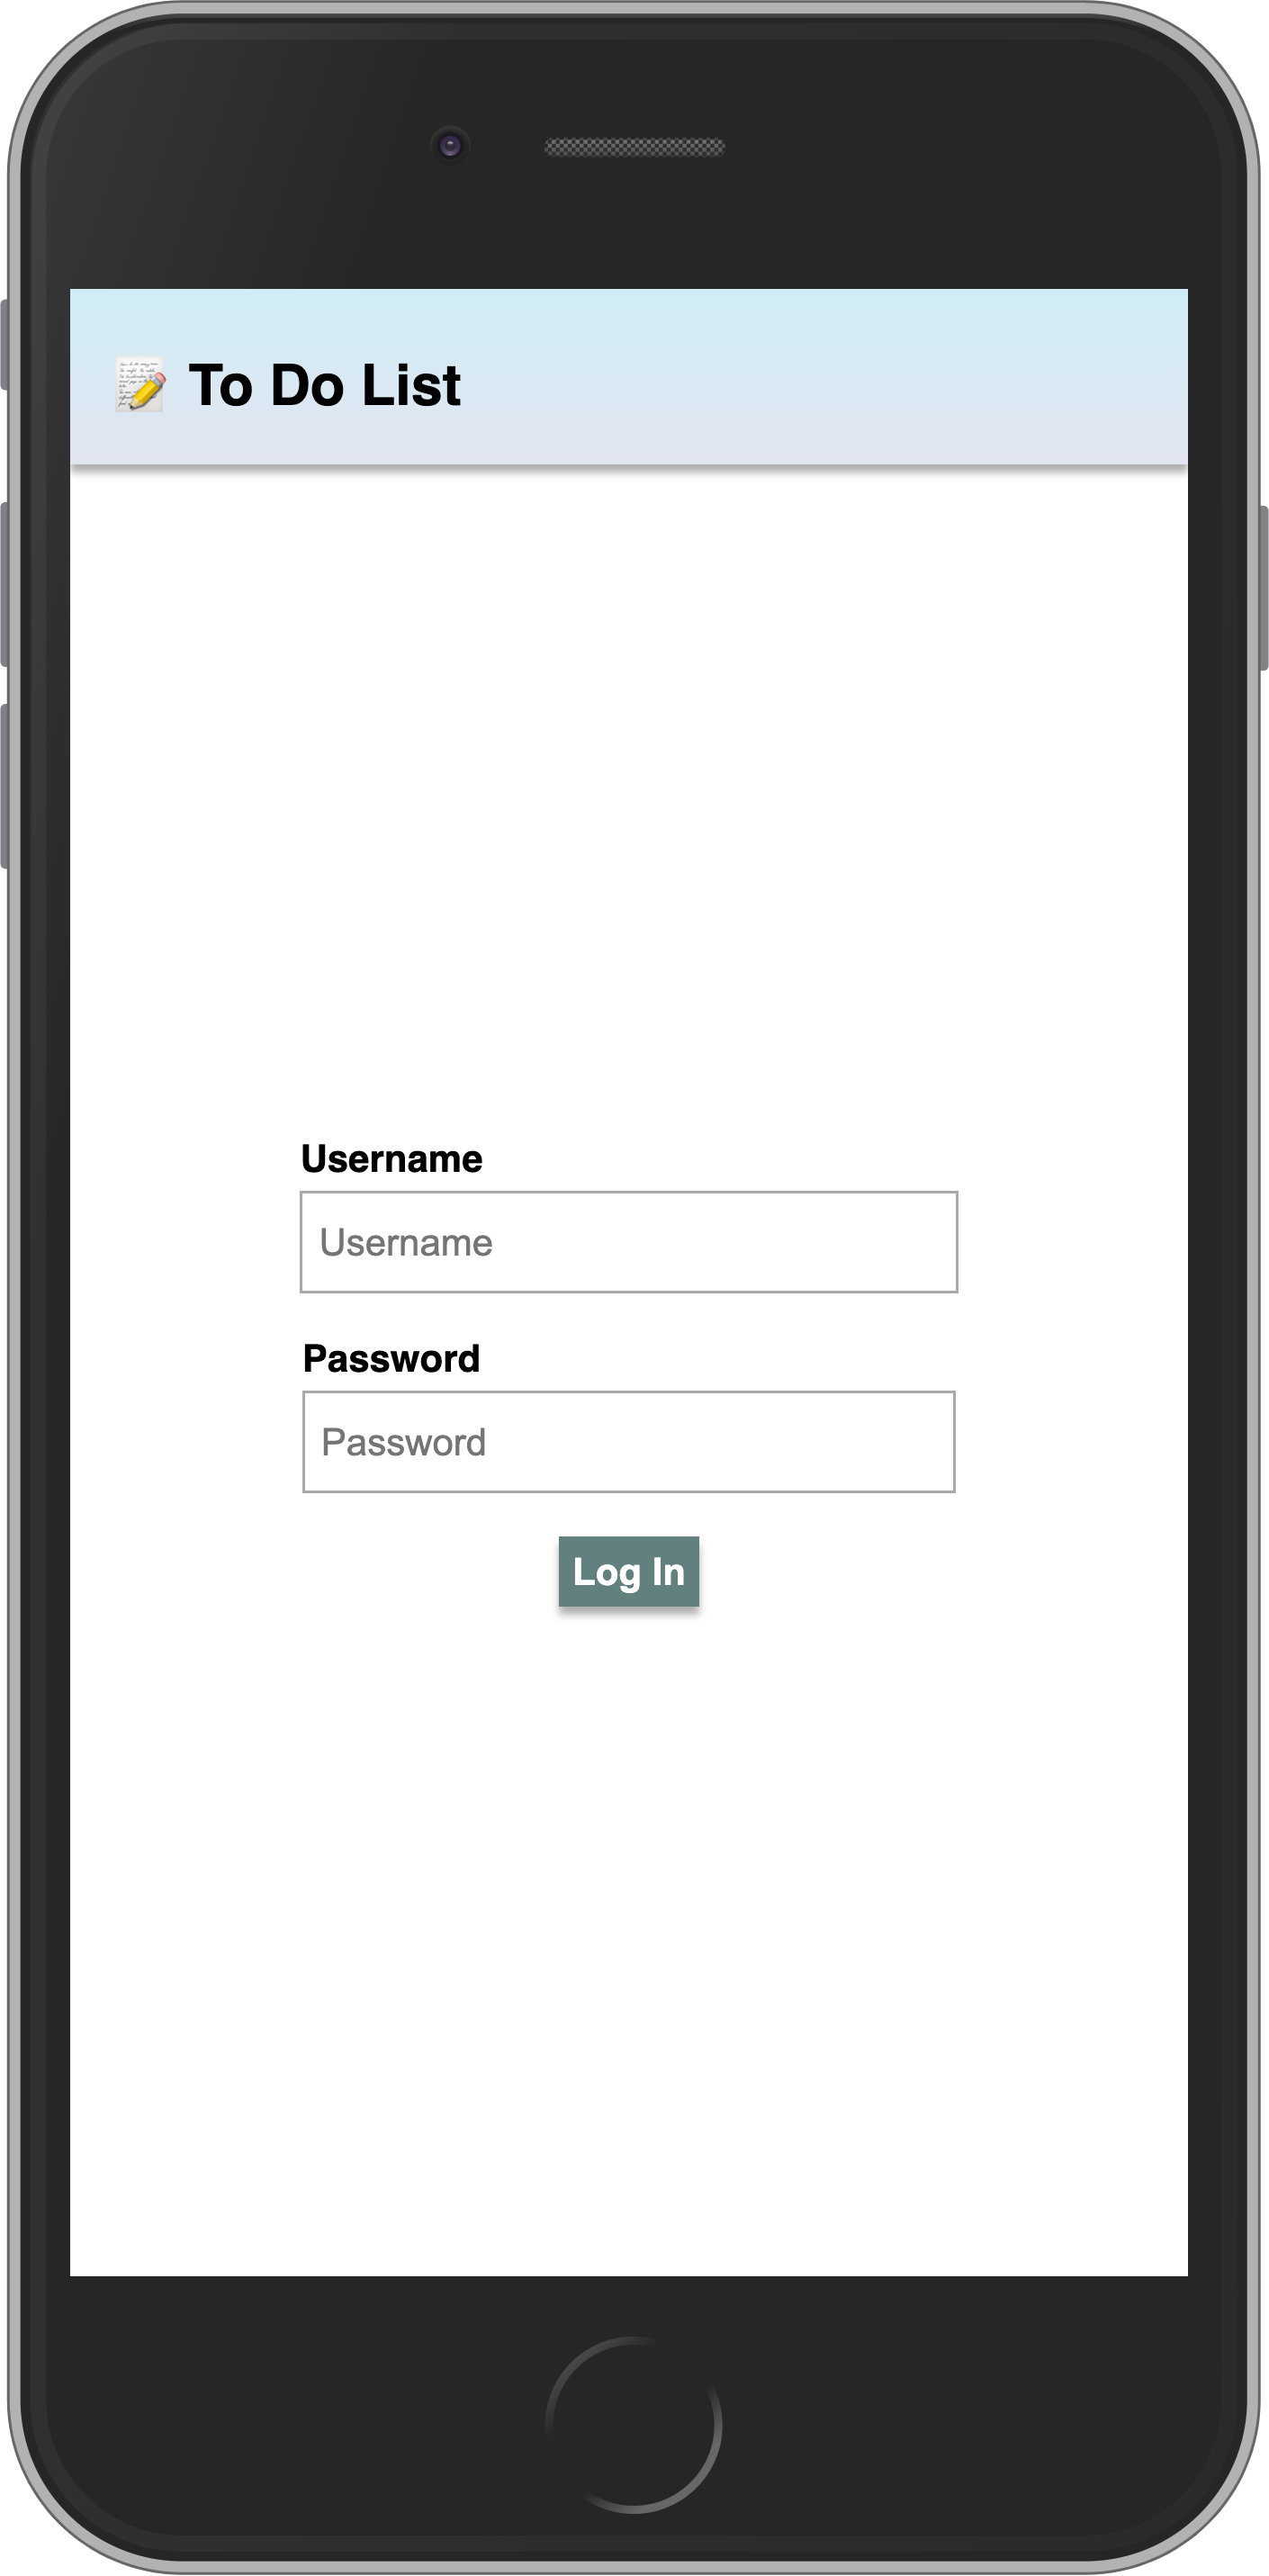
¥Phew! You have done quite a lot in this step. Authenticated the user, set the user in the tasks, and provided a way for the user to log out.
你的应用应如下所示:
¥Your app should look like this:
在下一步中,我们将学习如何部署你的应用!
¥In the next step, we are going to learn how to deploy your app!
8:部署
¥8: Deploying
部署 Meteor 应用类似于部署任何其他使用 websockets 的 Node.js 应用。你可以在 我们的指南 中找到部署选项,包括 Meteor Up、Docker 和我们推荐的方法 Galaxy。
¥Deploying a Meteor application is similar to deploying any other Node.js app that uses websockets. You can find deployment options in our guide, including Meteor Up, Docker, and our recommended method, Galaxy.
在本教程中,我们将在 Galaxy 上部署我们的应用,这是我们自己的云解决方案。Galaxy 提供免费计划,因此你可以部署和测试你的应用。很酷,对吧?
¥In this tutorial, we will deploy our app on Galaxy, which is our own cloud solution. Galaxy offers a free plan, so you can deploy and test your app. Pretty cool, right?
8.1:创建你的账户
¥8.1: Create your account
你需要一个 Meteor 账户来部署你的应用。如果你还没有,可以使用 在此处注册。使用此账户,你可以访问我们的包管理器、Atmosphere、论坛 等。
¥You need a Meteor account to deploy your apps. If you don’t have one yet, you can sign up here. With this account, you can access our package manager, Atmosphere, Forums and more.
8.2:设置 MongoDB(可选)
¥8.2: Set up MongoDB (Optional)
由于你的应用使用 MongoDB,第一步是设置 MongoDB 数据库,Galaxy 提供免费计划的 MongoDB 托管以供测试,你还可以请求允许你扩展的生产就绪数据库。
¥As your app uses MongoDB the first step is to set up a MongoDB database, Galaxy offers MongoDB hosting on a free plan for testing purposes, and you can also request for a production ready database that allows you to scale.
在任何 MongoDB 提供商中,你都会有一个必须使用的 MongoDB URL。如果你使用 Galaxy 提供的免费选项,则初始设置已为你完成。
¥In any MongoDB provider you will have a MongoDB URL which you must use. If you use the free option provided by Galaxy, the initial setup is done for you.
Galaxy MongoDB URL 将如下所示:mongodb://username:<password>@org-dbname-01.mongodb.galaxy-cloud.io .
¥Galaxy MongoDB URL will be like this: mongodb://username:<password>@org-dbname-01.mongodb.galaxy-cloud.io .
你可以阅读更多关于 Galaxy MongoDB 此处 的信息。
¥You can read more about Galaxy MongoDB here.
8.3:设置设置
¥8.3: Set up settings
如果你没有使用免费版本,则需要创建一个配置文件。这是一个 Meteor 应用可以从中读取配置的 JSON 文件。在项目根目录中名为 private 的新文件夹中创建此文件。需要注意的是,private 是一个特殊文件夹,不会发布到应用的客户端。
¥If you are not using the free option, then you need to create a settings file. It’s a JSON file that Meteor apps can read configurations from. Create this file in a new folder called private in the root of your project. It is important to notice that private is a special folder that is not going to be published to the client side of your app.
确保将 Your MongoDB URL 替换为你自己的 MongoDB URL 😃
¥Make sure you replace Your MongoDB URL by your own MongoDB URL 😃
json
{
  "galaxy.meteor.com": {
    "env": {
      "MONGO_URL": "Your MongoDB URL"
    }
  }
}
8.4:部署它
¥8.4: Deploy it
现在你已准备好部署,请在部署之前运行 meteor npm install 以确保安装了所有依赖。
¥Now you are ready to deploy, run meteor npm install before deploying to make sure all your dependencies are installed.
你还需要选择一个子域来发布你的应用。我们将使用免费的主域 meteorapp.com,它包含在任何 Galaxy 计划中。
¥You also need to choose a subdomain to publish your app. We are going to use the main domain meteorapp.com that is free and included on any Galaxy plan.
在此示例中,我们将使用 solid-meteor-3.meteorapp.com,但请确保你选择其他 XX,否则你将收到错误。
¥In this example we are going to use solid-meteor-3.meteorapp.com but make sure you select a different one, otherwise you are going to receive an error.
你可以了解如何在 Galaxy 此处 上使用自定义域。从 Essentials 计划开始,可以使用自定义域。
¥You can learn how to use custom domains on Galaxy here. Custom domains are available starting with the Essentials plan.
运行部署命令:
¥Run the deployment command:
shell
meteor deploy solid-meteor-3.meteorapp.com --free --mongo如果你没有在 Galaxy 上使用 MongoDB 的免费托管,请从部署脚本中删除
--mongo标志,并使用适合你应用的设置添加--settings private/settings.json。¥If you are not using the free hosting with MongoDB on Galaxy, then remove the
--mongoflag from the deploy script and add--settings private/settings.jsonwith the proper setting for your app.
确保将 solid-meteor-3 替换为你想要用作子域的自定义名称。你将看到如下日志:
¥Make sure you replace solid-meteor-3 by a custom name that you want as subdomain. You will see a log like this:
shell
meteor deploy solid-meteor-3.meteorapp.com --settings private/settings.json
Talking to Galaxy servers at https://us-east-1.galaxy-deploy.meteor.com
Preparing to build your app...
Preparing to upload your app...
Uploaded app bundle for new app at solid-meteor-3.meteorapp.com.
Galaxy is building the app into a native image.
Waiting for deployment updates from Galaxy...
Building app image...
Deploying app...
You have successfully deployed the first version of your app.
For details, visit https://galaxy.meteor.com/app/solid-meteor-3.meteorapp.com
此过程通常只需几分钟,但这取决于你的互联网速度,因为它会将你的应用包发送到 Galaxy 服务器。
¥This process usually takes just a few minutes, but it depends on your internet speed as it’s going to send your app bundle to Galaxy servers.
Galaxy 构建一个包含你的应用包的新 Docker 映像,然后使用它部署容器,阅读更多。你可以查看 Galaxy 上的日志,包括 Galaxy 构建 Docker 映像并部署它的部分。
¥Galaxy builds a new Docker image that contains your app bundle and then deploy containers using it, read more. You can check your logs on Galaxy, including the part that Galaxy is building your Docker image and deploying it.
8.5:访问应用并享受
¥8.5: Access the app and enjoy
现在,你应该能够在 https://galaxy.meteor.com/app/solid-meteor-3.meteorapp.com 访问你的 Galaxy 仪表板。
¥Now you should be able to access your Galaxy dashboard at https://galaxy.meteor.com/app/solid-meteor-3.meteorapp.com.
你还可以在 Galaxy 2.0 上访问你的应用,该应用目前处于 https://galaxy-beta.meteor.com/<your-username>/us-east-1/apps/<your-app-name>.meteorapp.com 测试阶段。请记住使用你自己的子域而不是 solid-meteor-3。
¥You can also access your app on Galaxy 2.0 which is currently in beta at https://galaxy-beta.meteor.com/<your-username>/us-east-1/apps/<your-app-name>.meteorapp.com. Remember to use your own subdomain instead of solid-meteor-3.
你可以在 solid-meteor-3.meteorapp.com 访问应用!只需使用你的子域即可访问你的子域!
¥You can access the app at solid-meteor-3.meteorapp.com! Just use your subdomain to access yours!
我们部署到在美国(us-east-1)运行的 Galaxy,我们也在世界其他地区运行 Galaxy,请查看列表 此处。这很重要,你的应用在 Galaxy 上运行,可供世界上任何人使用!
¥We deployed to Galaxy running in the US (us-east-1), we also have Galaxy running in other regions in the world, check the list here. This is huge, you have your app running on Galaxy, ready to be used by anyone in the world!
9:后续步骤
¥9: Next Steps
你已完成本教程!
¥You have completed the tutorial!
现在,你应该对 Meteor 和 Solid 的使用有了很好的理解。
¥By now, you should have a good understanding of working with Meteor and Solid.
信息
你可以在我们的 GitHub 存储库 中找到此应用的最终版本。
¥You can find the final version of this app in our GitHub repository.
以下是你接下来可以执行的一些选项:
¥Here are some options for what you can do next:
查看完整的 documentation 以了解有关 Meteor 3 的更多信息。
¥Check out the complete documentation to learn more about Meteor 3.
阅读 Galaxy 指南 以了解有关部署应用的更多信息。
¥Read the Galaxy Guide to learn more about deploying your app.
加入我们的 Meteor 论坛 和 Meteor Lounge Discord 社区,提出问题并分享你的经验。
¥Join our community on the Meteor Forums and the Meteor Lounge on Discord to ask questions and share your experiences.
我们迫不及待地想看看你接下来会构建什么!
¥We can't wait to see what you build next!