
Appearance
Meteor.js 3 + Vue 3 和 vue-meteor-tracker
¥Meteor.js 3 + Vue 3 and vue-meteor-tracker
在本教程中,我们将使用 Vue 3 和 Meteor 3.0 创建一个简单的 To-Do 应用。Meteor 可以很好地与其他框架配合使用,例如 Blaze、React、Solid 和 Svelte。
¥In this tutorial, we will create a simple To-Do app using Vue 3 and Meteor 3.0. Meteor works well with other frameworks like Blaze, React, Solid, and Svelte.
Vue.js 是一个用于制作用户界面的强大 JavaScript 框架。它通过使用连接到数据并在数据更改时自动更新的模板来帮助你构建交互式应用。Vue.js 模板使用类似于 HTML 的简单语法,并与 Vue 的反应系统配合使用以在浏览器中显示组件。
¥Vue.js is a powerful JavaScript framework for making user interfaces. It helps you build interactive applications by using templates that connect to data and update automatically when the data changes. Vue.js templates use a simple syntax similar to HTML and work with Vue’s reactivity system to show components in the browser.
要开始构建你的 Vue.js 应用,你需要一个代码编辑器。如果你不确定选择哪一个,Visual Studio 代码 是一个不错的选择。
¥To start building your Vue.js app, you'll need a code editor. If you're unsure which one to choose, Visual Studio Code is a good option.
警告
本教程使用 vue-meteor-tracker 包,该包目前处于测试阶段,尚不支持异步调用。但是,它仍然是一个有价值的包,我们希望它能尽快更新。我们还在编写一个新教程,该教程将改用 Meteor 核心包。
¥This tutorial uses the vue-meteor-tracker package, which is currently in beta and does not support async calls yet. However, it is still a valuable package, and we hope it will be updated soon. We are also working on a new tutorial that will use Meteor core packages instead.
让我们开始构建你的应用!
¥Let’s begin building your app!
目录
¥Table of Contents
1:创建应用
¥1: Creating the app
1.1:安装 Meteor.js
¥1.1: Install Meteor.js
首先,确保你已安装 Node.js 版本 20。你可以使用以下命令安装最新版本的 Meteor:
¥First, ensure you have Node.js version 20 installed. You can install the latest version of Meteor by using the command:
shell
npx meteor如果你遇到任何问题,请参阅 我们的文档 中的要求和详细信息。
¥If you encounter any issues, please refer to the requirements and details in our documentation.
1.2:创建 Meteor.js 项目
¥1.2: Create a Meteor.js Project
要轻松地使用 Vue 设置 Meteor,请运行以下命令,将 simple-todos-vue 替换为你选择的项目名称:
¥To set up Meteor with Vue easily, run the following command, replacing simple-todos-vue with your chosen project name:
shell
meteor create --vue simple-todos-vue信息
你可以在我们的 GitHub 存储库 中找到此应用的最终版本。
¥You can find the final version of this app in our GitHub repository.
Meteor 将为你创建所有必要的文件。--vue 标志使用 Vue、Vite 和 Tailwind CSS 生成项目。
¥Meteor will create all the necessary files for you. The --vue flag generates a project using Vue, Vite and Tailwind CSS.
你会发现 client 目录包含用于客户端设置的文件。在内部,应该有一个 Meteor 导入模式所需的空 main.js 文件。但是,对于 Vite,入口点设置在 vite.config.js 文件中,指向 imports/ui/main.js,这是 Meteor 渲染主要组件的地方。
¥You will find the client directory contains files for your client-side setup. Inside, there should be an empty main.js file required for Meteor's import mode. However, with Vite, the entry point is set in the vite.config.js file, pointing to imports/ui/main.js, which is where Meteor renders the main component.
检查服务器目录以了解服务器设置,你将在其中看到 server/main.js 使用一些默认数据填充你的 MongoDB 数据库。无需单独安装 MongoDB,因为 Meteor 包含一个嵌入式版本。
¥Check the server directory for the server setup where you will see server/main.js populating your MongoDB database with some default data. There's no need to install MongoDB separately, as Meteor includes an embedded version.
要运行你的应用,请使用:
¥To run your app, use:
shell
meteor npm run start你的 Vue 代码将位于 imports/ui directory 中,App.vue 是你应用的根组件。
¥Your Vue code will be located in the imports/ui directory, with App.vue as the root component of your app.
花点时间探索 Meteor 创建的文件。你不必立即了解所有内容,但了解它们在哪里会有所帮助。
¥Take a moment to explore the files created by Meteor. You don’t have to understand everything right away, but it helps to know where they are.
1.3:清理 UI 文件夹
¥1.3: Cleaning the UI Folder
让我们删除一些不必要的文件以获得更干净的开始。在 imports/ui 文件夹中仅保留 App.vue、main.js 和 router.js。删除以下文件:About.vue、AppMenu.vue、Hello.vue、Home.vue 和 Info.vue。
¥Let's remove some unnecessary files for a cleaner start. Keep only App.vue, main.js, and router.js in the imports/ui folder. Delete the following files: About.vue, AppMenu.vue, Hello.vue, Home.vue, and Info.vue.
接下来,更新 router.js 以删除对已删除组件的引用:
¥Next, update router.js to remove references to the deleted components:
javascript
import { createRouter, createWebHistory } from 'vue-router';
import App from './App.vue';

export const router = createRouter({
  history: createWebHistory(),
  routes: [
    {
      path: '/',
      name: 'home',
      component: App,
    },
  ],
});
此文件是你设置路由并决定为每个路径渲染哪个组件的地方。
¥This file is where you set up your routes and decide which component to render for each path.
另外,更新 App 组件,因为某些组件不再存在。
¥Also, update the App component since some components no longer exist.
vue
<template>
  <div class="p-8">
    <h1>Hello Meteor</h1>
  </div>
</template>
1.4:创建示例任务
¥1.4: Creating Sample Tasks
我们将在 imports/ui/components 文件夹中创建我们的 Vue 组件。首先创建此文件夹并在其中添加一个名为 Task.vue 的文件。
¥We’ll create our Vue components in the imports/ui/components folder. Start by making this folder and adding a file named Task.vue inside it.
此文件将导出一个名为 Task 的 Vue 组件,代表你的待办事项列表中的一项任务。
¥This file will export a Vue component called Task, representing an individual task in your To-Do list.
vue
<script setup>
defineProps({
  task: {
    type: Object,
    required: true,
  },
});
</script>

<template>
  <li>{{ task.text }}</li>
</template>
由于 Task 组件将成为列表的一部分,因此它返回 li 元素。
¥Since the Task component will be part of a list, it returns a li element.
目前,我们不会连接到我们的数据库,因此在 App.vue 文件中定义一些示例数据以显示任务列表。创建一个数组和一个函数来返回此数组。
¥For now, we won’t connect to our database, so define some sample data in the App.vue file to display a list of tasks. Create an array and a function to return this array.
vue
<script setup>
import Task from './components/Task.vue'

const getTasks = () => {
    return [
      { _id: 1, text: 'Install Node.js' },
      { _id: 2, text: 'Install Meteor 3' },
      { _id: 3, text: 'Create and run your project' },
    ];
}
</script>

<template>
  <div class="p-8">
    <h1>Hello Meteor</h1>
  </div>
</template>
1.5:渲染任务
¥1.5: Rendering Tasks
现在让我们使用 Vue 添加一些简单的渲染逻辑,以使用 Task 组件显示我们的列表项。
¥Now let's add some simple rendering logic with Vue to display our list items using the Task component.
更新 App 组件的模板以包含任务列表:
¥Update the template of the App component to include the list of tasks:
vue
<script setup>
import Task from './components/Task.vue'

const getTasks = () => {
    return [
      { _id: 1, text: 'Install Node.js' },
      { _id: 2, text: 'Install Meteor 3' },
      { _id: 3, text: 'Create and run your project' },
    ];
}
</script>
<template>
  <div class="container">
    <header>
      <h1 class="text-4xl font-bold text-gray-800 my-4">Todo List</h1>
    </header>
    <ul class="list-disc list-inside p-4">
      <Task v-for="task in getTasks()" :key="task._id" :task="task" />
    </ul>
  </div>
</template>
有关 Vue 迭代的更多信息,你可以阅读 此处。
¥For more information on Vue iterations, you can read here.
在下一步中,我们将连接到 MongoDB 数据库来存储我们的任务。
¥In the next step, we will connect to the MongoDB database to store our tasks.
2:集合
¥2: Collections
Meteor 已经为你设置了 MongoDB。为了使用我们的数据库,我们需要创建一个集合,我们将在其中存储我们的文档,在我们的例子中是 tasks。你可以阅读有关集合 此处 的更多信息。
¥Meteor already sets up MongoDB for you. In order to use our database we need to create a collection, which is where we will store our documents, in our case our tasks. You can read more about collections here.
在此步骤中,我们将实现所有必要的代码,以便为我们的任务建立一个基本集合并运行。
¥In this step we will implement all the necessary code to have a basic collection for our tasks up and running.
2.1:创建任务集合
¥2.1: Create Tasks Collection
在创建我们的集合之前,让我们从 imports/api 文件夹中删除 links.js 文件,因为我们不会使用它。现在,你可以通过在 imports/api 文件夹中创建一个名为 tasksCollection.js 的新文件来创建一个新集合来存储我们的任务。
¥Before creating our collection, let's remove the links.js file from the imports/api folder because we won't use it. Now, you can create a new collection to store our tasks by creating a new file named tasksCollection.js inside the imports/api folder.
javascript
import { Mongo } from 'meteor/mongo';

export const TasksCollection = new Mongo.Collection('tasks');
上面的代码实例化了一个新的 MongoDB 集合并将其导出。你可以阅读有关应用结构和导入/导出 此处 的更多信息。
¥The code above instantiates a new MongoDB collection and exports it. You can read more about app structure and imports/exports here.
2.2:初始化任务集合
¥2.2: Initialize Tasks Collection
要使我们的集合正常工作,你需要将其导入到服务器上进行设置。
¥To make our collection work, you need to import it on the server to set things up.
如果你计划在同一文件中使用 TasksCollection,则可以使用 import './imports/api/tasksCollection' 或 import { TasksCollection } from './imports/api/tasksCollection'。只需确保它已被导入。
¥You can use import './imports/api/tasksCollection' or import { TasksCollection } from './imports/api/tasksCollection' if you plan to use TasksCollection in the same file. Just make sure it's imported.
现在,我们可以轻松检查我们的集合中是否有数据,或者我们可以轻松添加一些示例数据。
¥Now, it’s easy to check if there is data in our collection, or we can easily add some sample data.
用下面的代码替换 server/main.js 中的旧内容。
¥Replace the old content in server/main.js with the code below.
javascript
import { Meteor } from 'meteor/meteor';
import { TasksCollection } from '../imports/api/tasksCollection';

const insertTask = async text => await TasksCollection.insertAsync({text});

Meteor.startup(async () => {
  const tasksCount = await TasksCollection.find().countAsync();
  if (tasksCount === 0) {
    await insertTask('First Task');
    await insertTask('Second Task');
    await insertTask('Third Task');
    await insertTask('Fourth Task');
    await insertTask('Fifth Task');
    await insertTask('Sixth Task');
    await insertTask('Seventh Task');
  }
});
因此,你正在导入 TasksCollection 并在其上添加一些任务,调用一个函数将此字符串作为我们的 text 字段插入到我们的 task 文档中。
¥So you are importing the TasksCollection and adding a few tasks on it calling a function to insert this string as our text field in our task document.
2.3:渲染任务集合
¥2.3: Render Tasks Collection
现在到了有趣的部分,你将使用“数据容器”渲染任务,以将 Meteor 的反应数据输入到 Vue 的组件层次结构中。我们将为此使用 vue-meteor-tracker 包。
¥Now comes the fun part, you will render the tasks using a “data container” to feed Meteor’s reactive data into Vue’s component hierarchy. We will use the vue-meteor-tracker package for this.
信息
Meteor 可与 Meteor 包和 NPM 包配合使用,通常 Meteor 包使用 Meteor 内部组件或其他 Meteor 包。
¥Meteor works with Meteor packages and NPM packages, usually Meteor packages are using Meteor internals or other Meteor packages.
vue-meteor-tracker 包已包含在 Vue 骨架中,因此你无需添加它。
¥The vue-meteor-tracker package is already included in the Vue skeleton, so you don’t need to add it.
当从 Meteor 包导入代码时,与 NPM 模块的唯一区别是你需要在导入的 from 部分中添加 meteor/。首先,我们需要在 App 组件上实现订阅,以便从服务器获取更新的任务。只需使用 vue-meteor-tracker 中的 subscribe 和 autorun 函数即可完成。
¥When importing code from a Meteor package the only difference from NPM modules is that you need to prepend meteor/ in the from part of your import. First we need to implement a subscription at the App component to get the tasks updated from the server. It can be done simply by using the subscribe and autorun functions from vue-meteor-tracker.
信息
vue-meteor-tracker 包尚不支持异步调用,因此我们需要使用同步函数。这不是问题,但了解这一点很重要。
¥The vue-meteor-tracker package doesn't support async calls yet, so we need to use sync functions. This is not an issue, but it's important to know.
vue
<script setup>
import Task from './components/Task.vue';
import { subscribe, autorun } from 'vue-meteor-tracker';
import { TasksCollection } from '../api/tasksCollection';

subscribe('tasks');
const tasks = autorun(() => TasksCollection.find({}).fetch()).result;
</script>

<template>
  <div class="container">
    <header>
      <h1 class="text-4xl font-bold text-gray-800 my-4">Todo List</h1>
    </header>
    <ul class="list-disc list-inside p-4">
      <Task v-for="task of tasks" :key="task._id" :task="task" />
    </ul>
  </div>
</template>
为了能够在客户端获取数据,你需要将其发布到服务器中。为此,请创建一个名为 tasksPublications.js 的文件并添加以下代码:
¥To be able to fetch data in the client, you need to publish it in the server. To do it, create a file called tasksPublications.js and add the following code:
javascript
import { Meteor } from 'meteor/meteor';
import { TasksCollection } from './tasksCollection';

Meteor.publish('tasks', function publishTasks() {
    return TasksCollection.find();
});
现在,将其导入到服务器上:
¥Now, import it on the server:
javascript
import '../imports/api/tasksPublications';如果你想了解有关发布物如何工作的更多信息,你可以阅读 此处。
¥If you want to learn more about how publications works, you can read here.
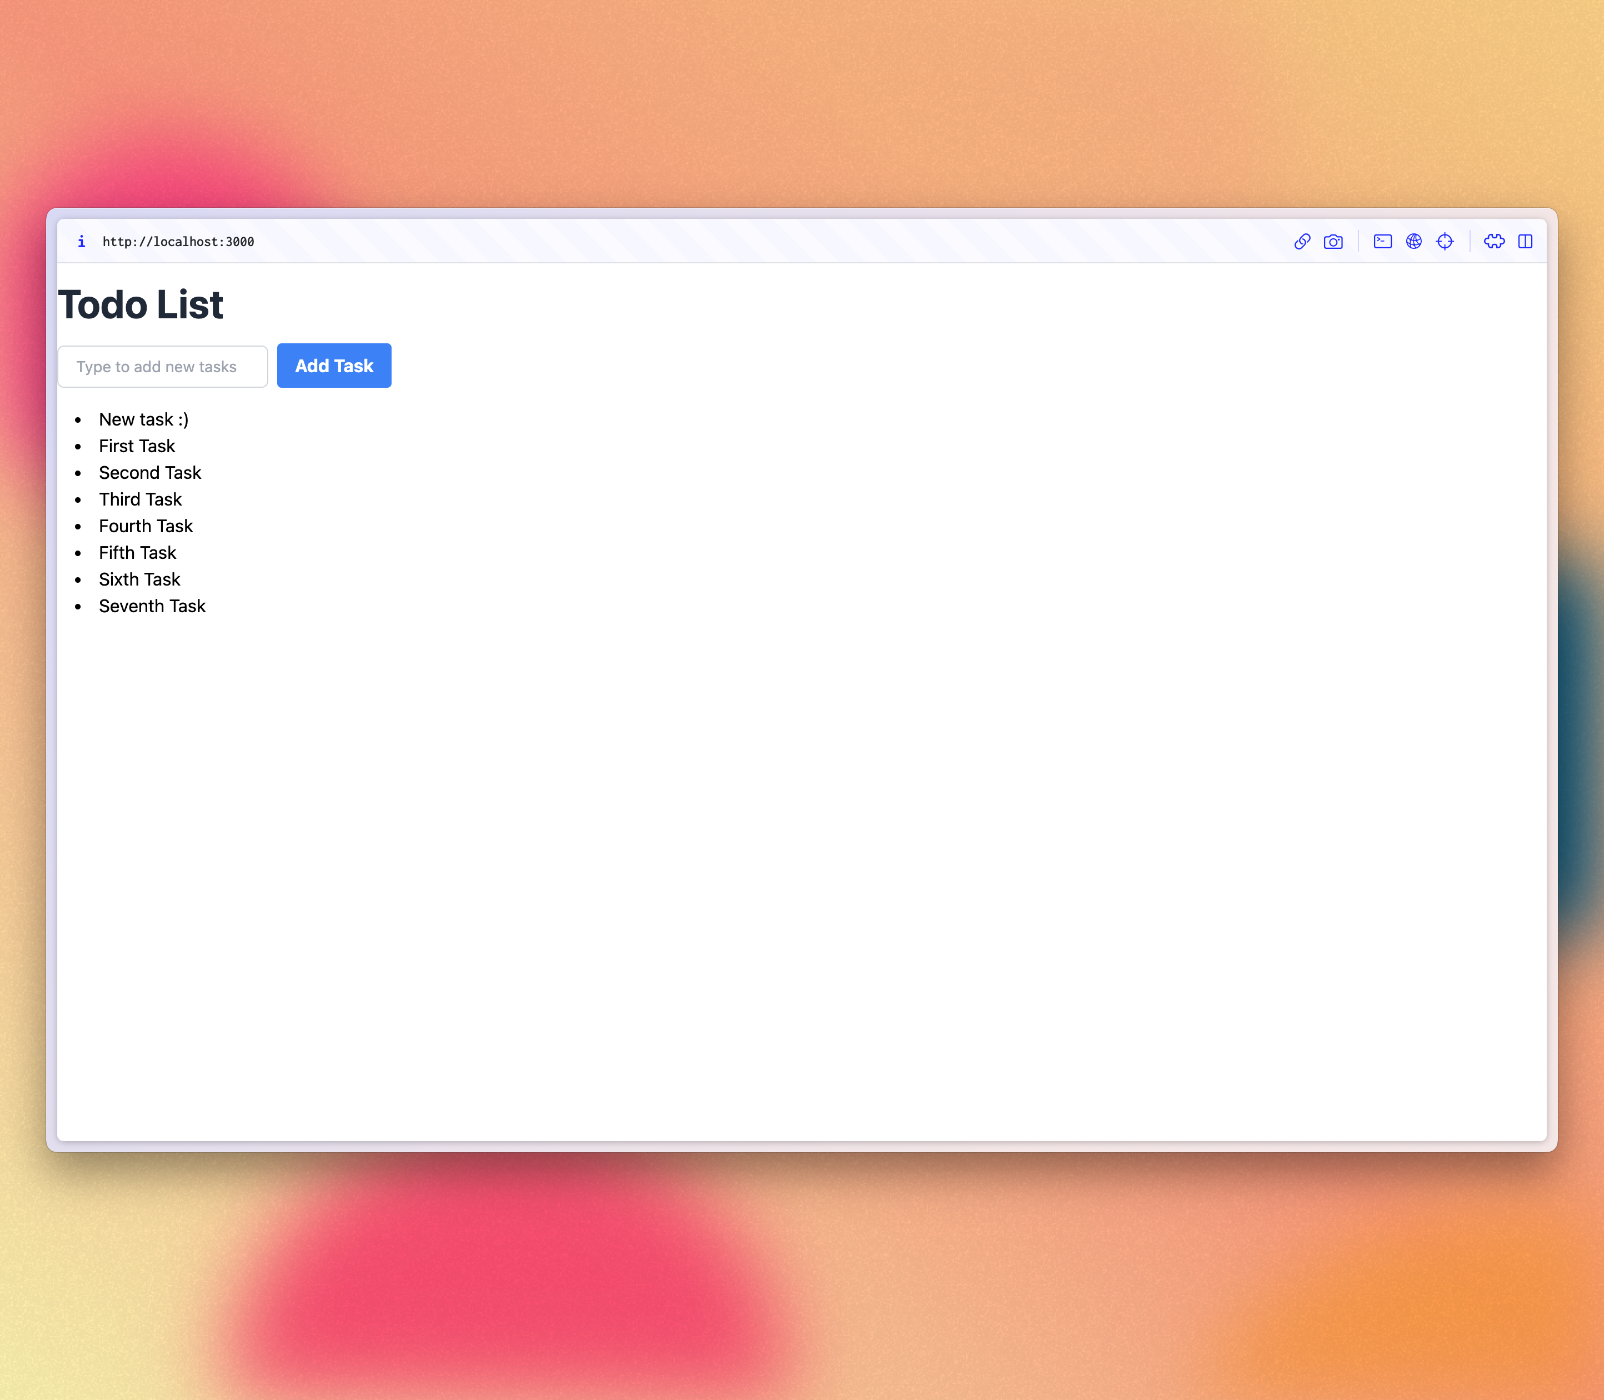
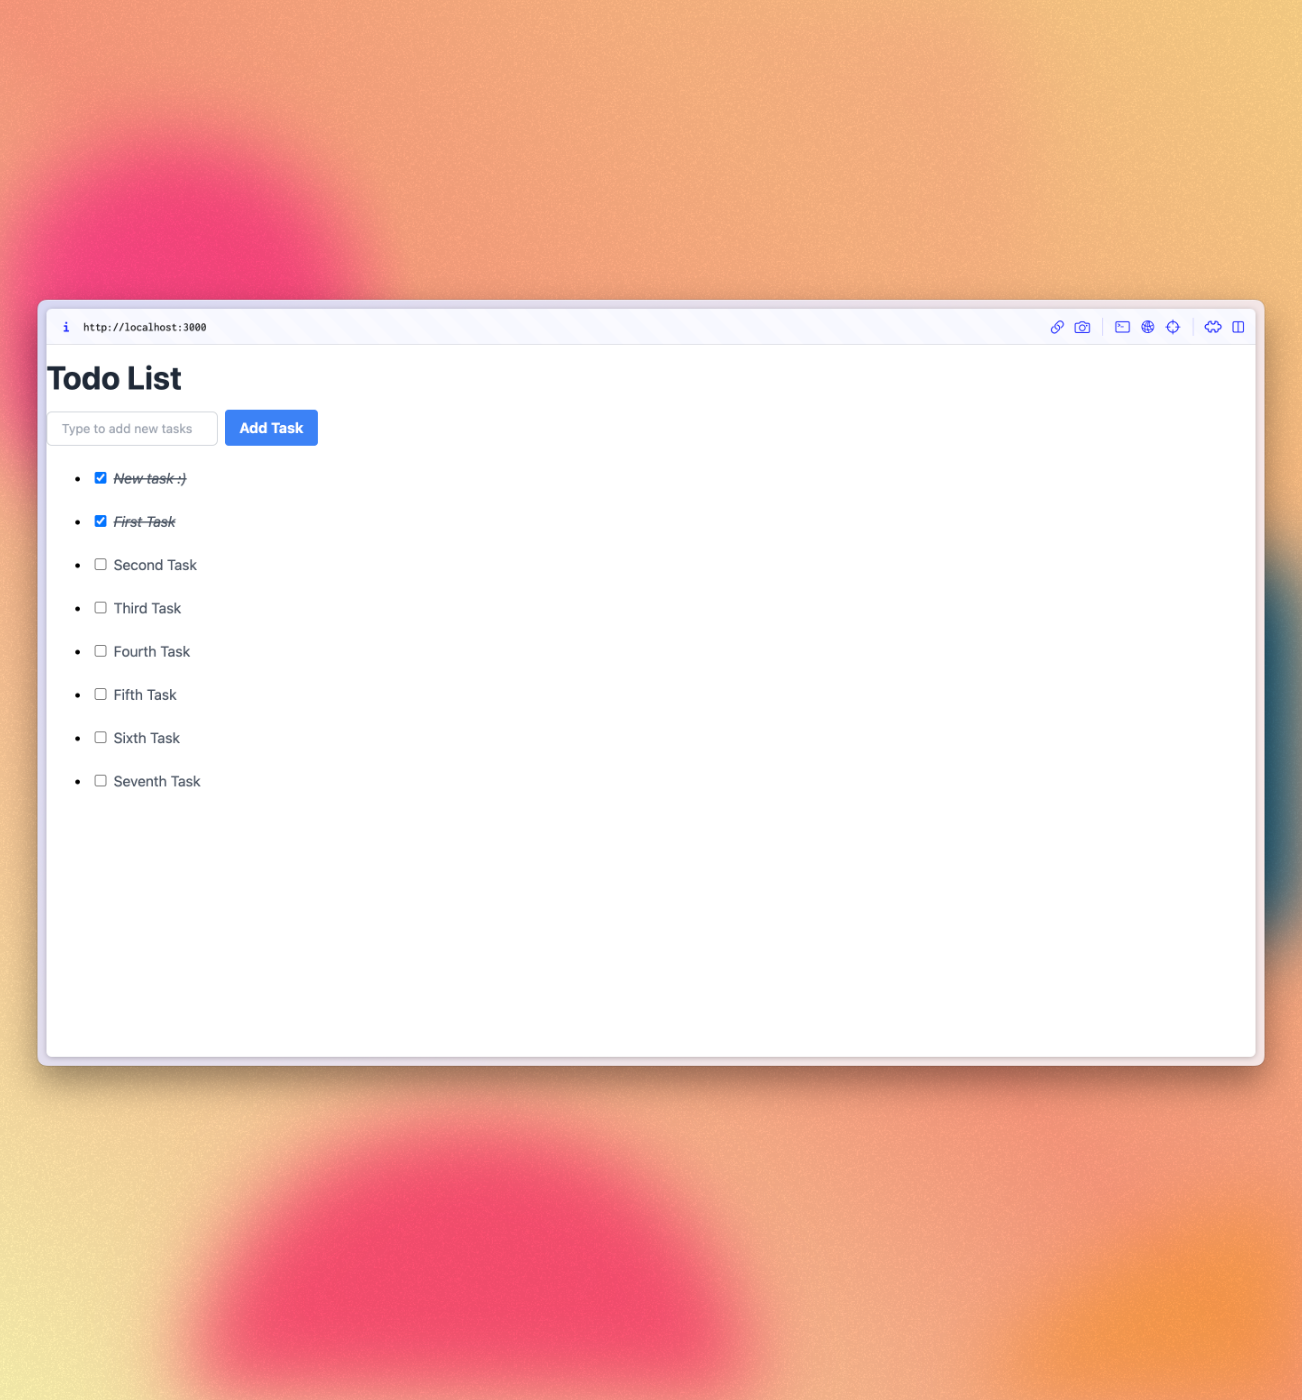
现在,你的应用应如下所示:
¥Now, your app should look like this:

你可以在服务器上更改 MongoDB 上的数据,你的应用将做出反应并为你重新渲染。
¥You can change your data on MongoDB in the server and your app will react and re-render for you.
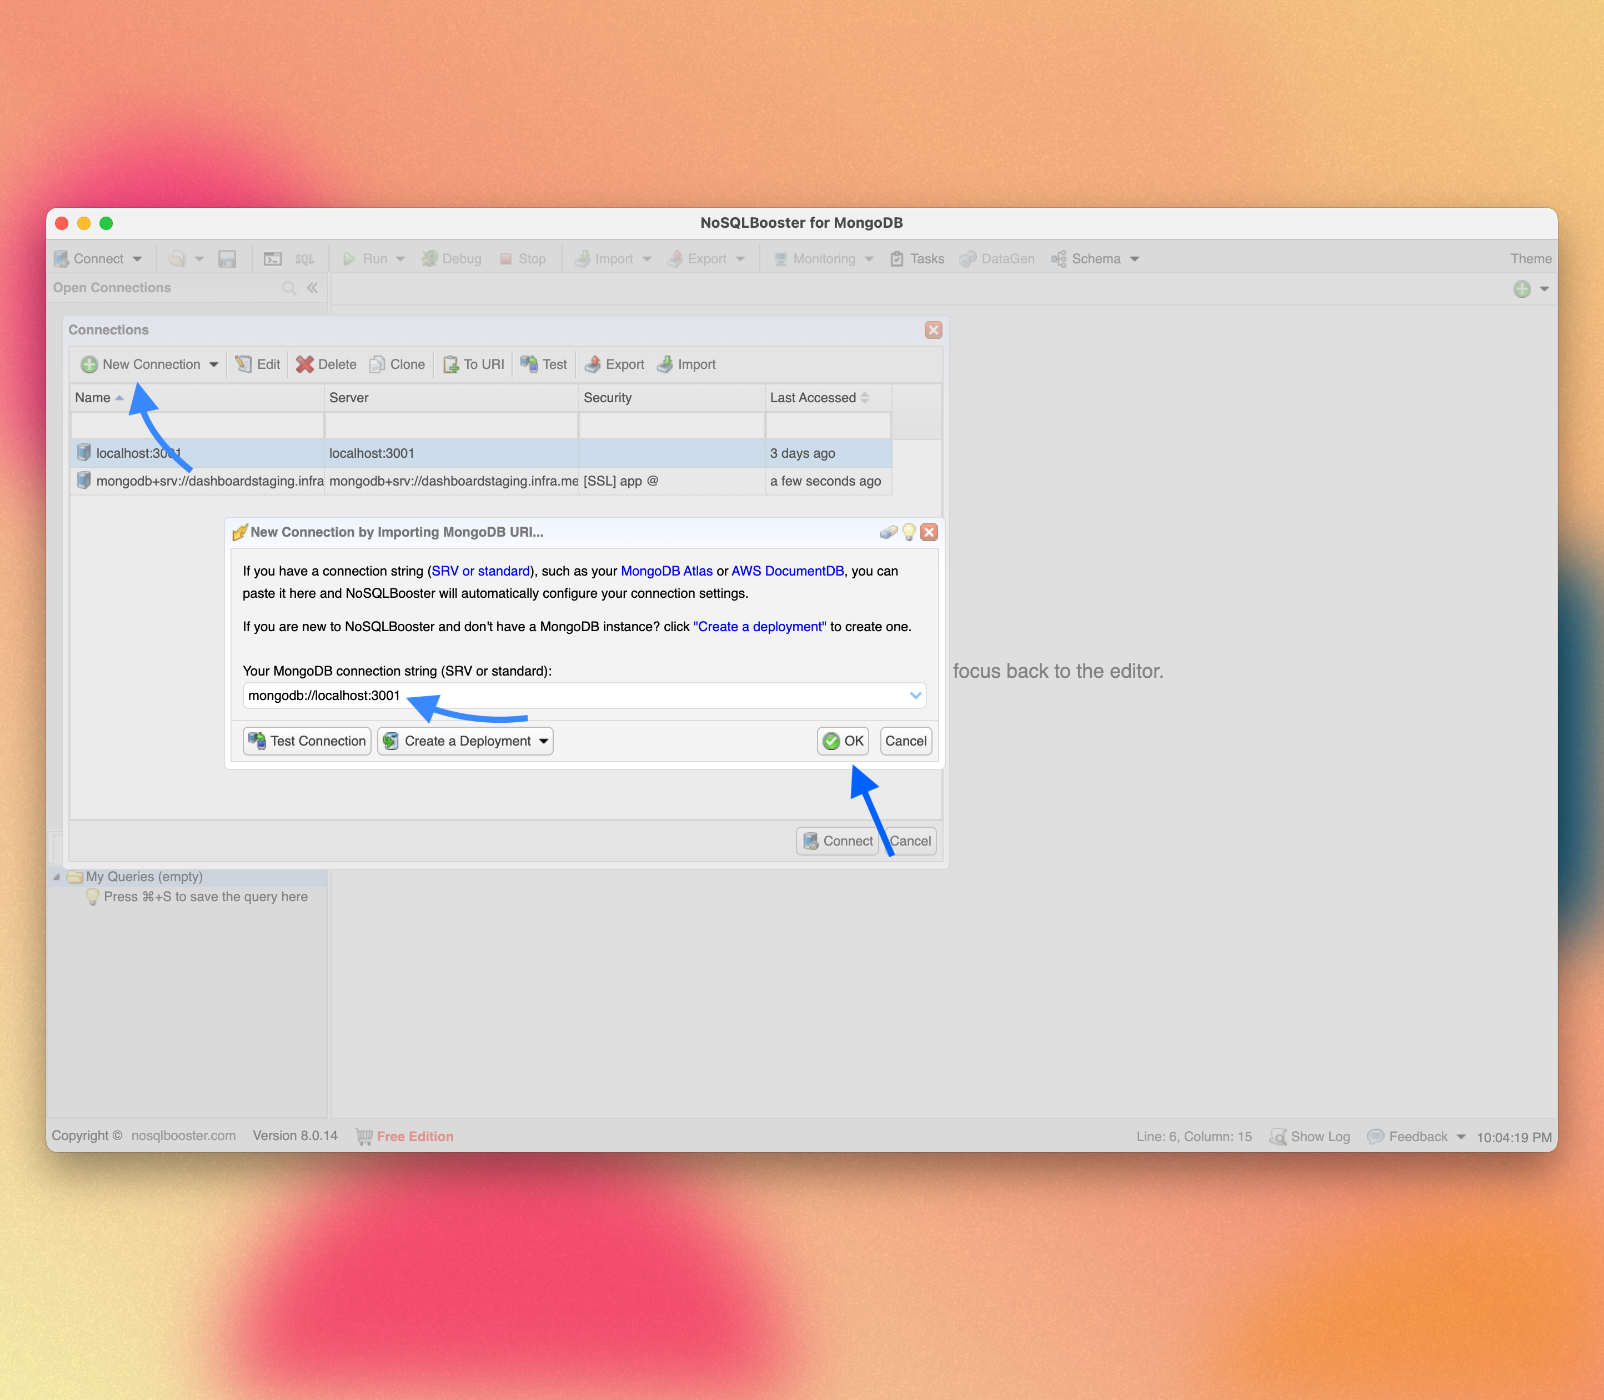
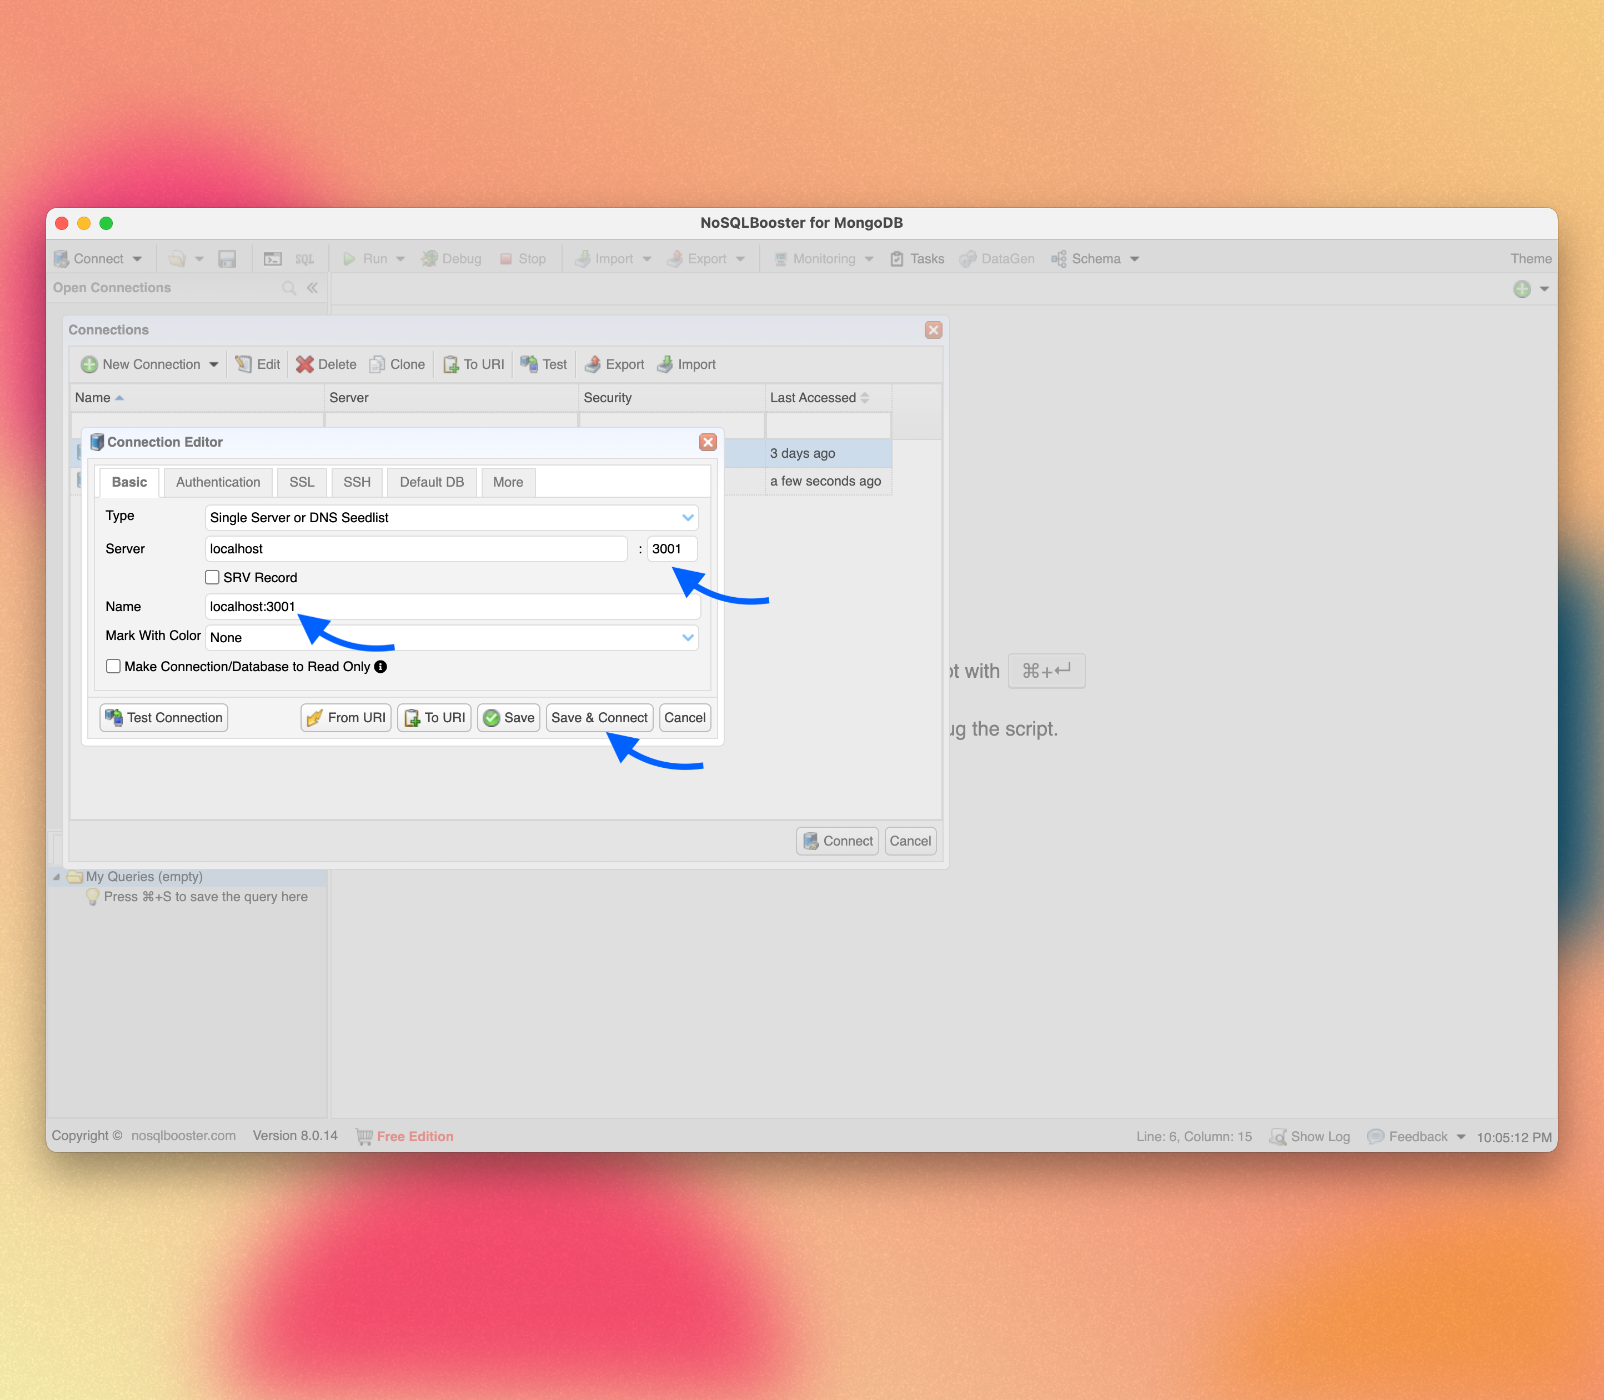
你可以从应用文件夹或使用 MongoDB UI 客户端(如 NoSQLBooster 或 MongoDB Compass)连接到在终端中运行 meteor mongo 的 MongoDB。你的嵌入式 MongoDB 正在端口 3001 中运行。
¥You can connect to your MongoDB running meteor mongo in the terminal from your app folder or using a MongoDB UI client, like NoSQLBooster or MongoDB Compass. Your embedded MongoDB is running in the port 3001.
查看如何连接:
¥See how to connect:
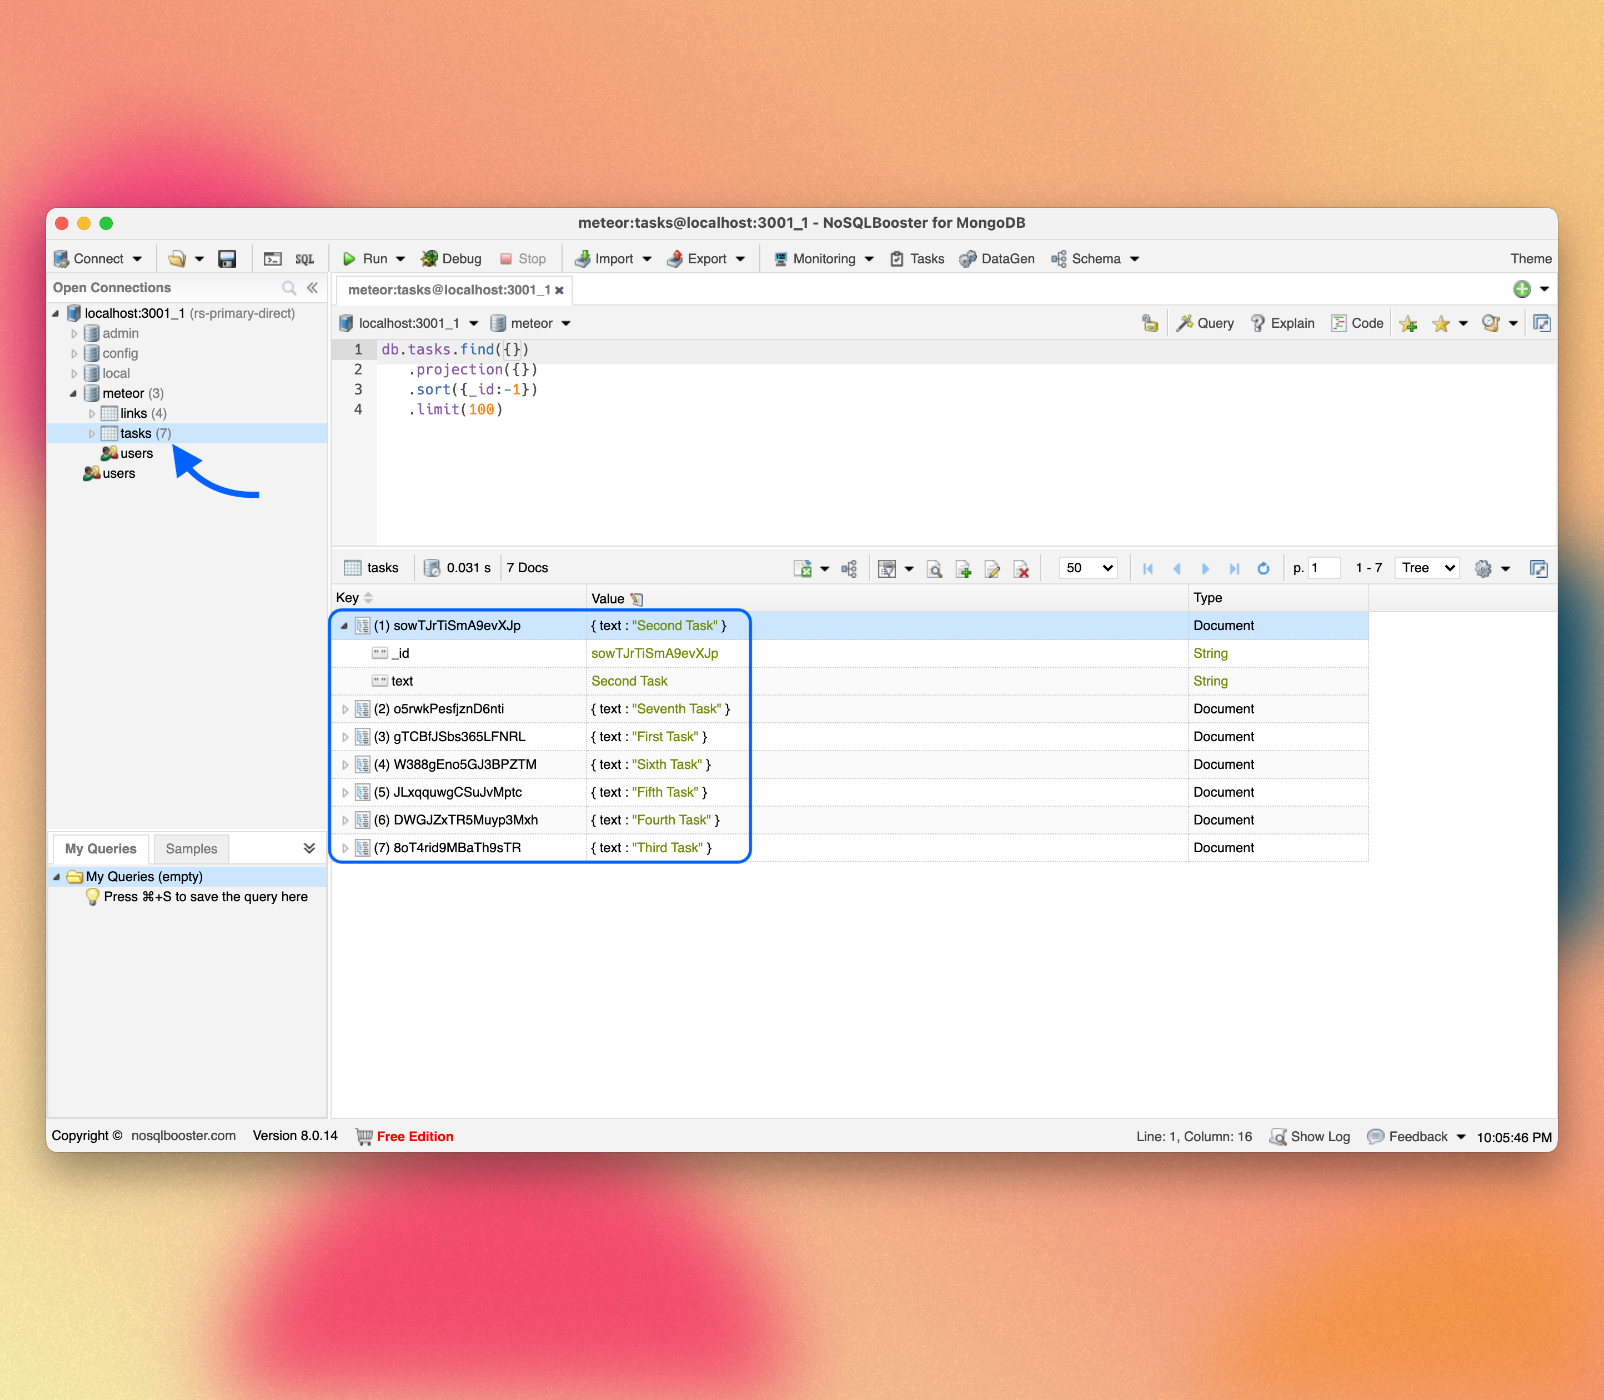
查看你的数据库:
¥See your database:
你可以双击你的集合以查看存储在其中的文档:
¥You can double-click your collection to see the documents stored on it:
3:表单和事件
¥3: Forms and Events
现在,我们需要让用户与存储的数据进行交互。在我们的例子中,第一个交互是添加新任务。用户在网站中插入或编辑数据的主要方式之一是通过表单,使用 <form> 标签。
¥Now, we need to let users interact with the stored data. In our case, the first interaction is to add new tasks. One of the main ways in which a user can insert or edit data in a website is through forms, using the <form> tag.
3.1:创建任务表单
¥3.1: Create Task Form
首先,我们需要创建一个简单的表单组件来封装我们的逻辑。
¥First, we need to create a simple form component to encapsulate our logic.
在 ui/components 文件夹中创建一个新文件 TaskForm.vue。
¥Create a new file TaskForm.vue in your ui/components folder.
vue
<script setup>
import { ref } from 'vue';

const newTask = ref('');

const addTask = () => {
  console.log(newTask.value);
}
</script>

<template>
    <form @submit.prevent="addTask">
        <input
            v-model="newTask"
            class=" border border-gray-300 rounded-md py-2 px-4 mr-2 text-gray-600 text-sm focus:outline-none focus:border-gray-400 focus:ring-0"
            type="text" placeholder="Type to add new tasks" />
        <button class="bg-blue-500 hover:bg-blue-600 text-white font-bold py-2 px-4 rounded" type="submit">Add Task</button>
    </form>
</template>
此表单将有一个具有 v-model 属性的输入元素。newTask 数据字段现在将通过双向绑定绑定到输入元素的值。
¥This form will have an input element that has a v-model attribute. The newTask data field will now be bound via two-way binding to the input element’s value.
你可以看到表单元素具有 @submit.prevent 属性。这将调用 addTask 方法,该方法将在提交表单时将文本打印到控制台。@ 符号是 v-on: 的简写。prevent 修饰符会停止表单的默认行为,即重新加载页面。
¥You can see that the form element has a @submit.prevent attribute. This will call the addTask method, which will print the text to the console when the form is submitted. The @ symbol is a shorthand for v-on:. The prevent modifier stops the form's default behavior, which is to reload the page.
3.2:更新应用组件
¥3.2: Update the App component
然后我们可以简单地将其添加到任务列表上方的 App 组件中:
¥Then we can simply add this to our App component above your list of tasks:
vue
<script setup>
import Task from './components/Task.vue';
import TaskForm from './components/TaskForm.vue';
import { subscribe, autorun } from 'vue-meteor-tracker';
import { TasksCollection } from '../api/tasksCollection';

subscribe('tasks');
const tasks = autorun(() => TasksCollection.find({}).fetch()).result;
</script>

<template>
  <div class="container">
    <header>
      <h1 class="text-4xl font-bold text-gray-800 my-4">Todo List</h1>
    </header>
    <TaskForm />
    <ul class="list-disc list-inside p-4">
      <Task v-for="task of tasks" :key="task._id" :task="task" />
    </ul>
  </div>
</template>
3.3:添加插入操作
¥3.3: Add Insert Operation
现在你可以编辑 addTask 函数以将新任务插入数据库。为此,我们需要实现一个 Meteor 方法。
¥Now you can edit the addTask function to insert a new task into the database. To do it, we will need to implement a Meteor Method.
方法本质上是对服务器的 RPC 调用,可让你安全地在服务器端执行操作。你可以阅读有关 Meteor 方法 此处 的更多信息。
¥Methods are essentially RPC calls to the server that let you perform operations on the server side securely. You can read more about Meteor Methods here.
要创建方法,你可以创建一个名为 tasksMethods.js 的文件。
¥To create your methods, you can create a file called tasksMethods.js.
javascript
import { Meteor } from 'meteor/meteor';
import { check } from 'meteor/check';
import { TasksCollection } from './tasksCollection';

async function insertTask(text) {
    check(text, String);
    return await TasksCollection.insertAsync({
        text,
        createdAt: new Date,
    });
}

Meteor.methods({ insertTask });
请记住在 main.js 服务器文件上导入你的方法。
¥Remember to import your method on the main.js server file.
javascript
import { Meteor } from 'meteor/meteor';
import { TasksCollection } from '../imports/api/tasksCollection';
import '../imports/api/tasksPublications';
import '../imports/api/tasksMethods';
现在,我们可以从我们的 TaskForm.vue 组件调用此方法。
¥Now, we can call this method from our TaskForm.vue component.
vue
<script setup>
import { ref } from 'vue';
import { Meteor } from 'meteor/meteor';

const newTask = ref('');

const addTask = async () => {
  await Meteor.callAsync('insertTask', newTask.value.trim());
  newTask.value = '';
}
</script>
在函数内部,我们通过调用 Meteor.callAsync() 将任务添加到 tasks 集合。第一个参数是我们要调用的方法的名称,第二个参数是任务的文本。我们还在修剪文本以删除任何多余的空格。
¥Inside the function, we are adding a task to the tasks collection by calling Meteor.callAsync(). The first argument is the name of the method we want to call, and the second argument is the text of the task. We are also trimming the text to remove any extra spaces.
3.5:首先显示最新任务
¥3.5: Show Newest Tasks First
现在,你只需要进行一些可以改善用户体验的更改:我们将首先展示最新的任务。我们可以通过对 MongoDB 查询进行排序来快速完成此操作。
¥Now, you just need to make a change which will improve user experience: we will show the newest tasks first. We can accomplish this quickly by sorting our MongoDB query.
javascript
...

const tasks = autorun(() => {
  return TasksCollection.find({}, { sort: { createdAt: -1 } }).fetch();
}).result;

...
你的应用应如下所示:
¥Your app should look like this:
4:更新和删除
¥4: Update and Remove
到目前为止,你只将文档插入到我们的集合中。让我们看看如何使用用户界面更新和删除它们。
¥Until now, you have only inserted documents to our collection. Let’s see how you can update and remove them using the user interface.
4.1:添加复选框
¥4.1: Add Checkbox
首先,你需要向你的 Task 组件添加一个 checkbox 元素,并且我们需要将 v-model 指令添加到复选框。这将使我们能够将复选框的值绑定到任务文档的 checked 字段。为此,我们需要将 ref 添加到任务文档中。这将使我们能够访问模板中的任务文档。并添加计算属性 isChecked 以管理复选框的状态。
¥First, you need to add a checkbox element to your Task component, and we need to add the v-model directive to the checkbox. This will allow us to bind the value of the checkbox to the checked field of the task document. To do this, we need to add a ref to the task document. This will allow us to access the task document in the template. And add a computed property isChecked for the state management of the checkbox.
我们还有一个名为 task 的 prop,它传递给组件。此 prop 是一个表示任务文档的对象。
¥We also have a prop called task that is passed to the component. This prop is an object that represents the task document.
vue
<script setup>
import { ref, computed } from 'vue';

const props = defineProps({
  task: {
    type: Object,
    required: true,
  },
});

const taskRef = ref({ ...props.task }); // Create a reactive copy of the task

const isChecked = computed(() => taskRef.value.checked);

</script>

<template>
  <div class="flex items-center rounded px-4 py-2 mb-2">
    <li>
      <input v-model="taskRef.checked" type="checkbox" :checked="isChecked" @change="handleCheckboxChange" />
    </li>
    <span class="text-gray-600 pl-2" :class="{ 'text-gray-400 italic line-through': taskRef.checked }">
      {{ task.text }}
    </span>
  </div>
</template>
 ..
4.2:切换复选框
¥4.2: Toggle Checkbox
我们需要实现更新任务文档的方法。因此,使用以下代码更新 tasksMethods.js 文件:
¥We need to implement the method to update the task document. So, update the tasksMethods.js file with the following code:
javascript
import { Meteor } from 'meteor/meteor';
import { check } from 'meteor/check';
import { TasksCollection } from './tasksCollection';

async function insertTask(text) {
    check(text, String);
    return await TasksCollection.insertAsync({
        text,
        createdAt: new Date,
    });
}

async function removeTask(taskId) {
    check(taskId, String);
    await TasksCollection.removeAsync(taskId);
}

async function setIsCheckedTask(taskId, checked) {
    check(taskId, String);
    check(checked, Boolean);

    await TasksCollection.updateAsync(taskId, {
        $set: {
            checked
        }
    });
}

Meteor.methods({ insertTask, removeTask, setIsCheckedTask });
集合上的 updateAsync 函数接受两个参数。第一个是标识集合子集的选择器,第二个是指定应对匹配对象执行的操作的更新参数。
¥The updateAsync function on a collection takes two arguments. The first is a selector that identifies a subset of the collection, and the second is an update parameter that specifies what should be done to the matched objects.
在这种情况下,选择器只是相关任务的 _id。在我们的方法中,update 参数使用 $set 来切换 checked 字段,该字段将表示任务是否已完成。
¥In this case, the selector is just the _id of the relevant task. The update parameter uses $set, on our method, to toggle the checked field, which will represent whether the task has been completed.
在客户端,你需要添加一个函数来处理复选框更改事件。此方法更新本地 taskRef.checked 状态并处理 Meteor 调用以更新任务的已检查状态。它封装了你想要在选中或取消选中复选框时执行的任何逻辑。
¥On the client side, you need to add a function to handle the checkbox change event. This method updates the local taskRef.checked state and handles the Meteor call to update the task's checked status. It encapsulate any logic you want to perform when the checkbox is checked or unchecked.
vue
<script setup>
import { ref, computed } from 'vue';

const props = defineProps({
    task: {
      type: Object,
      required: true,
    },
});

const taskRef = ref({ ...props.task });

const isChecked = computed(() => taskRef.value.checked);

const handleCheckboxChange = async (event) => {
    const newCheckedValue = event.target.checked;
    taskRef.value.checked = newCheckedValue;

    try {
      await Meteor.callAsync('setIsCheckedTask', taskRef.value._id, newCheckedValue);
    } catch (error) {
      console.error('Error updating task checked state:', error);
    }
};
</script>

<template>
  <div class="flex items-center rounded px-4 py-2 mb-2">
    <li>
      <input v-model="taskRef.checked" type="checkbox" :checked="isChecked" @change="handleCheckboxChange" />
    </li>
    <span class="text-gray-600 pl-2" :class="{ 'text-gray-400 italic line-through': taskRef.checked }">
      {{ task.text }}
    </span>
  </div>
</template>
你的应用应如下所示:
¥Your app should look like this:
4.3:删除任务
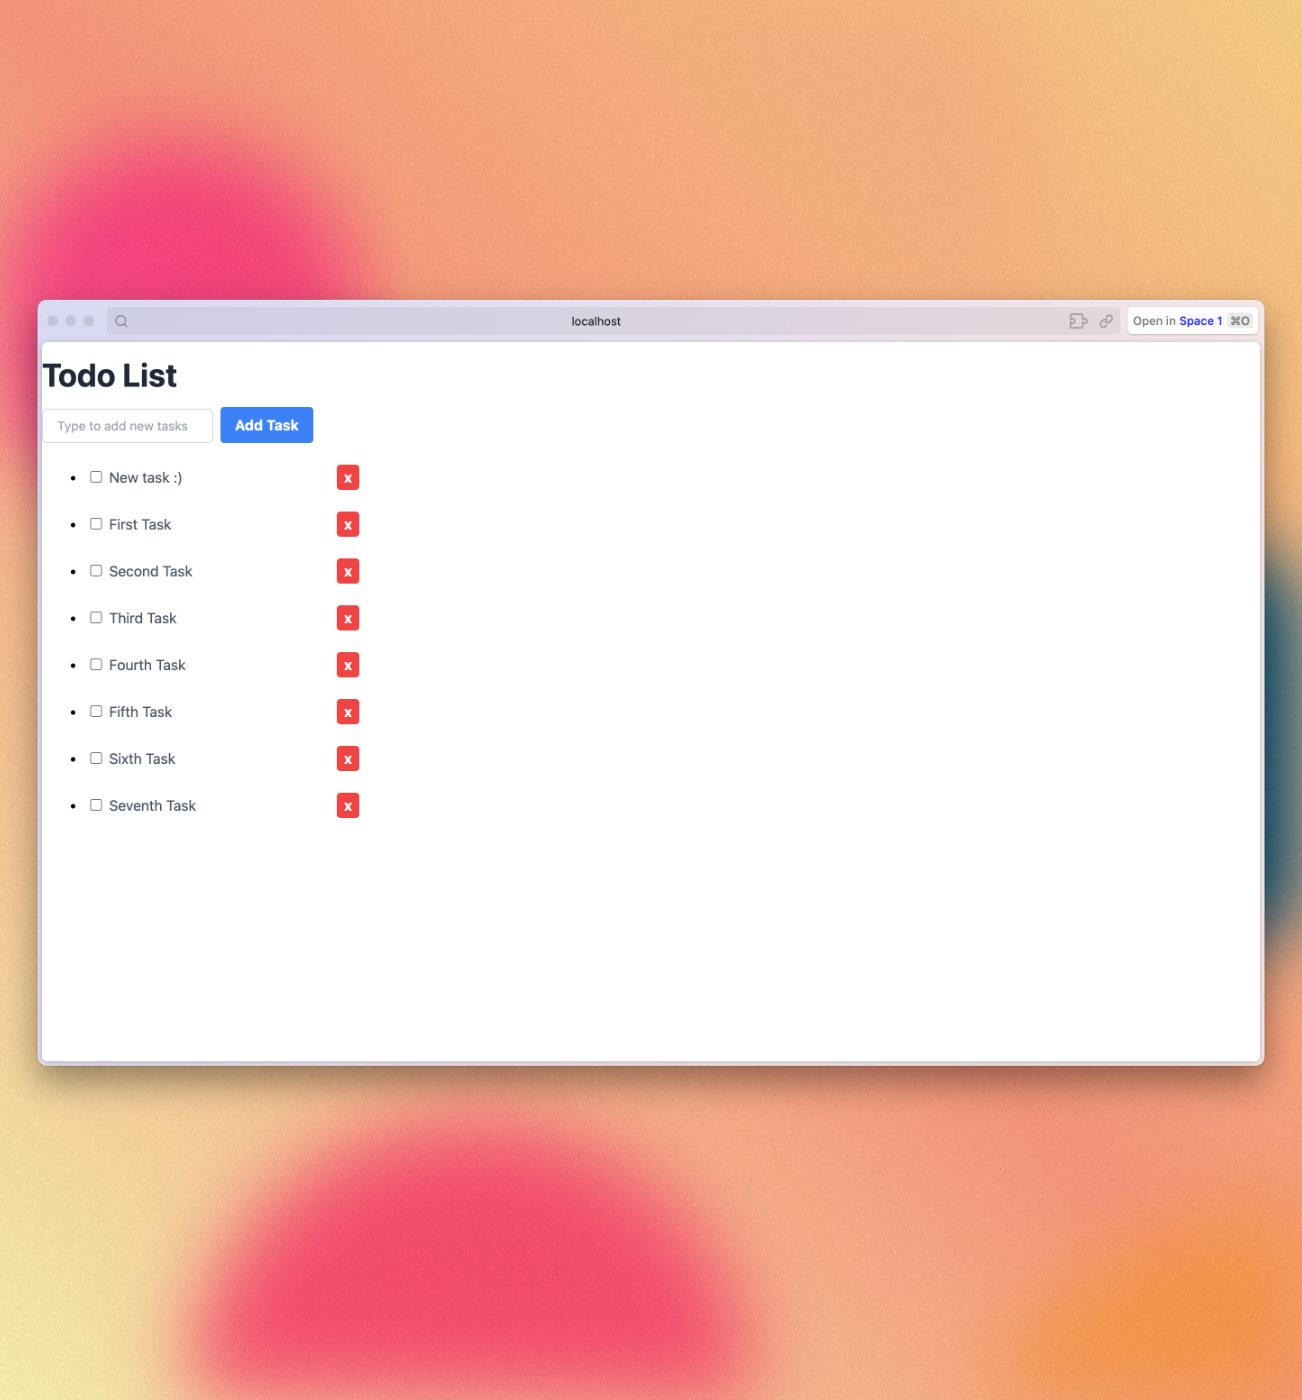
¥4.3: Remove tasks
你只需几行代码即可删除任务。
¥You can remove tasks with just a few lines of code.
首先在 Task 组件中的文本后添加一个按钮并接收回调函数。
¥First add a button after the text in your Task component and receive a callback function.
vue
...
<span class="text-gray-600 pl-2" :class="{ 'text-gray-400 italic line-through': taskRef.checked }">
{{ task.text }}
</span>
<button
class="ml-auto bg-red-500 hover:bg-red-600 text-white font-bold py-0.5 px-2 rounded"
@click="deleteTask"> ×
</button>
...现在将删除逻辑添加到方法中:
¥Now add the removal logic into methods:
javascript
...
const deleteTask = async () => {
  try {
    await Meteor.callAsync('removeTask', taskRef.value._id);
  } catch (error) {
    console.error('Error deleting task:', error);
  }
};
...
你的应用应如下所示:
¥Your app should look like this:
5:样式
¥5: Styles
5.1:Tailwind CSS
到目前为止,我们的用户界面看起来并不好。让我们添加一些基本样式来为更专业的应用奠定基础。我们将从 App 组件开始。
¥Our user interface has not looked great so far. Let’s add some basic styling to create a foundation for a more professional app. We'll start with the App component.
vue
<template>
  <header class="flex items-center justify-between px-4 py-4 bg-gray-100 border-t border-b border-gray-200">
    <h1 class="text-4xl font-bold text-gray-800 my-4">🚀 To-Do List</h1>
  </header>
  <div class="mx-auto max-w-2xl px-4 py-8 sm:px-6 lg:px-8">
    <div class="mb-8 md:w-96 md:mx-auto md:mb-0 md:mt-8 md:px-4 md:py-8 text-center md:bg-gray-100 md:rounded-lg">
      <TaskForm />
      <ul class="list-none list-inside pt-4 md:w-96">
        <Task v-for="task of tasks" :key="task._id" :task="task" />
      </ul>
    </div>
  </div>
</template>
Flexbox 是分发和对齐 UI 中元素的绝佳工具。查看此 article 以了解有关我们在本教程中使用的 CSS 框架 Tailwind CSS 的更多信息。
¥Flexbox is an excellent tool to distribute and align elements in your UI. Check this article to learn more about Tailwind CSS, the CSS framework we are using in this tutorial.
我们还将更新 TaskForm 组件和 Task 组件。
¥We’ll also update the TaskForm component and the Task component.
vue
<template>
  <form @submit.prevent="addTask">
    <input
        v-model="newTask"
        class=" border border-gray-300 rounded-md py-2 px-4 mr-2 text-gray-600 text-sm focus:outline-none focus:border-gray-400 focus:ring-0"
        type="text" placeholder="Type to add new tasks" />
    <button class="bg-blue-500 hover:bg-blue-600 text-white font-bold py-1.5 px-4 rounded" type="submit">Add Task</button>
  </form>
</template>
vue
<template>
<div class="flex items-center rounded p-4 py-2 mb-2 shadow-sm border border-gray-200 md:mr-8">
<li>
<input v-model="taskRef.checked" type="checkbox" readonly :checked="isChecked" @change="handleCheckboxChange" />
</li>
<span class="text-gray-600 pl-2" :class="{ 'text-gray-400 italic line-through': taskRef.checked }">
{{ task.text }}
</span>
<button class="ml-auto bg-red-500 hover:bg-red-600 text-white font-bold py-0.5 px-2 rounded" @click="deleteTask">
×
</button>
</div>
</template>你的应用应如下所示:
¥Your app should look like this:

在下一步中,我们将使此任务列表更具交互性,并提供一种过滤任务的方法。
¥In the next step we will make this task list more interactive providing a way to filter tasks.
6:过滤任务
¥6: Filter tasks
在此步骤中,你将按状态过滤任务并显示待处理任务的数量。
¥In this step you will filter your tasks by status and show the quantity of pending tasks.
6.1:过滤任务
¥6.1: Filter tasks
首先,你将添加一个按钮来显示或隐藏列表中的已完成任务:
¥First, you will add a button to show or hide the completed tasks from the list:
vue
<div class="mb-8 md:w-96 md:mx-auto md:mb-0 md:mt-8 md:px-4 md:py-8 text-center md:bg-gray-100 md:rounded-lg">
    <TaskForm />
    <div>
      <button class="text-sm font-semibold text-gray-600 hover:text-gray-800" @click="toggleHideCompleted">
        <span v-if="hideCompleted">Show all</span>
        <span v-else>Hide completed</span>
      </button>
    </div>
    <ul class="list-none list-inside pt-4 md:w-96">
      <Task v-for="task of tasks" :key="task._id" :task="task" />
    </ul>
</div>
你可以看到它从 hideCompleted 读取。我们需要在脚本部分使用 ref 初始化 hideCompleted 的值:
¥You can see that it reads from hideCompleted. We’ll need to initialize the value of hideCompleted using ref in the script section:
javascript
...
import { ref } from 'vue';

const hideCompleted = ref(false);

subscribe('tasks');
...
我们可以直接从事件处理程序更新 hideCompleted,然后导致组件重新渲染:
¥We can update hideCompleted from an event handler directly, which will then cause the component to re-render:
javascript
...
const toggleHideCompleted = () => {
  hideCompleted.value = !hideCompleted.value
};
</script>
...
现在,我们需要更新任务列表以在 hideCompleted 为 true 时过滤掉已完成的任务。
¥Now, we need to update the list of tasks to filter out completed tasks when hideCompleted is true.
imports/ui/App.vue
javascript
...

subscribe('tasks');

const tasks = autorun(() => {
  const filter = hideCompleted.value ? { checked: { $ne: true } } : {};
  return TasksCollection.find(filter, { sort: { createdAt: -1 } }).fetch();
}).result;

...
将一些任务标记为已完成,以便你可以检查过滤器行为。
¥Mark a few tasks as completed so you can check the filter behaviour.
6.2:待处理任务
¥6.2: Pending tasks
更新 App 组件以显示应用栏中待处理任务的数量。
¥Update the App component in order to show the number of pending tasks in the app bar.
当没有待处理任务时,你应该避免在应用栏中添加零。
¥You should avoid adding zero to your app bar when there are no pending tasks.
vue
<script setup>
...
const incompleteTasksCount = autorun(() => {
  return TasksCollection.find({ checked: { $ne: true } }).count();
}).result;
...
</script>

<template>
...
  <h1 class="text-4xl font-bold text-gray-800 my-4">🚀 To-Do List
    <span v-if="incompleteTasksCount > 0" class="text-xl font-light text-gray-600">({{ incompleteTasksCount }})</span>
  </h1>
...
</template>
此时,你的应用应如下所示:
¥At this point, your app should look like this:

7:添加用户账户
¥7: Adding User Accounts
7.1:密码身份验证
¥7.1: Password Authentication
Meteor 已经自带了开箱即用的身份验证和账户管理系统,因此你只需添加 accounts-password 包即可启用用户名和密码身份验证:
¥Meteor already comes with authentication and account management system out of the box, so you only need to add the accounts-password package to enable username and password authentication:
shell
meteor add accounts-password支持更多身份验证方法。你可以阅读有关账户系统 此处 的更多信息。
¥There are many more authentication methods supported. You can read more about the accounts system here.
我们还建议你安装 bcrypt Node 模块,否则你将看到一条警告,提示你正在使用它的纯 Javascript 实现。
¥We also recommend you to install bcrypt node module, otherwise you are going to see a warning saying that you are using pure-Javascript implementation of it.
shell
meteor npm install --save bcrypt你应该始终使用
meteor npm而不是仅使用npm,因此你始终使用 Meteor 固定的npm版本,这有助于你避免由于不同版本的 npm 安装不同的模块而导致的问题。¥You should always use
meteor npminstead of onlynpmso you always use thenpmversion pinned by Meteor, this helps you to avoid problems due to different versions of npm installing different modules.
7.2:创建用户账户
¥7.2: Create User Account
现在,你可以为我们的应用创建一个默认用户。如果在数据库中找不到新用户,我们将在服务器启动时创建一个新用户。让我们为用户创建和任务创建创建特定函数,然后在 Meteor.startup() 中调用这两个函数。
¥Now, you can create a default user for our app. We will create a new user when the server starts if we don’t find one in the database. Let's make specific functions for user creation and task creation, and then call both in Meteor.startup().
javascript
import { Meteor } from 'meteor/meteor';
import { Accounts } from 'meteor/accounts-base';
import { TasksCollection } from '../imports/api/tasksCollection';
import '../imports/api/tasksPublications';
import '../imports/api/tasksMethods';

const SEED_USERNAME = 'meteorite';
const SEED_PASSWORD = 'password';

const createFirstUser = async () => {
  const user = await Accounts.findUserByUsername(SEED_USERNAME);
  if (!user) {
    await Accounts.createUserAsync({
      username: SEED_USERNAME,
      password: SEED_PASSWORD,
    });
  }
}

const insertTask = async text => await TasksCollection.insertAsync({text});

const createTasks = async () => {
  const tasksCount = await TasksCollection.find().countAsync();
  if (tasksCount === 0) {
    await insertTask('First Task');
    await insertTask('Second Task');
    await insertTask('Third Task');
    await insertTask('Fourth Task');
    await insertTask('Fifth Task');
    await insertTask('Sixth Task');
    await insertTask('Seventh Task');
  }
}

Meteor.startup(async () => {
  await createFirstUser();
  await createTasks();
});
你目前不应该在应用 UI 中看到任何不同。
¥You should not see anything different in your app UI yet.
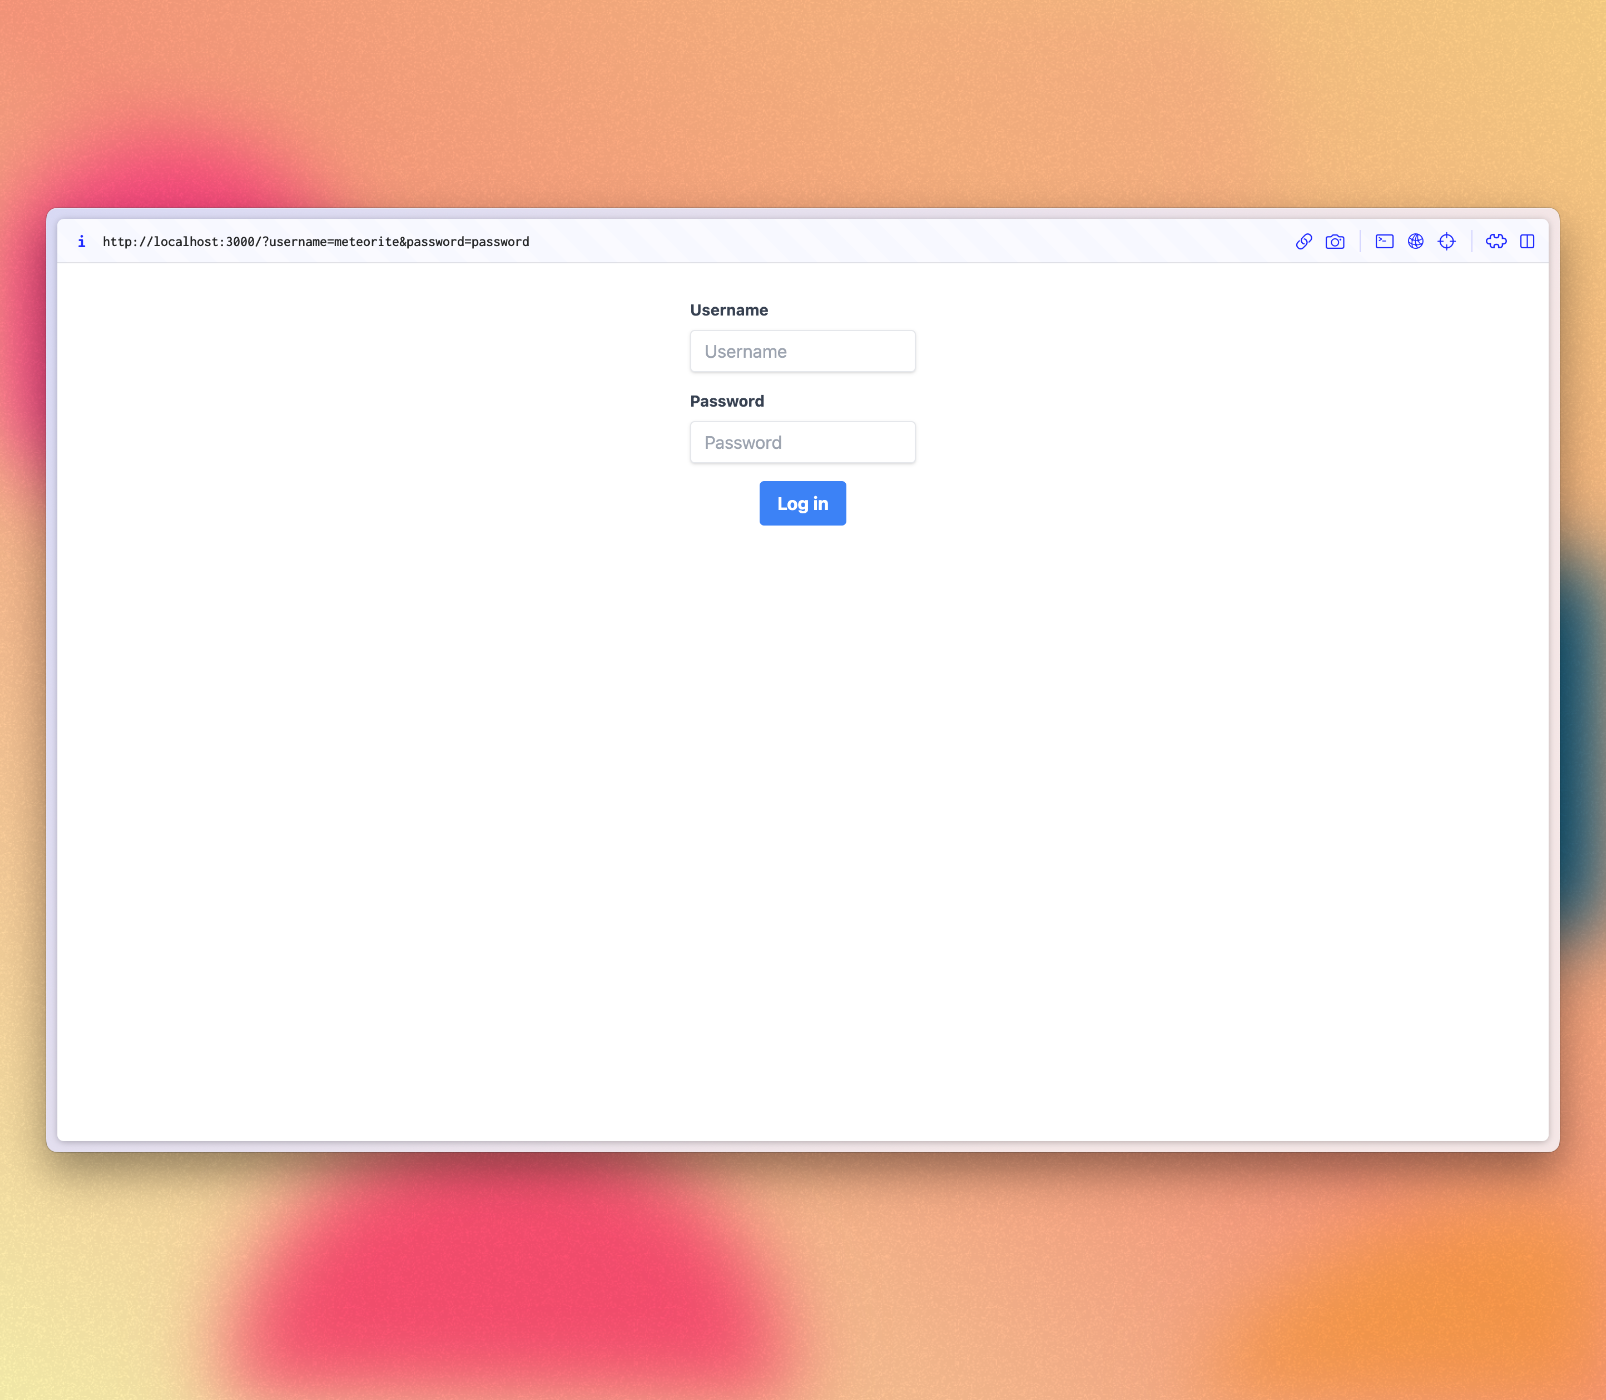
7.3:登录表单
¥7.3: Login Form
你需要为用户提供一种输入凭据并登录的方式。为此,我们需要一个表单。
¥You need to give users a way to enter their credentials and log in. For this, we need a form.
创建一个名为 LoginForm.vue 的新文件并向其中添加表单。使用 Meteor.loginWithPassword(username, password) 使用提供的信息登录用户。
¥Create a new file called LoginForm.vue and add a form to it. Use Meteor.loginWithPassword(username, password) to log in the user with the provided information.
vue
<script setup>
import { Meteor } from 'meteor/meteor';
import { ref } from 'vue';

const username = ref('');
const password = ref('');

const login = () => {
  Meteor.loginWithPassword(username.value, password.value);
}
</script>

<template>
  <form class="flex flex-col justify-center items-center w-full max-w-md mx-auto my-8" @submit.prevent="login">
    <div>
      <label for="username" class="block text-gray-700 text-sm font-bold mb-2">Username</label>
      <input v-model="username" type="text" name="username" placeholder="Username" required
             class="shadow appearance-none border rounded w-full py-2 px-3 text-gray-700 leading-tight focus:outline-none focus:shadow-outline">
    </div>

    <div class="mt-4">
      <label for="password" class="block text-gray-700 text-sm font-bold mb-2">Password</label>
      <input v-model="password" type="password" name="password" placeholder="Password" required
             class="shadow appearance-none border rounded w-full py-2 px-3 text-gray-700 leading-tight focus:outline-none focus:shadow-outline">
    </div>

    <div>
      <button type="submit"
              class="bg-blue-500 hover:bg-blue-700 text-white font-bold py-2 mt-4 px-4 rounded focus:outline-none focus:shadow-outline">
        Log in
      </button>
    </div>
  </form>
</template>
7.4:需要身份验证
¥7.4: Require Authentication
我们的应用应该只允许经过身份验证的用户访问任务管理功能。
¥Our app should only let authenticated users access the task management features.
我们可以通过在没有经过身份验证的用户时显示 LoginForm 组件来实现这一点。如果用户已登录,我们将显示任务列表。
¥We can achieve this by showing the LoginForm component when there is no authenticated user. If the user is logged in, we will show the tasks list.
我们需要一个 ref 来检查用户是否已登录,一个 userId 变量来存储用户数据,以及一些使用 watch 的逻辑,以便在用户更改时更新 isLogged ref。
¥We’ll need a ref to check if the user is logged in, a userId variable to store user data, and some logic using watch to update the isLogged ref when the user changes.
javascript
...
import { Meteor } from 'meteor/meteor';
import { ref, watch } from 'vue';

const hideCompleted = ref(false);
const isLogged = ref(false);

const userId = autorun(() => Meteor.userId()).result;

watch(
  () => userId.value,
  (newUser) => {
    isLogged.value = !!newUser
  },
  { immediate: true }
);
...
接下来,我们可以将用户功能封装在 <div> 标签中,并使用 v-if 指令仅在用户登录时显示这些功能:
¥Next, we can wrap our user features in a <div> tag and use the v-if directive to show these features only when a user is logged in:
vue
<script setup>
...
import LoginForm from './components/LoginForm.vue';
...
</script>

<template>
  <div v-if="isLogged">
    <header class="flex items-center justify-between px-4 py-4 bg-gray-100 border-t border-b border-gray-200">
      <h1 class="text-4xl font-bold text-gray-800 my-4">🚀 To-Do List
        <span v-if="incompleteTasksCount > 0" class="text-xl font-light text-gray-600">({{ incompleteTasksCount }})</span>
      </h1>
    </header>
    <div class="mx-auto max-w-2xl px-4 py-8 sm:px-6 lg:px-8">
      <div class="mb-8 md:w-96 md:mx-auto md:mb-0 md:mt-8 md:px-4 md:py-8 text-center md:bg-gray-100 md:rounded-lg">
        <TaskForm />
        <div>
          <button class="text-sm font-semibold text-gray-600 hover:text-gray-800" @click="toggleHideCompleted">
            <span v-if="hideCompleted">Show all</span>
            <span v-else>Hide completed</span>
          </button>
        </div>
        <ul class="list-none list-inside pt-4 md:w-96">
          <Task v-for="task of tasks" :key="task._id" :task="task" />
        </ul>
      </div>
    </div>
  </div>

  <div v-else>
    <LoginForm />
  </div>
</template>
7.5:服务器启动
¥7.5: Server startup
从现在开始,每个任务都必须有一个所有者。请转到你的数据库并删除所有任务:
¥From now on, every task must have an owner. Please go to your database and remove all the tasks:
db.tasks.remove({});
然后,更新你的 server/main.js 以添加以你的 meteoriote 用户为所有者的种子任务。
¥Then, update your server/main.js to add the seed tasks with your meteoriote user as the owner.
javascript
import { Meteor } from 'meteor/meteor';
import { Accounts } from 'meteor/accounts-base';
import { TasksCollection } from '../imports/api/tasksCollection';
import '../imports/api/tasksPublications';
import '../imports/api/tasksMethods';

const SEED_USERNAME = 'meteorite';
const SEED_PASSWORD = 'password';

const createFirstUser = async () => {
  const user = await Accounts.findUserByUsername(SEED_USERNAME);
  if (!user) {
    await Accounts.createUserAsync({
      username: SEED_USERNAME,
      password: SEED_PASSWORD,
    });
  }
}

const insertTask = async (text, userId) => {
  await TasksCollection.insertAsync({text, userId, createdAt: new Date()});
}

const createTasks = async () => {
  const tasksCount = await TasksCollection.find().countAsync();
  if (tasksCount === 0) {
    const user = await Accounts.findUserByUsername(SEED_USERNAME);

    await insertTask('First Task', user._id);
    await insertTask('Second Task', user._id);
    await insertTask('Third Task', user._id);
    await insertTask('Fourth Task', user._id);
    await insertTask('Fifth Task', user._id);
    await insertTask('Sixth Task', user._id);
    await insertTask('Seventh Task', user._id);
  }
}

Meteor.startup(async () => {
  await createFirstUser();
  await createTasks();
});
看到我们正在将一个名为 userId 的新字段与用户 _id 字段一起使用,我们还设置了 createdAt 字段。
¥See that we are using a new field called userId with our user _id field, we are also setting createdAt field.
转到任务发布并将 userId 添加到查找选择器,这样用户就只能看到他们自己的任务。
¥Go to the tasks publication and add the userId to the find selector, so users will be able to see only their own tasks.
javascript
import { Meteor } from 'meteor/meteor';
import { TasksCollection } from './tasksCollection';

Meteor.publish('tasks', function publishTasks() {
  return TasksCollection.find({ userId: Meteor.userId() });
});
在测试之前,请确保在进行此更改后重新启动服务器,以便 Meteor.startup 块再次运行。由于你正在更改服务器端代码,因此这可能会自动发生。
¥Before testing, make sure to restart the server after making this change so that the Meteor.startup block runs again. This will likely happen automatically since you're changing the server-side code.
7.7:任务所有者
¥7.7: Task owner
任务由其所有者使用经过身份验证的用户在发布物中过滤,但我们也应该在 UI 中过滤任务。从 Minimongo 检索任务时,使用用户的 _id 将 userId 字段添加到 MongoDB 选择器。
¥Tasks are filtered by their owner in the publication using the authenticated user, but we should also filter the tasks in the UI. Use the user's _id to add the userId field to your MongoDB selector when retrieving tasks from Minimongo.
你的 tasks 函数应如下所示:
¥Your tasks function should look like this:
vue
<script setup>
...
const userId = autorun(() => Meteor.userId()).result;

watch(
  () => userId.value,
  (newUserId) => {
    isLogged.value = !!newUserId
  },
  { immediate: true }
);

subscribe('tasks');

const tasks = autorun(() => {
  const filter = hideCompleted.value ? { checked: { $ne: true }, userId: userId.value } : { userId: userId.value };
  return TasksCollection.find(filter, { sort: { createdAt: -1 } }).fetch();
}).result;

const incompleteTasksCount = autorun(() => {
  return TasksCollection.find({ checked: { $ne: true }, userId: userId.value }).count()
}).result;

...
</script>
7.8:注销
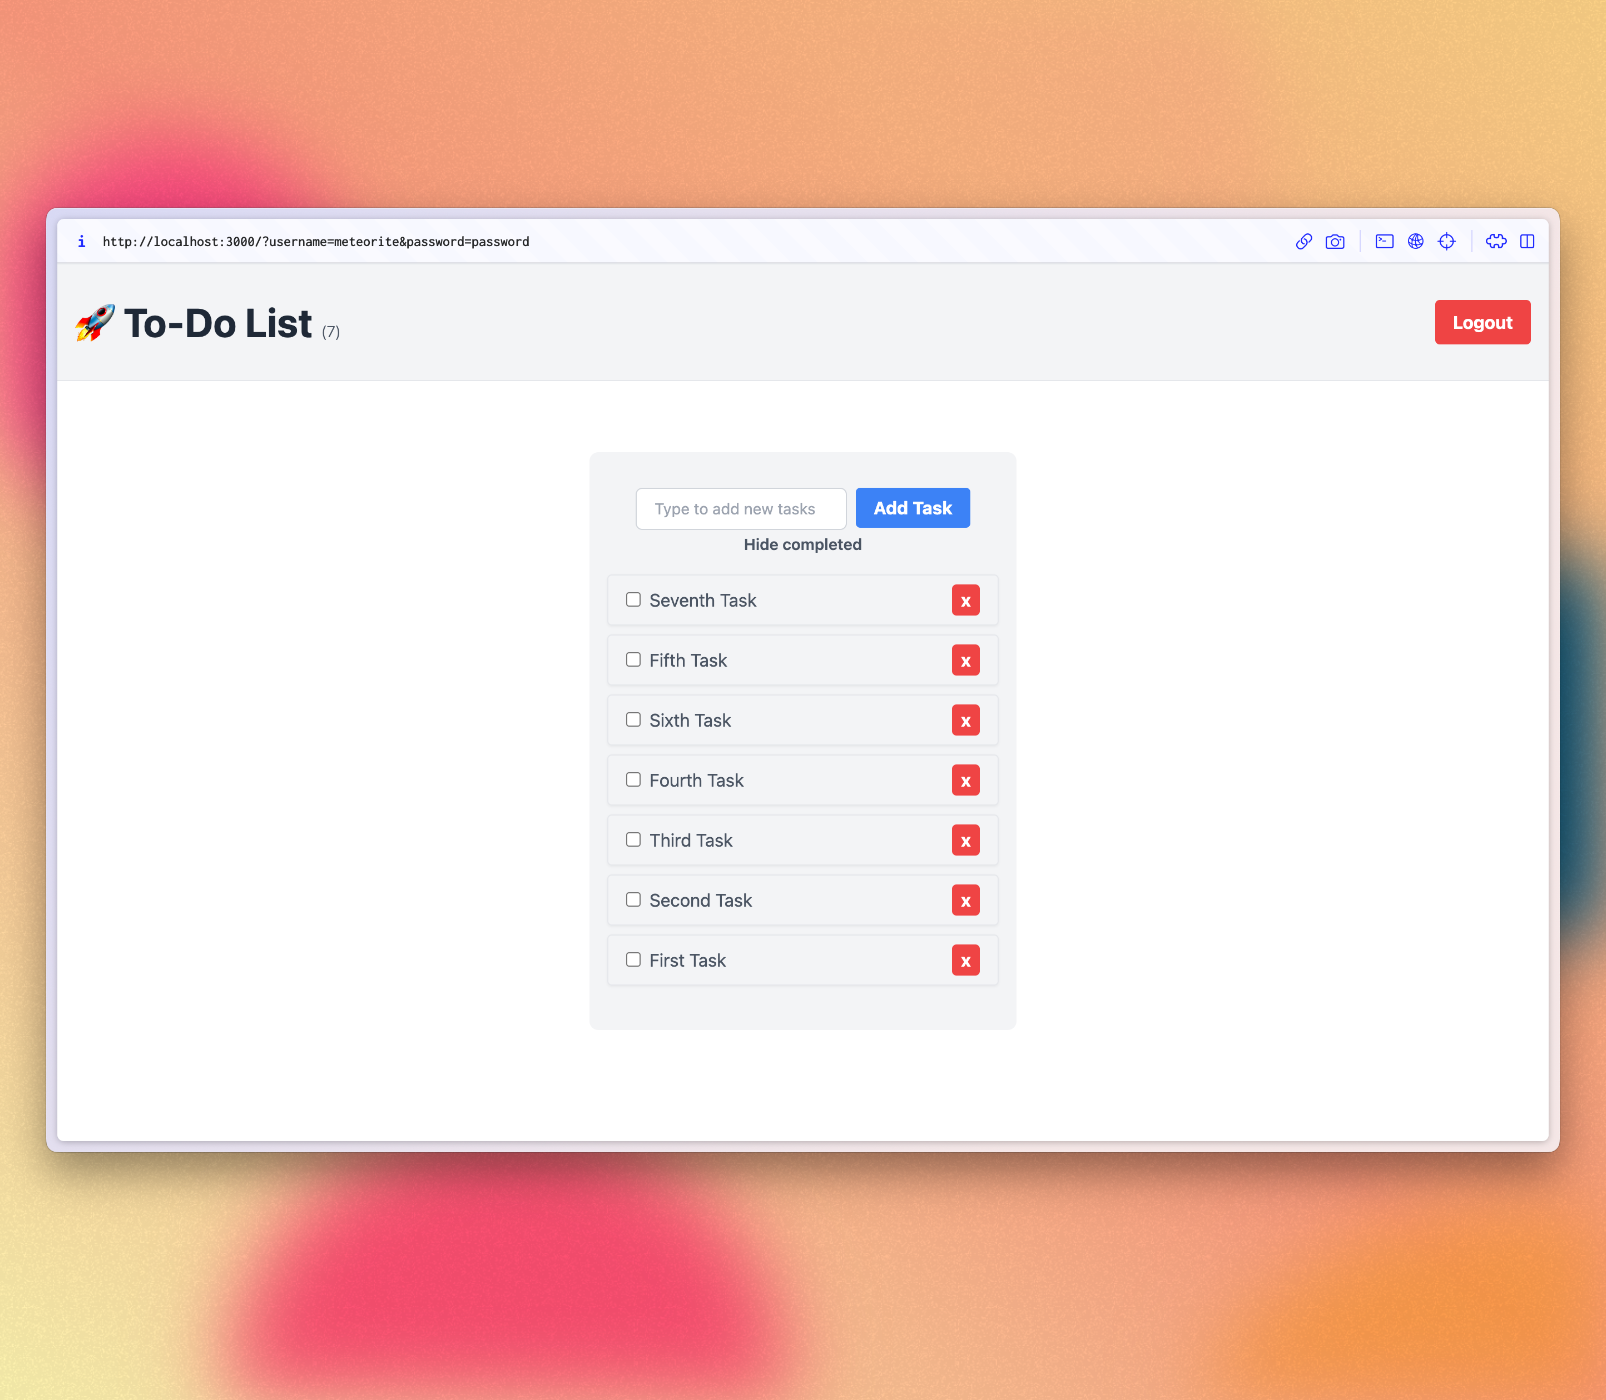
¥7.8: Log out
我们可以在 h1 之后立即包含一个新的 button。在此按钮上,你可以添加一个 onClick 处理程序来注销用户。它非常简单,只需调用 Meteor.logout() 即可。
¥We can include a new button right after our h1. On this button you can add an onClick handler to logout the user. It is very straightforward, just call Meteor.logout() on it.
vue
<script setup>
...
const logout = () => Meteor.logout();
...
</script>

<h1 class="text-4xl font-bold text-gray-800 my-4">🚀 To-Do List
  <span v-if="incompleteTasksCount > 0" class="text-xl font-light text-gray-600">({{ incompleteTasksCount }})</span>
</h1>

<button
  class="bg-red-500 hover:bg-red-600 text-white font-bold py-2 px-4 rounded focus:outline-none focus:shadow-outline"
  @click="logout">
      Logout
</button>
...
现在我们有了身份验证,我们可以在服务器端添加检查,以确保只有登录的用户才能删除、更新或添加新任务。
¥Now that we have authentication, we can add a check on the server side to ensure only logged-in users can delete, update, or add new tasks.
我们可以通过将以下代码添加到 tasksMethods 上的每个代码来做到这一点:
¥We can do this by adding the code below to each on tasksMethods:
javascript
if (!Meteor.userId()) {
 throw new Meteor.Error('Not authorized.');
}
请按照你的 tasksMethods 的样子进行操作:
¥Follow how your tasksMethods should look like:
javascript
import { Meteor } from 'meteor/meteor';
import { check } from 'meteor/check';
import { TasksCollection } from './tasksCollection';

async function insertTask(text) {
    check(text, String);
    if (!Meteor.userId()) {
        throw new Meteor.Error('Not authorized.');
    }
    return await TasksCollection.insertAsync({
        text,
        userId: Meteor.userId(),
        createdAt: new Date,
    });
}

async function removeTask(taskId) {
    check(taskId, String);
    if (!Meteor.userId()) {
        throw new Meteor.Error('Not authorized.');
    }
    await TasksCollection.removeAsync(taskId);
}

async function setIsCheckedTask(taskId, checked) {
    check(taskId, String);
    check(checked, Boolean);

    if (!Meteor.userId()) {
        throw new Meteor.Error('Not authorized.');
    }

    await TasksCollection.updateAsync(taskId, {
        $set: {
            checked
        }
    });
}

Meteor.methods({ insertTask, removeTask, setIsCheckedTask });
呼!你在此步骤中做了很多工作。对用户进行身份验证,在任务中设置用户,并为用户提供注销方式。
¥Phew! You have done quite a lot in this step. Authenticated the user, set the user in the tasks and provided a way for the user to log out.
你的应用应如下所示:
¥Your app should look like this:
8:部署
¥8: Deploying
部署 Meteor 应用类似于部署任何其他使用 websockets 的 Node.js 应用。你可以在 我们的指南 中找到部署选项,包括 Meteor Up、Docker 和我们推荐的方法 Galaxy。
¥Deploying a Meteor application is similar to deploying any other Node.js app that uses websockets. You can find deployment options in our guide, including Meteor Up, Docker, and our recommended method, Galaxy.
在本教程中,我们将在 Galaxy 上部署我们的应用,这是我们自己的云解决方案。Galaxy 提供免费计划,因此你可以部署和测试你的应用。很酷,对吧?
¥In this tutorial, we will deploy our app on Galaxy, which is our own cloud solution. Galaxy offers a free plan, so you can deploy and test your app. Pretty cool, right?
8.1:创建你的账户
¥8.1: Create your account
你需要一个 Meteor 账户来部署你的应用。如果你还没有,可以使用 在此处注册。使用此账户,你可以访问我们的包管理器、Atmosphere、论坛 等。
¥You need a Meteor account to deploy your apps. If you don’t have one yet, you can sign up here. With this account, you can access our package manager, Atmosphere, Forums and more.
8.2:设置 MongoDB(可选)
¥8.2: Set up MongoDB (Optional)
由于你的应用使用 MongoDB,第一步是设置 MongoDB 数据库,Galaxy 提供免费计划的 MongoDB 托管以供测试,你还可以请求允许你扩展的生产就绪数据库。
¥As your app uses MongoDB the first step is to set up a MongoDB database, Galaxy offers MongoDB hosting on a free plan for testing purposes, and you can also request for a production ready database that allows you to scale.
在任何 MongoDB 提供程序中,你都会有一个必须使用的 MongoDB URL。如果你使用 Galaxy 提供的免费选项,则初始设置已为你完成。
¥In any MongoDB provider you will have a MongoDB URL which you must use it. If you use the free option provided by Galaxy, the initial setup is done for you.
Galaxy MongoDB URL 将如下所示:mongodb://username:<password>@org-dbname-01.mongodb.galaxy-cloud.io .
¥Galaxy MongoDB URL will be like this: mongodb://username:<password>@org-dbname-01.mongodb.galaxy-cloud.io .
你可以阅读更多关于 Galaxy MongoDB 此处 的信息。
¥You can read more about Galaxy MongoDB here.
8.3:设置设置
¥8.3: Set up settings
你需要创建一个设置文件,它是一个 JSON 文件,Meteor 应用可以从中读取配置。在项目根目录中名为 private 的新文件夹中创建此文件。需要注意的是,private 是一个特殊文件夹,不会发布到应用的客户端。
¥You need to create a setting file, it’s a JSON file that Meteor apps can read configurations from. Create this file in a new folder called private in the root of your project. It is important to notice that private is a special folder that is not going to be published to the client side of your app.
确保将 Your MongoDB URL 替换为你自己的 MongoDB URL 😃
¥Make sure you replace Your MongoDB URL by your own MongoDB URL 😃
json
{
  "galaxy.meteor.com": {
    "env": {
      "MONGO_URL": "Your MongoDB URL"
    }
  }
}
8.4:部署它
¥8.4: Deploy it
现在你已准备好部署,请在部署之前运行 meteor npm install 以确保安装了所有依赖。
¥Now you are ready to deploy, run meteor npm install before deploying to make sure all your dependencies are installed.
你还需要选择一个子域来发布你的应用。我们将使用免费的主域 meteorapp.com,它包含在任何 Galaxy 计划中。
¥You also need to choose a subdomain to publish your app. We are going to use the main domain meteorapp.com that is free and included on any Galaxy plan.
在此示例中,我们将使用 vue3-meteor-3.meteorapp.com,但请确保你选择其他 XX,否则你将收到错误。
¥In this example we are going to use vue3-meteor-3.meteorapp.com but make sure you select a different one, otherwise you are going to receive an error.
你可以了解如何在 Galaxy 此处 上使用自定义域。从 Essentials 计划开始,可以使用自定义域。
¥You can learn how to use custom domains on Galaxy here. Custom domains are available starting with the Essentials plan.
运行部署命令:
¥Run the deployment command:
shell
meteor deploy vue3-meteor-3.meteorapp.com --free --mongo如果你没有在 Galaxy 上使用 MongoDB 的免费托管,请从部署脚本中删除
--mongo标志,并使用适合你应用的设置添加--settings private/settings.json。¥If you are not using the free hosting with MongoDB on Galaxy, then remove the
--mongoflag from the deploy script and add--settings private/settings.jsonwith the proper setting for your app.
确保将 vue3-meteor-3 替换为你想要用作子域的自定义名称。你将看到如下日志:
¥Make sure you replace vue3-meteor-3 by a custom name that you want as subdomain. You will see a log like this:
shell
meteor deploy vue3-meteor-3.meteorapp.com --settings private/settings.json
Talking to Galaxy servers at https://us-east-1.galaxy-deploy.meteor.com
Preparing to build your app...
Preparing to upload your app...
Uploaded app bundle for new app at vue-tutorial.meteorapp.com.
Galaxy is building the app into a native image.
Waiting for deployment updates from Galaxy...
Building app image...
Deploying app...
You have successfully deployed the first version of your app.
For details, visit https://galaxy.meteor.com/app/vue3-meteor-3.meteorapp.com
此过程通常只需几分钟,但这取决于你的互联网速度,因为它会将你的应用包发送到 Galaxy 服务器。
¥This process usually takes just a few minutes, but it depends on your internet speed as it’s going to send your app bundle to Galaxy servers.
Galaxy 构建一个包含你的应用包的新 Docker 映像,然后使用它部署容器,阅读更多。
¥Galaxy builds a new Docker image that contains your app bundle and then deploy containers using it, read more.
你可以查看 Galaxy 上的日志,包括 Galaxy 构建 Docker 映像并部署它的部分。
¥You can check your logs on Galaxy, including the part that Galaxy is building your Docker image and deploying it.
8.5:访问应用并享受
¥8.5: Access the app and enjoy
现在,你应该能够在 https://galaxy.meteor.com/app/vue3-meteor-3.meteorapp.com 访问你的 Galaxy 仪表板。
¥Now you should be able to access your Galaxy dashboard at https://galaxy.meteor.com/app/vue3-meteor-3.meteorapp.com.
你还可以在 Galaxy 2.0 上访问你的应用,该应用目前处于 https://galaxy-beta.meteor.com/<your-username>/us-east-1/apps/<your-app-name>.meteorapp.com 测试阶段。请记住使用你自己的子域而不是 vue3-meteor-3。
¥You can also access your app on Galaxy 2.0 which is currently in beta at https://galaxy-beta.meteor.com/<your-username>/us-east-1/apps/<your-app-name>.meteorapp.com. Remember to use your own subdomain instead of vue3-meteor-3.
你可以在 vue3-meteor-3.meteorapp.com 访问应用!只需使用你的子域即可访问你的子域!
¥You can access the app at vue3-meteor-3.meteorapp.com! Just use your subdomain to access yours!
我们部署到在美国(us-east-1)运行的 Galaxy,我们也在世界其他地区运行 Galaxy,请查看列表 此处。
¥We deployed to Galaxy running in the US (us-east-1), we also have Galaxy running in other regions in the world, check the list here.
这很重要,你的应用在 Galaxy 上运行,可供世界上任何人使用!
¥This is huge, you have your app running on Galaxy, ready to be used by anyone in the world!
9:后续步骤
¥9: Next Steps
你已完成本教程!
¥You have completed the tutorial!
现在,你应该对使用 Meteor 和 Vue 有了很好的理解。
¥By now, you should have a good understanding of working with Meteor and Vue.
信息
你可以在我们的 GitHub 存储库 中找到此应用的最终版本。
¥You can find the final version of this app in our GitHub repository.
以下是你接下来可以执行的一些选项:
¥Here are some options for what you can do next:
查看完整的 documentation 以了解有关 Meteor 3 的更多信息。
¥Check out the complete documentation to learn more about Meteor 3.
阅读 Galaxy 指南 以了解有关部署应用的更多信息。
¥Read the Galaxy Guide to learn more about deploying your app.
加入我们的 Meteor 论坛 和 Meteor Lounge Discord 社区,提出问题并分享你的经验。
¥Join our community on the Meteor Forums and the Meteor Lounge on Discord to ask questions and share your experiences.
我们迫不及待地想看看你接下来会构建什么!
¥We can't wait to see what you build next!